Brother International HL-3075CW Users Manual - English - Page 147
LCD messages, Error messages - fuser
 |
View all Brother International HL-3075CW manuals
Add to My Manuals
Save this manual to your list of manuals |
Page 147 highlights
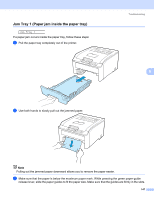
Troubleshooting LCD messages 6 As with any sophisticated office product, errors may occur and consumable items may need to be replaced. If this happens, your printer automatically stops printing, diagnoses the problem, and displays the resulting message on the LCD to alert you. The most common error and maintenance messages are shown below. You can clear most errors and routine maintenance messages by yourself, referring to the following tables. If you need more help, the Brother Solutions Center offers the latest FAQs and troubleshooting tips. Visit us at http://solutions.brother.com/. If you cannot clear the problem, call the dealer you bought the printer from or Brother Customer Service. Note The LCD names for the paper trays are as follows. • Standard paper tray: Tray 1 6 • Manual feed slot: Manual Feed Error messages Error message Access Error (HL-3075CW only) Cartridge Error Cover is Open DIMM Error Drum Error Slide the Green tab on Drum Unit. Drum Error Replace the Drum Unit. Fuser Error Jam XXX Low Temperature Manual Feed Action The USB device was removed while data was processing. Press Cancel. Reinsert the USB device and try to print with Direct Print or PictBridge. Take out the drum unit and toner cartridge assembly for the toner color that is indicated on the LCD. Remove the toner cartridge and then re-install it in the drum. Put the drum unit and toner cartridge assembly back into the printer again. Repeat this process for each drum unit and toner cartridge assembly until the error message is cleared from the LCD. If the problem continues, call your dealer or Brother Customer Service. Close the cover that is indicated on the LCD. Turn off the printer. Re-install the DIMM correctly. Wait a few seconds, and then turn it on again. If this error message appears again, replace the DIMM with a new one. (See Installing extra memory on page 99.) Clean the corona wires. (See Cleaning the corona wires on page 130.) Replace the drum unit with a new one for the color that is indicated on the LCD. (See Replacing the drum units on page 112.) Turn the power switch off, wait a few seconds and then turn it again. Leave the printer for 15 minutes with the power on. Carefully pull out the jammed paper from the area shown in Paper jams and how to clear them on page 146. Increase room temperature to allow the printer to operate. Put the same size of paper in the manual feed slot as is shown on the LCD. 142
-
 1
1 -
2
-
3
-
4
-
5
-
6
-
7
-
8
-
9
-
10
-
11
-
12
-
13
-
14
-
15
-
16
-
17
-
18
-
19
-
20
-
21
-
22
-
23
-
24
-
25
-
26
-
27
-
28
-
29
-
30
-
31
-
32
-
33
-
34
-
35
-
36
-
37
-
38
-
39
-
40
-
41
-
42
-
43
-
44
-
45
-
46
-
47
-
48
-
49
-
50
-
51
-
52
-
53
-
54
-
55
-
56
-
57
-
58
-
59
-
60
-
61
-
62
-
63
-
64
-
65
-
66
-
67
-
68
-
69
-
70
-
71
-
72
-
73
-
74
-
75
-
76
-
77
-
78
-
79
-
80
-
81
-
82
-
83
-
84
-
85
-
86
-
87
-
88
-
89
-
90
-
91
-
92
-
93
-
94
-
95
-
96
-
97
-
98
-
99
-
100
-
101
-
102
-
103
-
104
-
105
-
106
-
107
-
108
-
109
-
110
-
111
-
112
-
113
-
114
-
115
-
116
-
117
-
118
-
119
-
120
-
121
-
122
-
123
-
124
-
125
-
126
-
127
-
128
-
129
-
130
-
131
-
132
-
133
-
134
-
135
-
136
-
137
-
138
-
139
-
140
-
141
-
 142
142 -
 143
143 -
 144
144 -
 145
145 -
 146
146 -
 147
147 -
 148
148 -
 149
149 -
 150
150 -
 151
151 -
 152
152 -
153
-
154
-
155
-
156
-
157
-
158
-
159
-
160
-
161
-
162
-
163
-
164
-
165
-
166
-
167
-
168
-
169
-
170
-
171
-
172
-
173
-
174
-
175
-
176
-
177
-
178
-
179
-
180
-
181
-
182
-
183
-
184
-
185
-
186
-
187
-
188
-
189
-
190
-
191
-
192
-
193
-
194
 |
 |
