Brother International HL 4040CN Network Users Manual - English - Page 116
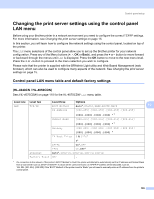
Changing the print server settings using the control panel LAN menu
 |
UPC - 012502617785
View all Brother International HL 4040CN manuals
Add to My Manuals
Save this manual to your list of manuals |
Page 116 highlights
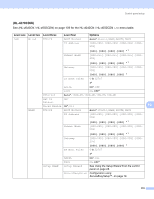
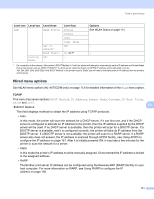
Control panel setup Changing the print server settings using the control panel LAN menu 10 Before using your Brother printer in a network environment you need to configure the correct TCP/IP settings. For more information, see Changing the print server settings on page 15. In this section, you will learn how to configure the network settings using the control panel, located on top of the printer. The LAN menu selections of the control panel allow you to set up the Brother printer for your network configuration. Press any of the Menu buttons (+, -, OK or Back), and press the + or - button to move forward or backward through the menus until LAN is displayed. Press the OK button to move to the next menu level. Press the + or - button to proceed to the menu selection you wish to configure. Please note that the printer is supplied with the BRAdmin Light utility and Web Based Management (web browser), which can also be used to configure many aspects of the network. See Changing the print server settings on page 15. Control panel LAN menu table and default factory settings 10 (HL-4040CN / HL-4050CDN) 10 See (HL-4070CDW) on page 110 for the HL-4070CDW LAN menu table. Level one Level two Level three Options LAN TCP/IP BOOT Method Auto*, Static, RARP, BOOTP, DHCP 10 IP Address [000-255].[000-255].[000-255].[000-255] [000].[000].[000].[000] * 1 Subnet Mask [000-255].[000-255].[000-255].[000-255] [000].[000].[000].[000] * 1 Gateway [000-255].[000-255].[000-255].[000-255] [000].[000].[000].[000] * IP Boot Tries 0 to 32767 3* APIPA IPv6 On*, Off On, Off* Ethernet Auto*, 100B-FD, 100B-HD, 10B-FD, 10B-HD Factory Reset OK? - 1 On connection to the network, if the printer's 'BOOT Method' is 'Auto' the printer will attempt to automatically set the IP address and Subnet Mask from a boot server such as DHCP or BOOTP. If a boot server cannot be found, an APIPA IP address will be allocated, such as 169. 254. [001-254]. [000-255]. If the 'BOOT Method' of the printer is set to 'Static' you will need to manually enter an IP address from the printer's control panel. 109
-
 1
1 -
2
-
3
-
4
-
5
-
6
-
7
-
8
-
9
-
10
-
11
-
12
-
13
-
14
-
15
-
16
-
17
-
18
-
19
-
20
-
21
-
22
-
23
-
24
-
25
-
26
-
27
-
28
-
29
-
30
-
31
-
32
-
33
-
34
-
35
-
36
-
37
-
38
-
39
-
40
-
41
-
42
-
43
-
44
-
45
-
46
-
47
-
48
-
49
-
50
-
51
-
52
-
53
-
54
-
55
-
56
-
57
-
58
-
59
-
60
-
61
-
62
-
63
-
64
-
65
-
66
-
67
-
68
-
69
-
70
-
71
-
72
-
73
-
74
-
75
-
76
-
77
-
78
-
79
-
80
-
81
-
82
-
83
-
84
-
85
-
86
-
87
-
88
-
89
-
90
-
91
-
92
-
93
-
94
-
95
-
96
-
97
-
98
-
99
-
100
-
101
-
102
-
103
-
104
-
105
-
106
-
107
-
108
-
109
-
110
-
 111
111 -
 112
112 -
 113
113 -
 114
114 -
 115
115 -
 116
116 -
 117
117 -
 118
118 -
 119
119 -
 120
120 -
 121
121 -
122
-
123
-
124
-
125
-
126
-
127
-
128
-
129
-
130
-
131
-
132
-
133
-
134
-
135
-
136
-
137
-
138
-
139
-
140
-
141
-
142
-
143
-
144
-
145
-
146
-
147
-
148
-
149
-
150
-
151
-
152
-
153
-
154
-
155
-
156
-
157
-
158
-
159
-
160
-
161
-
162
-
163
-
164
-
165
-
166
-
167
-
168
-
169
-
170
-
171
-
172
-
173
-
174
-
175
-
176
-
177
 |
 |