Brother International HL 5170DN Quick Setup Guide - English - Page 15
Setting your printer as the default, printer, For Windows, XP users only - series
 |
UPC - 012502612667
View all Brother International HL 5170DN manuals
Add to My Manuals
Save this manual to your list of manuals |
Page 15 highlights
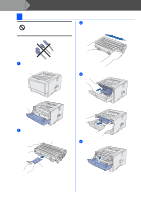
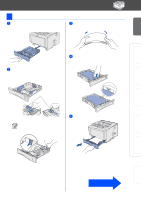
Setting Up Your Printer 6 When this screen appears, make sure the printer power switch is on. Connect the USB interface cable to your PC, and then connect it to the printer. Click the Next button. Setting your printer as the default printer (For Windows® 2000/XP users only) 1 Click Start and then Printers and Faxes. Windows® USB Installing the Driver 2 Select the Brother HL-5170DN series icon. 7 Click the Finish button. 3 From the File menu, select Set as Default printer. The setup is now complete. If you want to register your product on-line, check the "On-Line Registration" box. For Windows® 98 / Me users: The Setup is now complete. For Windows® 2000/XP users: Go to "Setting Your Printer as the Default Printer". 13 For Administrators
-
 1
1 -
2
-
3
-
4
-
5
-
6
-
7
-
8
-
9
-
 10
10 -
 11
11 -
 12
12 -
 13
13 -
 14
14 -
 15
15 -
 16
16 -
 17
17 -
 18
18 -
 19
19 -
 20
20 -
21
-
22
-
23
-
24
-
25
-
26
-
27
-
28
-
29
-
30
-
31
-
32
-
33
-
34
-
35
 |
 |

13
6
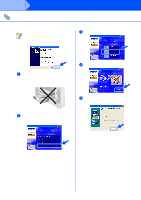
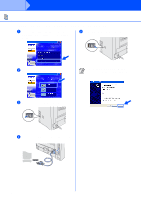
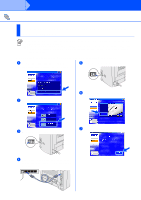
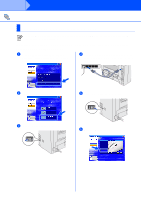
When this screen appears, make sure the
printer power switch is on.
Connect the USB interface cable to your
PC, and then connect it to the printer.
Click the
Next
button.
7
Click the
Finish
button.
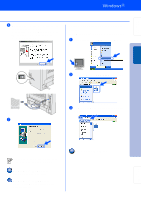
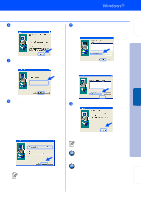
For Windows
®
98 / Me users:
The Setup is now complete.
For Windows
®
2000/XP users:
Go to "Setting Your Printer as the
Default Printer".
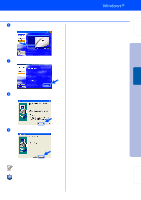
Setting your printer as the default
printer
(For Windows
®
2000/XP users only)
1
Click
Start
and then
Printers and Faxes
.
2
Select the
Brother HL-5170DN series
icon.
3
From the
File
menu, select
Set as Default
printer
.
The setup is now complete.
If you want to register your product on-line,
check the “On-Line Registration” box.
Setting Up
Your Printer
Windows
®
USB
For
Administrators
Installing the Driver