Brother International HL 5170DN Quick Setup Guide - English - Page 30
Print Center, AppleTalk, For Mac OS, X 10.2.4 or greater users, the HL-5170DN seriesBRN_x_P1_AT - print configuration page
 |
UPC - 012502612667
View all Brother International HL 5170DN manuals
Add to My Manuals
Save this manual to your list of manuals |
Page 30 highlights
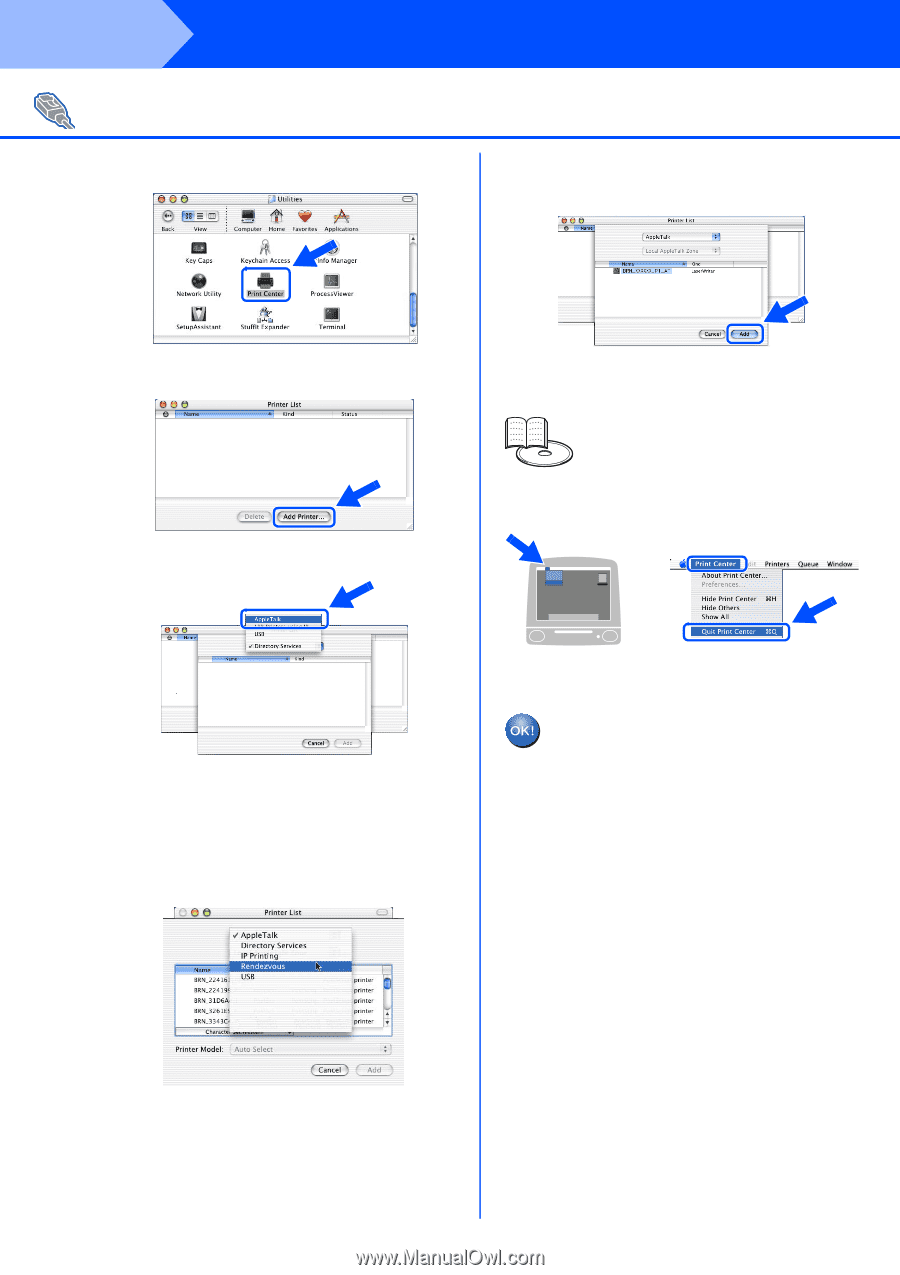
Step 2 Installing the Driver For Network Interface Cable Users 8 Double-click the Print Center icon. A Select BRN_xxxxxx_P1_AT*, and then click the Add button. 9 Click the Add Printer... button. 0 Select AppleTalk. * Where xxxxxx are the last six digits of the Ethernet address. Network User's Guide Chapter 7. B From the Print Center menu, select Quit Print Center. For Mac OS® X 10.2.4 or greater users: If you want to connect your printer using the Simple Network Configuration capabilities of Apple® Mac OS® X, select Rendezvous and then the HL-5170DN series(BRN_xxxxxx_P1_AT*). Now proceed to Step B. The setup is now complete. * Where xxxxxx are the last six digits of the Ethernet address. 28
-
 1
1 -
2
-
3
-
4
-
5
-
6
-
7
-
8
-
9
-
10
-
11
-
12
-
13
-
14
-
15
-
16
-
17
-
18
-
19
-
20
-
21
-
22
-
23
-
24
-
 25
25 -
 26
26 -
 27
27 -
 28
28 -
 29
29 -
 30
30 -
 31
31 -
 32
32 -
 33
33 -
 34
34 -
 35
35
 |
 |
28
Installing the Driver
8
Double-click the
Print Center
icon.
9
Click the
Add Printer...
button.
0
Select
AppleTalk
.
For Mac OS
®
X 10.2.4 or greater users:
If you want to connect your printer using the
Simple Network Configuration capabilities of
Apple
®
Mac OS
®
X, select Rendezvous and then
the HL-5170DN series(BRN_xxxxxx_P1_AT*)
.
Now proceed to Step
B
.
*
Where xxxxxx are the last six digits of
the Ethernet address.
A
Select
BRN_xxxxxx_P1_AT
*
, and then
click the
Add
button.
*
Where xxxxxx are the last six digits of
the Ethernet address.
B
From the
Print Center
menu, select
Quit
Print Center
.
The setup is now complete.
For Network Interface Cable Users
Network User's Guide Chapter 7.
Step 2