Brother International HS-5300 Service Manual - Page 142
LI AJ B.. CI QJ AI MJ
 |
View all Brother International HS-5300 manuals
Add to My Manuals
Save this manual to your list of manuals |
Page 142 highlights
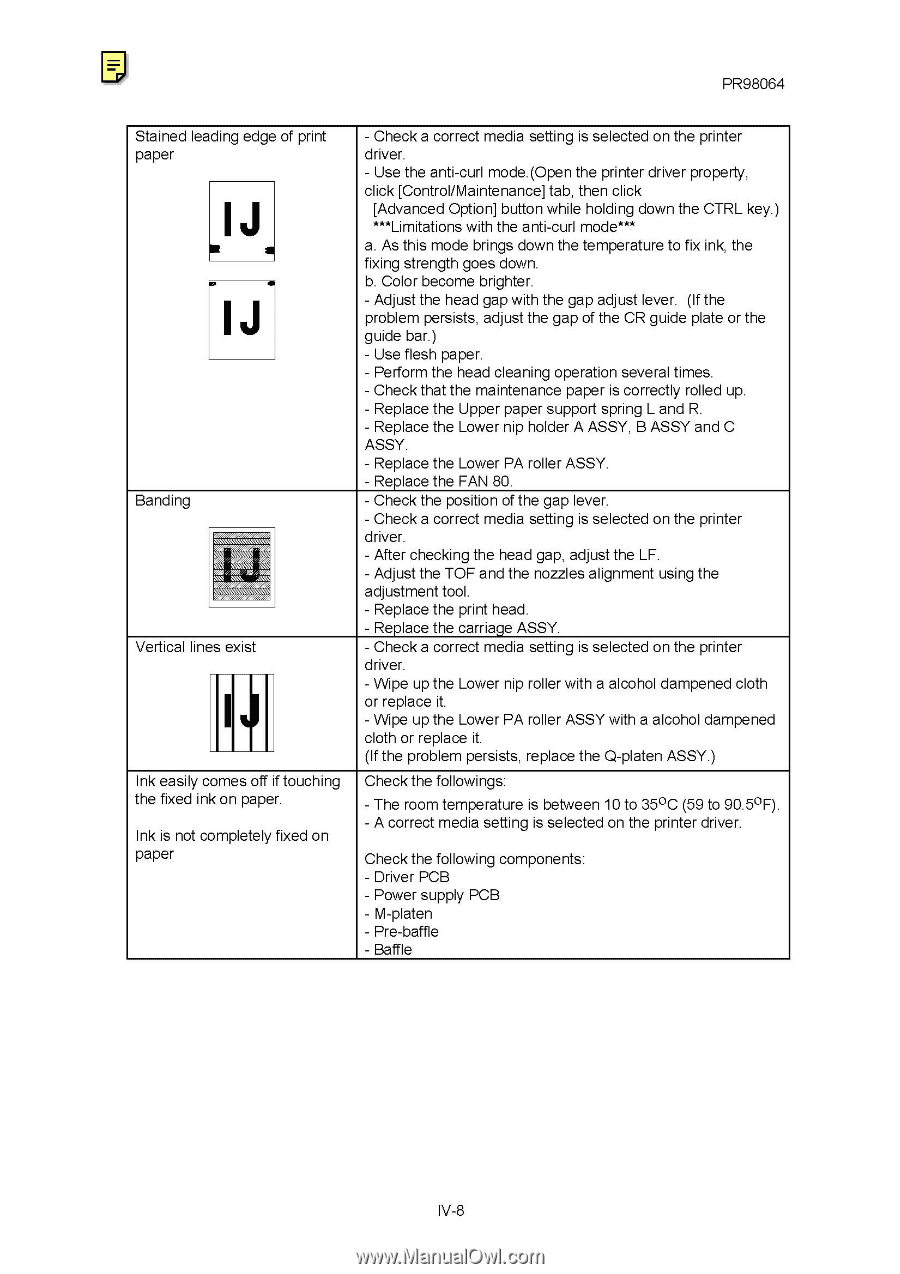
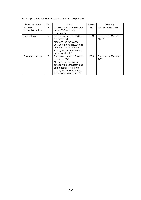
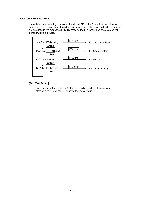
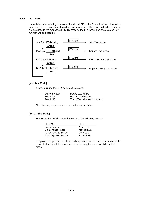
PR98064 Stained leading edge of print paper I J.. . • I J Banding ,r .•. ,. A /i , %i , /AV .4, v 4 YAW , W, ' 4 , 1 h, .1 1 v A Vertical lines exist I J Ink easily comes off if touching the fixed ink on paper. Ink is not completely fixed on paper - Check a correct media setting is selected on the printer driver. - Use the anti-curl mode.(Open the printer driver property, click [Control/Maintenance] tab, then click [Advanced Option] button while holding down the CTRL key.) ***Limitations with the anti-curl mode*** a. As this mode brings down the temperature to fix ink, the fixing strength goes down. b. Color become brighter. - Adjust the head gap with the gap adjust lever. (If the problem persists, adjust the gap of the CR guide plate or the guide bar.) - Use flesh paper. - Perform the head cleaning operation several times. - Check that the maintenance paper is correctly rolled up. - Replace the Upper paper support spring L and R. - Replace the Lower nip holder A ASSY, B ASSY and C ASSY. - Replace the Lower PA roller ASSY. - Replace the FAN 80. - Check the position of the gap lever. - Check a correct media setting is selected on the printer driver. - After checking the head gap, adjust the LF. - Adjust the TOF and the nozzles alignment using the adjustment tool. - Replace the print head. - Replace the carriage ASSY. - Check a correct media setting is selected on the printer driver. - Wipe up the Lower nip roller with a alcohol dampened cloth or replace it. - Wipe up the Lower PA roller ASSY with a alcohol dampened cloth or replace it. (If the problem persists, replace the Q-platen ASSY.) Check the followings: - The room temperature is between 10 to 35°C (59 to 90.5°F). - A correct media setting is selected on the printer driver. Check the following components: - Driver PCB - Power supply PCB - M-platen - Pre-baffle - Baffle IV-8
-
 1
1 -
2
-
3
-
4
-
5
-
6
-
7
-
8
-
9
-
10
-
11
-
12
-
13
-
14
-
15
-
16
-
17
-
18
-
19
-
20
-
21
-
22
-
23
-
24
-
25
-
26
-
27
-
28
-
29
-
30
-
31
-
32
-
33
-
34
-
35
-
36
-
37
-
38
-
39
-
40
-
41
-
42
-
43
-
44
-
45
-
46
-
47
-
48
-
49
-
50
-
51
-
52
-
53
-
54
-
55
-
56
-
57
-
58
-
59
-
60
-
61
-
62
-
63
-
64
-
65
-
66
-
67
-
68
-
69
-
70
-
71
-
72
-
73
-
74
-
75
-
76
-
77
-
78
-
79
-
80
-
81
-
82
-
83
-
84
-
85
-
86
-
87
-
88
-
89
-
90
-
91
-
92
-
93
-
94
-
95
-
96
-
97
-
98
-
99
-
100
-
101
-
102
-
103
-
104
-
105
-
106
-
107
-
108
-
109
-
110
-
111
-
112
-
113
-
114
-
115
-
116
-
117
-
118
-
119
-
120
-
121
-
122
-
123
-
124
-
125
-
126
-
127
-
128
-
129
-
130
-
131
-
132
-
133
-
134
-
135
-
136
-
 137
137 -
 138
138 -
 139
139 -
 140
140 -
 141
141 -
 142
142 -
 143
143 -
 144
144 -
 145
145 -
 146
146 -
 147
147 -
148
-
149
-
150
-
151
-
152
-
153
-
154
-
155
-
156
-
157
-
158
-
159
-
160
-
161
-
162
-
163
-
164
-
165
-
166
-
167
-
168
 |
 |