Brother International Laura Ashley Innov-ís NX2000 BOBBIN WORK INSTRUCTIO - Page 12
Adjusting the Thread Tension
 |
View all Brother International Laura Ashley Innov-ís NX2000 manuals
Add to My Manuals
Save this manual to your list of manuals |
Page 12 highlights
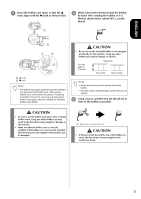
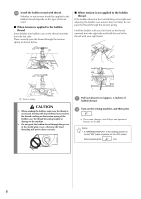
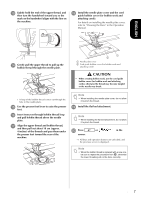
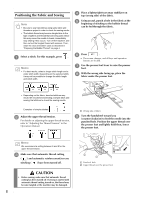
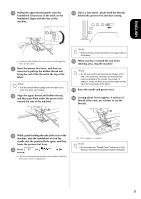
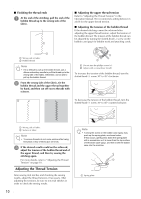
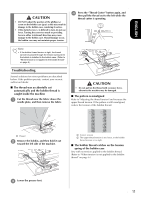
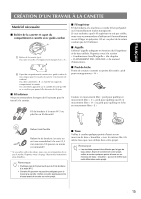
■ Finishing the thread ends a At the end of the stitching, pull the end of the bobbin thread up to the wrong side of the fabric. ■ Adjusting the upper thread tension Refer to "Adjusting the Thread Tension" in the Operation Manual. We recommend a setting between 6 and 8 for the upper thread tension. ■ Adjusting the tension of the bobbin thread If the desired stitching cannot be achieved after adjusting the upper thread tension, adjust the tension of the bobbin thread. The tension of the bobbin thread can be adjusted by turning the slotted-head (-) screw on the bobbin case (gray) for bobbin work and attaching cords. a Wrong side of fabric b Bobbin thread Note • If it is difficult to pull up the bobbin thread, use a ribbon embroidery needle to pull the thread up to the wrong side of the fabric. Otherwise, use an awl to pull up the bobbin thread. b From the wrong side of the fabric, tie the bobbin thread and the upper thread together by hand, and then cut off excess threads with scissors. a Do not turn the phillips screw (+). b Adjust with a screwdriver (small). To increase the tension of the bobbin thread, turn the slotted-head (-) screw 30° to 45° clockwise. To decrease the tension of the bobbin thread, turn the slotted-head (-) screw 30° to 45° counterclockwise. a Wrong side of fabric b Surface of fabric Note • To ensure threads do not come undone after being tied place a drop of fabric glue on knots. c If the desired results could not be achieved, adjust the tension of the bobbin thread and of the upper thread, and then try sewing the stitching again. For more details, refer to "Adjusting the Thread Tension" on page 10. Adjusting the Thread Tension After sewing trial stitches and checking the sewing results, adjust the thread tensions if necessary. After adjusting the tensions, be sure to sew trial stitches in order to check the sewing results. 10 Note • Turning the screw on the bobbin case (gray) may push up the spring plate, as shown below. If this occurs, gently press down the spring plate with a screwdriver so it is lower than the top surface of the bobbin case (gray), and then insert the bobbin case into the machine. a Spring plate
-
 1
1 -
2
-
3
-
4
-
5
-
6
-
 7
7 -
 8
8 -
 9
9 -
 10
10 -
 11
11 -
 12
12 -
 13
13 -
 14
14 -
 15
15 -
 16
16 -
 17
17 -
18
-
19
-
20
-
21
-
22
-
23
-
24
-
25
-
26
-
27
-
28
-
29
-
30
-
31
-
32
-
33
-
34
-
35
-
36
-
37
-
38
-
39
-
40
 |
 |
