Brother International MFC-7460DN Network Users Manual - English - Page 28
Wireless LAN Setup Wizard, Network and Sharing Center - user manual
 |
UPC - 012502627012
View all Brother International MFC-7460DN manuals
Add to My Manuals
Save this manual to your list of manuals |
Page 28 highlights
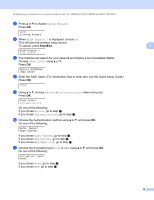
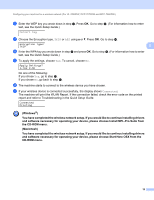
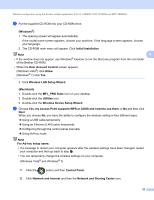
Wireless configuration using the Brother installer application (For HL-2280DW, DCP-7070DW and MFC-7860DW) b Put the supplied CD-ROM into your CD-ROM drive. (Windows®) 4 1 The opening screen will appear automatically. If the model name screen appears, choose your machine. If the language screen appears, choose your language. 2 The CD-ROM main menu will appear. Click Initial Installation. Note 4 • If the window does not appear, use Windows® Explorer to run the Start.exe program from the root folder of the Brother CD-ROM. • When the User Account Control screen appears, (Windows Vista®) click Allow. (Windows® 7) click Yes. 3 Click Wireless LAN Setup Wizard. (Macintosh) 4 1 Double-click the MFL_PRO Suite icon on your desktop. 2 Double-click the Utilities icon. 3 Double-click the Wireless Device Setup Wizard. c Choose Yes, my Access Point supports WPS or AOSS and I want to use them. or No and then click Next. When you choose No, you have the ability to configure the wireless setting in four different ways. Using a USB cable temporarily Using an Ethernet (LAN) cable temporarily Configuring through the control panel manually Using Ad-hoc mode Note For Ad-hoc setup users: • If a message to restart your computer appears after the wireless settings have been changed, restart your computer and then go back to step b. • You can temporarily change the wireless settings on your computer. (Windows Vista® and Windows® 7) 1 Click the button and then Control Panel. 2 Click Network and Internet and then the Network and Sharing Center icon. 23
-
 1
1 -
2
-
3
-
4
-
5
-
6
-
7
-
8
-
9
-
10
-
11
-
12
-
13
-
14
-
15
-
16
-
17
-
18
-
19
-
20
-
21
-
22
-
 23
23 -
 24
24 -
 25
25 -
 26
26 -
 27
27 -
 28
28 -
 29
29 -
 30
30 -
 31
31 -
 32
32 -
 33
33 -
34
-
35
-
36
-
37
-
38
-
39
-
40
-
41
-
42
-
43
-
44
-
45
-
46
-
47
-
48
-
49
-
50
-
51
-
52
-
53
-
54
-
55
-
56
-
57
-
58
-
59
-
60
-
61
-
62
-
63
-
64
-
65
-
66
-
67
-
68
-
69
-
70
-
71
-
72
-
73
-
74
-
75
-
76
-
77
-
78
-
79
-
80
 |
 |