Brother International MFC-9450CDN Users Manual - English - Page 136
Improve Thin Line, Device Options - toner cartridge set
 |
UPC - 012502622154
View all Brother International MFC-9450CDN manuals
Add to My Manuals
Save this manual to your list of manuals |
Page 136 highlights
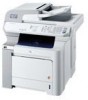
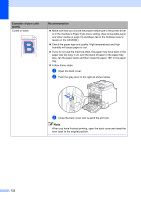
Examples of poor print quality Uneven density appears periodically across the page ABCDEFGHIJKLMNOPQRSTUVWXYZ. 0123456789. abcdefghijklmnopqrstuvwxyz. ABCDEFGHIJKLMNOPQRSTUVWXYZ. 0123456789. abcdefghijklmnopqrstuvwxyz. ABCDEFGHIJKLMNOPQRSTUVWXYZ. 0123456789. abcdefghijklmnopqrstuvwxyz. ABCDEFGHIJKLMNOPQRSTUVWXYZ. 0123456789. abcdefghijklmnopqrstuvwxyz. Recommendation „ Identify the color that is uneven and put in a new toner cartridge for that color. (See Replacing a toner cartridge on page 166.) „ The drum unit may be damaged. Put in a new drum unit. (See Replacing the drum unit on page 171.) „ Make sure that the fuser unit is installed properly. Missing image at edge Missing image at thin line Wrinkle ABCDEFGHIJKLMNOPQRSTUVWXYZ. 0123456789. abcdefghijklmnopqrstuvwxyz. ABCDEFGHIJKLMNOPQRSTUVWXYZ. 0123456789. abcdefghijklmnopqrstuvwxyz. ABCDEFGHIJKLMNOPQRSTUVWXYZ. 0123456789. abcdefghijklmnopqrstuvwxyz. ABCDEFGHIJKLMNOPQRSTUVWXYZ. 0123456789. abcdefghijklmnopqrstuvwxyz. Insufficient gloss „ Make sure that the toner cartridges are installed properly. (See Replacing a toner cartridge on page 166.) „ Make sure that the drum unit is installed properly. (See Replacing the drum unit on page 171.) „ One of the toner cartridges may be damaged. Identify the missing color and put in a new toner cartridge for the color with the white line. (See Replacing a toner cartridge on page 166.) „ The drum unit may be damaged. Put in a new drum unit. (See Replacing the drum unit on page 171.) „ If you are using a Windows® printer driver, open Properties window, and then click Printing Preferences. Choose the Advanced tab, Device Options, Print Setting, and then check the Improve pattern printing or Improve Thin Line boxes. „ Change to the recommended type of paper. (See Recommended paper on page 12.) „ Check the paper type and quality. (See Acceptable paper and other media on page 12.) „ Make sure that the back cover is closed properly. „ Make sure that paper is loaded properly. „ Make sure that you choose the proper media type in the printer driver or in the machine's Paper Type menu setting. (See Acceptable paper and other media on page 12 and Basic tab in the Software User's Guide on the CD-ROM.) „ Turn over the stack of paper in the tray or rotate the paper 180° in the input tray. „ Make sure that the drum unit is installed properly. (See Replacing the drum unit on page 171.) „ Make sure that the fuser unit is installed properly. „ Replace the fuser unit. Call Brother Customer Service. „ Change to the recommended type of paper. (See Recommended paper on page 12.) 120
-
 1
1 -
2
-
3
-
4
-
5
-
6
-
7
-
8
-
9
-
10
-
11
-
12
-
13
-
14
-
15
-
16
-
17
-
18
-
19
-
20
-
21
-
22
-
23
-
24
-
25
-
26
-
27
-
28
-
29
-
30
-
31
-
32
-
33
-
34
-
35
-
36
-
37
-
38
-
39
-
40
-
41
-
42
-
43
-
44
-
45
-
46
-
47
-
48
-
49
-
50
-
51
-
52
-
53
-
54
-
55
-
56
-
57
-
58
-
59
-
60
-
61
-
62
-
63
-
64
-
65
-
66
-
67
-
68
-
69
-
70
-
71
-
72
-
73
-
74
-
75
-
76
-
77
-
78
-
79
-
80
-
81
-
82
-
83
-
84
-
85
-
86
-
87
-
88
-
89
-
90
-
91
-
92
-
93
-
94
-
95
-
96
-
97
-
98
-
99
-
100
-
101
-
102
-
103
-
104
-
105
-
106
-
107
-
108
-
109
-
110
-
111
-
112
-
113
-
114
-
115
-
116
-
117
-
118
-
119
-
120
-
121
-
122
-
123
-
124
-
125
-
126
-
127
-
128
-
129
-
130
-
 131
131 -
 132
132 -
 133
133 -
 134
134 -
 135
135 -
 136
136 -
 137
137 -
 138
138 -
 139
139 -
 140
140 -
 141
141 -
142
-
143
-
144
-
145
-
146
-
147
-
148
-
149
-
150
-
151
-
152
-
153
-
154
-
155
-
156
-
157
-
158
-
159
-
160
-
161
-
162
-
163
-
164
-
165
-
166
-
167
-
168
-
169
-
170
-
171
-
172
-
173
-
174
-
175
-
176
-
177
-
178
-
179
-
180
-
181
-
182
-
183
-
184
-
185
-
186
-
187
-
188
-
189
-
190
-
191
-
192
-
193
-
194
-
195
-
196
-
197
-
198
-
199
-
200
-
201
-
202
-
203
-
204
-
205
-
206
-
207
-
208
-
209
-
210
-
211
-
212
-
213
-
214
-
215
-
216
-
217
-
218
-
219
-
220
-
221
-
222
-
223
-
224
-
225
-
226
-
227
-
228
-
229
-
230
-
231
-
232
-
233
-
234
-
235
-
236
-
237
-
238
-
239
-
240
-
241
-
242
-
243
-
244
-
245
-
246
-
247
-
248
-
249
-
250
-
251
-
252
 |
 |