Brother International MFC-J835DW Software Users Manual - English - Page 234
Print from media
 |
View all Brother International MFC-J835DW manuals
Add to My Manuals
Save this manual to your list of manuals |
Page 234 highlights
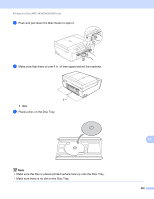
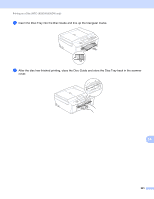
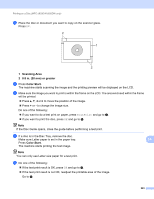
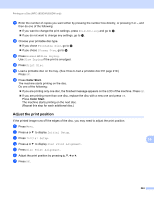
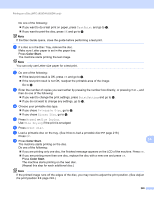
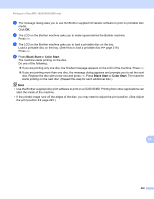
Printing on a Disc (MFC-J825DW/J835DW only) Print from media 14 You can select an image stored in a memory card or USB Flash memory drive and print the image on a printable disc. Note You can print eight images from a movie file on a printable disc. The images are extracted from the movie file and laid out automatically. a Insert a memory card or USB Flash memory drive into your Brother machine. b Press Stop/Exit. c Press Disc. Note You can also begin the print procedure by opening the Disc Guide. d Press Print from card. The LCD asks you to make space to set a disc. Press OK. Note Make sure that there is over 4 in. of free space behind the machine. e The LCD asks you to open the scanner cover and remove the Disc Tray. Press OK. f The LCD asks you to set the internal and external diameter in the next screen. Press OK. g Press a or b to set the outside and inside diameter of the printable area of the disc. Press OK. Note Refer to the package of the printable disc for the outside and inside diameter measurements. 14 h Images stored on the media will appear on the LCD. Press d or c to display the image you want to print. i Press the image you want. A print preview will be displayed on the LCD. j Make sure the image you want to print is inside of the frame on the LCD. The area enclosed within the frame will be printed. Press a or b, d or c to move the position of the image. Press + or - to change the image size. 225
-
 1
1 -
2
-
3
-
4
-
5
-
6
-
7
-
8
-
9
-
10
-
11
-
12
-
13
-
14
-
15
-
16
-
17
-
18
-
19
-
20
-
21
-
22
-
23
-
24
-
25
-
26
-
27
-
28
-
29
-
30
-
31
-
32
-
33
-
34
-
35
-
36
-
37
-
38
-
39
-
40
-
41
-
42
-
43
-
44
-
45
-
46
-
47
-
48
-
49
-
50
-
51
-
52
-
53
-
54
-
55
-
56
-
57
-
58
-
59
-
60
-
61
-
62
-
63
-
64
-
65
-
66
-
67
-
68
-
69
-
70
-
71
-
72
-
73
-
74
-
75
-
76
-
77
-
78
-
79
-
80
-
81
-
82
-
83
-
84
-
85
-
86
-
87
-
88
-
89
-
90
-
91
-
92
-
93
-
94
-
95
-
96
-
97
-
98
-
99
-
100
-
101
-
102
-
103
-
104
-
105
-
106
-
107
-
108
-
109
-
110
-
111
-
112
-
113
-
114
-
115
-
116
-
117
-
118
-
119
-
120
-
121
-
122
-
123
-
124
-
125
-
126
-
127
-
128
-
129
-
130
-
131
-
132
-
133
-
134
-
135
-
136
-
137
-
138
-
139
-
140
-
141
-
142
-
143
-
144
-
145
-
146
-
147
-
148
-
149
-
150
-
151
-
152
-
153
-
154
-
155
-
156
-
157
-
158
-
159
-
160
-
161
-
162
-
163
-
164
-
165
-
166
-
167
-
168
-
169
-
170
-
171
-
172
-
173
-
174
-
175
-
176
-
177
-
178
-
179
-
180
-
181
-
182
-
183
-
184
-
185
-
186
-
187
-
188
-
189
-
190
-
191
-
192
-
193
-
194
-
195
-
196
-
197
-
198
-
199
-
200
-
201
-
202
-
203
-
204
-
205
-
206
-
207
-
208
-
209
-
210
-
211
-
212
-
213
-
214
-
215
-
216
-
217
-
218
-
219
-
220
-
221
-
222
-
223
-
224
-
225
-
226
-
227
-
228
-
 229
229 -
 230
230 -
 231
231 -
 232
232 -
 233
233 -
 234
234 -
 235
235 -
 236
236 -
 237
237 -
 238
238 -
 239
239 -
240
-
241
 |
 |