Brother International PE-DESIGN2.0 Owner's Manual - English - Page 99
To Sew Setting, To Original Image and To Line Image on To Sew Setting below
 |
View all Brother International PE-DESIGN2.0 manuals
Add to My Manuals
Save this manual to your list of manuals |
Page 99 highlights
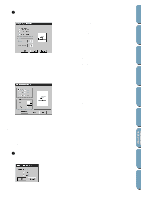
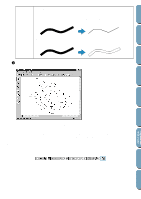
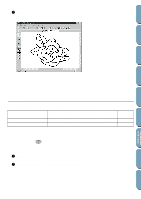
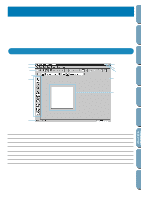
Contents Before Using Thinning Process This setting determines how the black lines of the line image are converted into pattern lines. ON: the black lines are replaced with pattern lines following the center of the black lines. You can set the degree of detailedness with the slider (if the degree is high, even very thick black lines will be replaced with a center line). ON OFF: the black lines are replaced with pattern lines following the border of the black lines. OFF 2 When you click OK, the Figure Handle Image displays and you are in Stage 3. Getting Started Design Center Layout & Editing File Utility Programmable Stich Creator Quick Reference Alphabetic Index In Stage 3, you can edit the patterns, by moving, deleting and inserting points and by drawing lines. Use the zooming tools available whenever you need to zoom your pattern. See also: "To Original Image" and "To Line Image" on page 86, "To Sew Setting" below, "Grid Setup" on page 82 and "Design Page Property" on page 84 s To Sew Setting Purpose: Moves from Stage 3 to Stage 4. Shortcut key: No shortcut key for this function Toolbar: 89
-
 1
1 -
2
-
3
-
4
-
5
-
6
-
7
-
8
-
9
-
10
-
11
-
12
-
13
-
14
-
15
-
16
-
17
-
18
-
19
-
20
-
21
-
22
-
23
-
24
-
25
-
26
-
27
-
28
-
29
-
30
-
31
-
32
-
33
-
34
-
35
-
36
-
37
-
38
-
39
-
40
-
41
-
42
-
43
-
44
-
45
-
46
-
47
-
48
-
49
-
50
-
51
-
52
-
53
-
54
-
55
-
56
-
57
-
58
-
59
-
60
-
61
-
62
-
63
-
64
-
65
-
66
-
67
-
68
-
69
-
70
-
71
-
72
-
73
-
74
-
75
-
76
-
77
-
78
-
79
-
80
-
81
-
82
-
83
-
84
-
85
-
86
-
87
-
88
-
89
-
90
-
91
-
92
-
93
-
 94
94 -
 95
95 -
 96
96 -
 97
97 -
 98
98 -
 99
99 -
 100
100 -
 101
101 -
 102
102 -
 103
103 -
 104
104 -
105
-
106
-
107
-
108
-
109
-
110
-
111
-
112
-
113
-
114
-
115
-
116
-
117
-
118
-
119
-
120
-
121
-
122
-
123
-
124
-
125
-
126
-
127
-
128
-
129
-
130
-
131
-
132
-
133
-
134
-
135
-
136
-
137
-
138
-
139
-
140
-
141
-
142
-
143
-
144
-
145
-
146
-
147
-
148
-
149
-
150
-
151
-
152
-
153
-
154
-
155
-
156
-
157
-
158
-
159
-
160
-
161
-
162
-
163
-
164
-
165
-
166
-
167
-
168
-
169
-
170
-
171
-
172
-
173
-
174
-
175
-
176
-
177
-
178
-
179
-
180
-
181
-
182
-
183
-
184
-
185
-
186
-
187
-
188
-
189
-
190
-
191
-
192
-
193
-
194
-
195
-
196
-
197
-
198
-
199
-
200
 |
 |
