Brother International PEDESIGN 6.0 Users Manual - English - Page 197
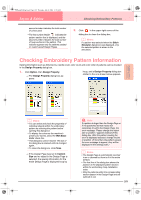
Checking Embroidery Pattern Information
 |
View all Brother International PEDESIGN 6.0 manuals
Add to My Manuals
Save this manual to your list of manuals |
Page 197 highlights
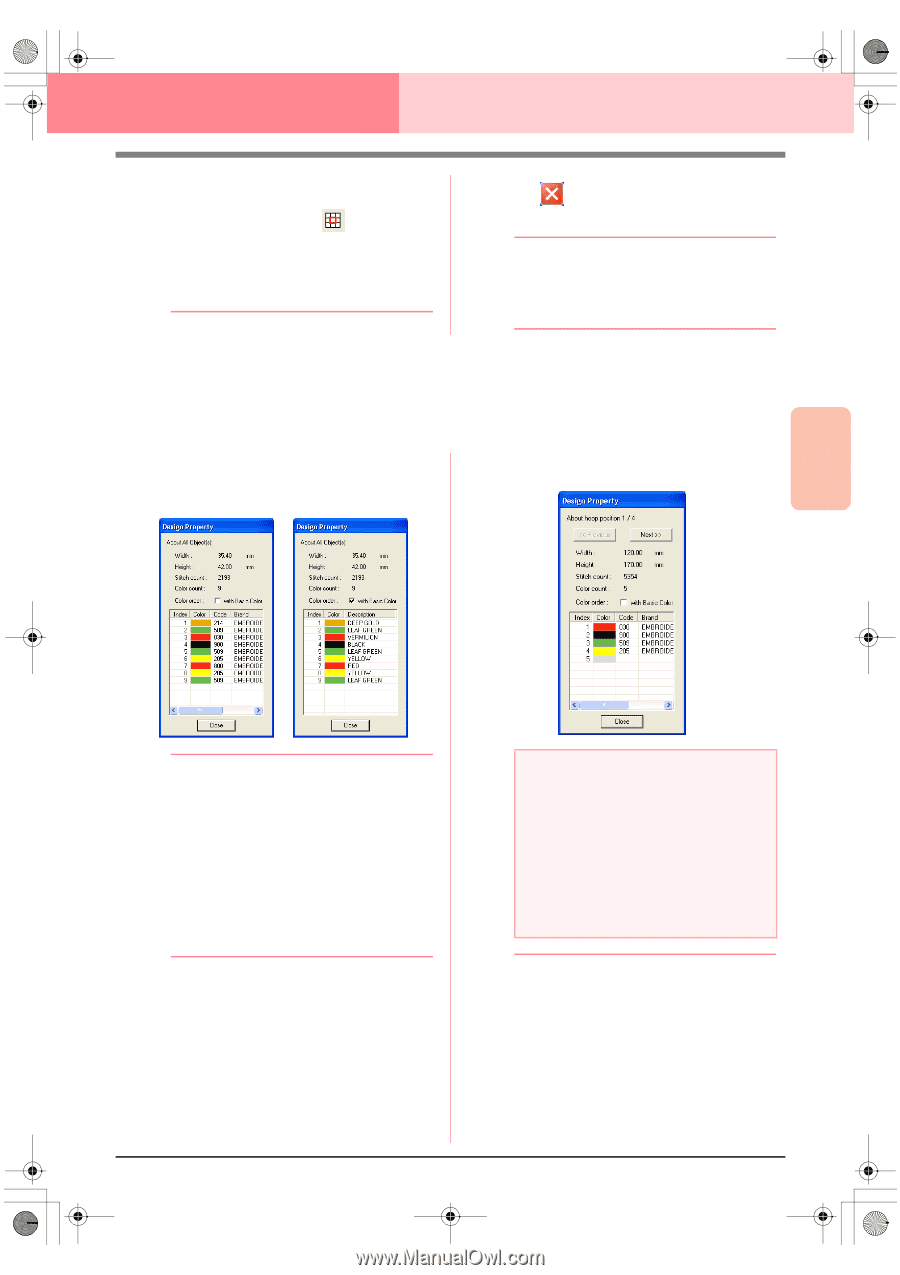
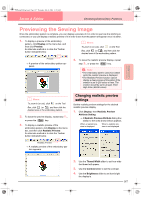
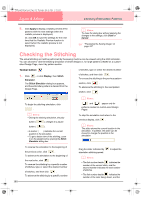
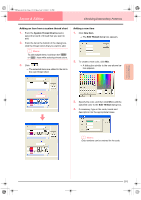
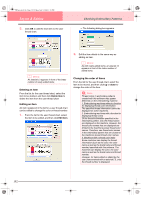
PeDesignV6Eng.book Page 189 Thursday, July 8, 2004 11:59 AM Layout & Editing Checking Embroidery Patterns second number indicates the total number of colors used. • The first number beside indicates the pattern section that is displayed, and the second number indicates the total number of hoop sections in the pattern. This indicator appears only for patterns created on custom-sized Design Pages. 2. Click in the upper-right corner of the dialog box to close the dialog box. b Memo: If a pattern was selected when the Stitch Simulator dialog box was displayed, only the selected pattern is drawn in the simulation. Checking Embroidery Pattern Information Sewing information such as dimensions, needle count, color count and color order of patterns can be checked in the Design Property dialog box. 1. Click Option, then Design Property. → The Design Property dialog box appears. hoop, and a Design Property dialog box similar to the one shown below appears. Advanced Opreation Layout & Editing b Memo: • You can select and check the properties of individual objects within the embroidery pattern by selecting the pattern before opening this dialog box. • To display the colors as the machine's preset color names, select the With Basic Color check box. • This dialog box can be resized. The size of the dialog box is retained until it is changed again. • To close the dialog box, click Close. → If the Design Page was set to Custom Size and no object in the Design Page is selected, the sewing information for the entire Design Page is displayed hoop by a Note: If a pattern is larger than the Design Page or if it is positioned so that it does not completely fit within the Design Page, the error message "Please change the object size or position." appears instead of this dialog box. After the pattern causing the error is displayed selected, change its size or position. (If more than one pattern causes the error message to appear, they will be displayed in the sewing order.) b Memo: • The Design Page is automatically zoomed in on or zoomed out from to fit in the entire window. • The first line of the dialog box shows the position of the displayed pattern section within the embroidery hoop installation order. • Only the patterns within the corresponding section appear in the Design Page and are outlined in red. 189
-
 1
1 -
2
-
3
-
4
-
5
-
6
-
7
-
8
-
9
-
10
-
11
-
12
-
13
-
14
-
15
-
16
-
17
-
18
-
19
-
20
-
21
-
22
-
23
-
24
-
25
-
26
-
27
-
28
-
29
-
30
-
31
-
32
-
33
-
34
-
35
-
36
-
37
-
38
-
39
-
40
-
41
-
42
-
43
-
44
-
45
-
46
-
47
-
48
-
49
-
50
-
51
-
52
-
53
-
54
-
55
-
56
-
57
-
58
-
59
-
60
-
61
-
62
-
63
-
64
-
65
-
66
-
67
-
68
-
69
-
70
-
71
-
72
-
73
-
74
-
75
-
76
-
77
-
78
-
79
-
80
-
81
-
82
-
83
-
84
-
85
-
86
-
87
-
88
-
89
-
90
-
91
-
92
-
93
-
94
-
95
-
96
-
97
-
98
-
99
-
100
-
101
-
102
-
103
-
104
-
105
-
106
-
107
-
108
-
109
-
110
-
111
-
112
-
113
-
114
-
115
-
116
-
117
-
118
-
119
-
120
-
121
-
122
-
123
-
124
-
125
-
126
-
127
-
128
-
129
-
130
-
131
-
132
-
133
-
134
-
135
-
136
-
137
-
138
-
139
-
140
-
141
-
142
-
143
-
144
-
145
-
146
-
147
-
148
-
149
-
150
-
151
-
152
-
153
-
154
-
155
-
156
-
157
-
158
-
159
-
160
-
161
-
162
-
163
-
164
-
165
-
166
-
167
-
168
-
169
-
170
-
171
-
172
-
173
-
174
-
175
-
176
-
177
-
178
-
179
-
180
-
181
-
182
-
183
-
184
-
185
-
186
-
187
-
188
-
189
-
190
-
191
-
 192
192 -
 193
193 -
 194
194 -
 195
195 -
 196
196 -
 197
197 -
 198
198 -
 199
199 -
 200
200 -
 201
201 -
 202
202 -
203
-
204
-
205
-
206
-
207
-
208
-
209
-
210
-
211
-
212
-
213
-
214
-
215
-
216
-
217
-
218
-
219
-
220
-
221
-
222
-
223
-
224
-
225
-
226
-
227
-
228
-
229
-
230
-
231
-
232
-
233
-
234
-
235
-
236
-
237
-
238
-
239
-
240
-
241
-
242
-
243
-
244
-
245
-
246
-
247
-
248
-
249
-
250
-
251
-
252
-
253
-
254
-
255
-
256
-
257
-
258
-
259
-
260
-
261
-
262
-
263
-
264
-
265
-
266
-
267
-
268
-
269
-
270
-
271
-
272
 |
 |