Brother International PEDESIGN 6.0 Users Manual - English - Page 206
Select Hoop s, Write, Browse
 |
View all Brother International PEDESIGN 6.0 manuals
Add to My Manuals
Save this manual to your list of manuals |
Page 206 highlights
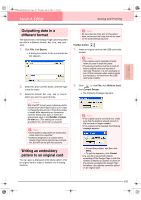
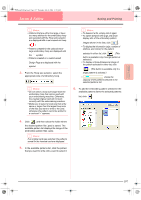
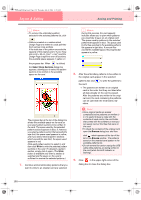
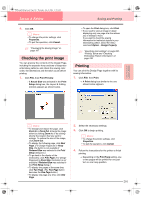
PeDesignV6Eng.book Page 198 Thursday, July 8, 2004 11:59 AM Layout & Editing Saving and Printing b Memo: • To remove the embroidery pattern selected in the selected patterns list, click . • Patterns created on a custom-sized Design Page are written to cards split into their various hoop sections. If the total size of the pattern exceeds the capacity of the original card or if your hoop size is 90 × 90 cm (3.54" × 3.54") and the Design Page is split into over 80 sections, the available space appears in yellow on the progress bar. When is clicked, the Select Hoop Sections dialog box appears, allowing you to select the pattern sections to be written in the available space on the card. The progress bar at the top of the dialog box shows the available space on the card as you select pattern sections to be written to the card. The space used by the selected pattern sections appears in blue. If, however, you select a pattern section that exceeds the size limit, the space used appears in yellow, and if you select several pattern sections which exceed the size limit, the space used appears in red. Click each pattern section to select it, and then click Write to write the selected pattern sections to the card. To deselect a pattern section, simply click it again. (The Write button is available only when a section is selected and the space on the card is sufficient to receive the selected patterns.) 7. Continue until all embroidery patterns that you want to write to an original card are selected. b Memo: During this process, the card capacity indicator allows you to plan which patterns you would like to save on an original card. The space used by patterns in the selected patterns list appears in blue. The space used by the files selected in the available patterns list appears in light blue. If several files exceed the available space, the progress bar appears in yellow. 8. After the embroidery patterns to be written to the original card appear in the selected patterns list, click the card. to write the patterns to → The patterns are written to an original card in the order that they are listed after all data already on the card is erased. After the patterns are written to the original card, the card containing the patterns can be used with the embroidery machine. a Note: • Since original cards are erased completely before patterns are written to it, it is useful to keep a copy with the contents of each card in the card folder that comes with the software so that you can easily recover the files that were on the card. • To check the contents of the original card, open the Browse dialog box, and then click , which appears at the top of the list in the Browse window. The patterns saved on the inserted card appear in the available patterns list. • Do not remove the card or unplug the USB cable while patterns are being written to the card (while the LED indicator is flashing). 9. Click in the upper-right corner of the dialog box to close the dialog box. 198
-
 1
1 -
2
-
3
-
4
-
5
-
6
-
7
-
8
-
9
-
10
-
11
-
12
-
13
-
14
-
15
-
16
-
17
-
18
-
19
-
20
-
21
-
22
-
23
-
24
-
25
-
26
-
27
-
28
-
29
-
30
-
31
-
32
-
33
-
34
-
35
-
36
-
37
-
38
-
39
-
40
-
41
-
42
-
43
-
44
-
45
-
46
-
47
-
48
-
49
-
50
-
51
-
52
-
53
-
54
-
55
-
56
-
57
-
58
-
59
-
60
-
61
-
62
-
63
-
64
-
65
-
66
-
67
-
68
-
69
-
70
-
71
-
72
-
73
-
74
-
75
-
76
-
77
-
78
-
79
-
80
-
81
-
82
-
83
-
84
-
85
-
86
-
87
-
88
-
89
-
90
-
91
-
92
-
93
-
94
-
95
-
96
-
97
-
98
-
99
-
100
-
101
-
102
-
103
-
104
-
105
-
106
-
107
-
108
-
109
-
110
-
111
-
112
-
113
-
114
-
115
-
116
-
117
-
118
-
119
-
120
-
121
-
122
-
123
-
124
-
125
-
126
-
127
-
128
-
129
-
130
-
131
-
132
-
133
-
134
-
135
-
136
-
137
-
138
-
139
-
140
-
141
-
142
-
143
-
144
-
145
-
146
-
147
-
148
-
149
-
150
-
151
-
152
-
153
-
154
-
155
-
156
-
157
-
158
-
159
-
160
-
161
-
162
-
163
-
164
-
165
-
166
-
167
-
168
-
169
-
170
-
171
-
172
-
173
-
174
-
175
-
176
-
177
-
178
-
179
-
180
-
181
-
182
-
183
-
184
-
185
-
186
-
187
-
188
-
189
-
190
-
191
-
192
-
193
-
194
-
195
-
196
-
197
-
198
-
199
-
200
-
 201
201 -
 202
202 -
 203
203 -
 204
204 -
 205
205 -
 206
206 -
 207
207 -
 208
208 -
 209
209 -
 210
210 -
 211
211 -
212
-
213
-
214
-
215
-
216
-
217
-
218
-
219
-
220
-
221
-
222
-
223
-
224
-
225
-
226
-
227
-
228
-
229
-
230
-
231
-
232
-
233
-
234
-
235
-
236
-
237
-
238
-
239
-
240
-
241
-
242
-
243
-
244
-
245
-
246
-
247
-
248
-
249
-
250
-
251
-
252
-
253
-
254
-
255
-
256
-
257
-
258
-
259
-
260
-
261
-
262
-
263
-
264
-
265
-
266
-
267
-
268
-
269
-
270
-
271
-
272
 |
 |