Brother International PEDESIGN 6.0 Users Manual - English - Page 5

Table of Contents

Page 5 highlights

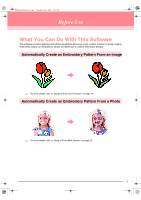
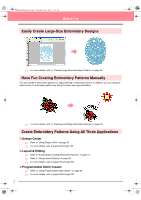
PeDesignV6Eng.book Page i Thursday, July 8, 2004 11:59 AM Table of Contents Basic Operation Advanced Opreation Design Center Advanced Opreation Layout & Editing Advanced Opreation Programmable Stitch Creator Advanced Opreation Design Database Before Use 1 What You Can Do With This Software 1 Automatically Create an Embroidery Pattern From an Image 1 Automatically Create an Embroidery Pattern From a Photo 1 Easily Create Large-Size Embroidery Designs ...... 2 Have Fun Creating Embroidery Patterns Manually 2 Create Embroidery Patterns Using All Three Applications 2 Overview of the Manual 3 Structure of the manual 3 List of terms used 3 Introduction 4 Applications of the software 4 Package contents 5 Optional supplies 6 Principal parts 6 Installation 7 Installation procedure 7 System requirements 8 [STEP 1] Installing the software 8 [STEP 2] Installing the driver for the card writer module 10 [STEP 3] Upgrading the USB card writer module 12 Online registration 13 Uninstallation 13 Technical support 13 Tips and Techniques for Creating Embroidery Patterns 14 Sew Types 15 Chapter 1 Basic Operation 17 Getting Started 18 About This Chapter 18 Automatically Creating Embroidery Patterns 19 Using the Auto Punch Function 19 Step1 Starting up Layout & Editing 19 Step2 Opening an image file 20 Step3 Adjusting the size and position of the image 21 Step4 Automatically converting the image to an embroidery pattern 21 Step5 Displaying a preview of the embroidery pattern 22 Step6 Saving the embroidery pattern 23 Step7 Transferring the pattern to an original card 24 Step8 Quitting Layout & Editing 24 Using a Photo Stitch Function 25 Step1 Starting up Layout & Editing 25 Step2 Opening an image file 26 Step3 Adjusting the size and position of the image 27 Step4 Automatically converting the image to an embroidery pattern 27 Creating and Editing Embroidery Patterns 30 Using Design Center 30 Step1 Starting up Design Center 30 Step2 Opening an image file 31 Step3 Continuing to stage 2 (Line Image stage 31 Step4 Editing lines 32 Step5 Continuing to stage 3 (Figure Handle stage 33 Step6 Continuing to stage 4 (Sew Setting stage 34 Step7 Specifying sewing attributes 34 Step8 Previewing the image 37 Step9 Saving the file 38 Using Layout & Editing 39 Step1 Importing embroidery patterns from Design Center 39 Step2 Adjusting the size and position of the embroidery pattern 40 Step3 Adding shapes 41 Step4 Adding text 43 Step5 Fitting the text around the oval 44 Step6 Adding a circle for the center of the sun 45 Step7 Selecting a programmable fill stitch....... 46 Step8 Adding a closed broken line for the sun's rays 48 Step9 Changing the sewing order of sun and rays 49 Step10 Adjusting the rays 50 Step11 Setting hole sewing 50 Step12 Previewing the embroidery pattern......... 51 Step13 Transferring the pattern to an original card 52 Step14 Saving the file 53 Step15 Quitting Layout & Editing 53 Using Programmable Stitch Creator 54 Step1 Starting up Programmable Stitch Creator 54 Step2 Opening a programmable stitch pattern.. 55 Step3 Drawing lines to edit the stitch pattern ... 56 Step4 Applying embossing/engraving effects .. 57 Step5 Saving the edited stitch pattern 58 Step6 Quitting Programmable Stitch Creator ... 58 Creating Large-Size Embroidery Patterns 59 Designing a large-size embroidery pattern........... 59 i Reference Design Center Reference Layout & Editing Reference Programmable Stitch Creator Reference Design Database

  • 1
  • 2
  • 3
  • 4
  • 5
  • 6
  • 7
  • 8
  • 9
  • 10
  • 11
  • 12
  • 13
  • 14
  • 15
  • 16
  • 17
  • 18
  • 19
  • 20
  • 21
  • 22
  • 23
  • 24
  • 25
  • 26
  • 27
  • 28
  • 29
  • 30
  • 31
  • 32
  • 33
  • 34
  • 35
  • 36
  • 37
  • 38
  • 39
  • 40
  • 41
  • 42
  • 43
  • 44
  • 45
  • 46
  • 47
  • 48
  • 49
  • 50
  • 51
  • 52
  • 53
  • 54
  • 55
  • 56
  • 57
  • 58
  • 59
  • 60
  • 61
  • 62
  • 63
  • 64
  • 65
  • 66
  • 67
  • 68
  • 69
  • 70
  • 71
  • 72
  • 73
  • 74
  • 75
  • 76
  • 77
  • 78
  • 79
  • 80
  • 81
  • 82
  • 83
  • 84
  • 85
  • 86
  • 87
  • 88
  • 89
  • 90
  • 91
  • 92
  • 93
  • 94
  • 95
  • 96
  • 97
  • 98
  • 99
  • 100
  • 101
  • 102
  • 103
  • 104
  • 105
  • 106
  • 107
  • 108
  • 109
  • 110
  • 111
  • 112
  • 113
  • 114
  • 115
  • 116
  • 117
  • 118
  • 119
  • 120
  • 121
  • 122
  • 123
  • 124
  • 125
  • 126
  • 127
  • 128
  • 129
  • 130
  • 131
  • 132
  • 133
  • 134
  • 135
  • 136
  • 137
  • 138
  • 139
  • 140
  • 141
  • 142
  • 143
  • 144
  • 145
  • 146
  • 147
  • 148
  • 149
  • 150
  • 151
  • 152
  • 153
  • 154
  • 155
  • 156
  • 157
  • 158
  • 159
  • 160
  • 161
  • 162
  • 163
  • 164
  • 165
  • 166
  • 167
  • 168
  • 169
  • 170
  • 171
  • 172
  • 173
  • 174
  • 175
  • 176
  • 177
  • 178
  • 179
  • 180
  • 181
  • 182
  • 183
  • 184
  • 185
  • 186
  • 187
  • 188
  • 189
  • 190
  • 191
  • 192
  • 193
  • 194
  • 195
  • 196
  • 197
  • 198
  • 199
  • 200
  • 201
  • 202
  • 203
  • 204
  • 205
  • 206
  • 207
  • 208
  • 209
  • 210
  • 211
  • 212
  • 213
  • 214
  • 215
  • 216
  • 217
  • 218
  • 219
  • 220
  • 221
  • 222
  • 223
  • 224
  • 225
  • 226
  • 227
  • 228
  • 229
  • 230
  • 231
  • 232
  • 233
  • 234
  • 235
  • 236
  • 237
  • 238
  • 239
  • 240
  • 241
  • 242
  • 243
  • 244
  • 245
  • 246
  • 247
  • 248
  • 249
  • 250
  • 251
  • 252
  • 253
  • 254
  • 255
  • 256
  • 257
  • 258
  • 259
  • 260
  • 261
  • 262
  • 263
  • 264
  • 265
  • 266
  • 267
  • 268
  • 269
  • 270
  • 271
  • 272

Basic Operation
Advanced Opreation
Design Center
Advanced Opreation
Layout & Editing
Advanced Opreation
Programmable
Stitch Creator
Advanced Opreation
Design Database
Reference
Design Center
Reference
Layout & Editing
Reference
Programmable
Stitch Creator
Reference
Design Database
i
Table of Contents
Before Use
...................................................
1
What You Can Do With This Software
..............
1
Automatically Create an Embroidery Pattern
From an Image
........................................................
1
Automatically Create an Embroidery Pattern
From a Photo
..........................................................
1
Easily Create Large-Size Embroidery Designs
......
2
Have Fun Creating Embroidery Patterns
Manually
.................................................................
2
Create Embroidery Patterns Using All Three
Applications
............................................................
2
Overview of the Manual
....................................
3
Structure of the manual
..........................................
3
List of terms used
...................................................
3
Introduction
.......................................................
4
Applications of the software
...................................
4
Package contents
....................................................
5
Optional supplies
....................................................
6
Principal parts
.........................................................
6
Installation
.........................................................
7
Installation procedure
.............................................
7
System requirements
..............................................
8
[STEP 1] Installing the software
............................
8
[STEP 2] Installing the driver for the card writer
module
..................................................................
10
[STEP 3] Upgrading the USB card writer
module
..................................................................
12
Online registration
................................................
13
Uninstallation
.......................................................
13
Technical support
.................................................
13
Tips and Techniques for Creating Embroidery
Patterns
...........................................................
14
Sew Types
......................................................
15
Chapter 1
Basic Operation
........................
17
Getting Started
..........................................
18
About This Chapter
.........................................
18
Automatically Creating Embroidery
Patterns
......................................................
19
Using the Auto Punch Function
......................
19
Step1
Starting up Layout & Editing
.................
19
Step2
Opening an image file
............................
20
Step3
Adjusting the size and position of the
image
......................................................
21
Step4
Automatically converting the image to an
embroidery pattern
..................................
21
Step5
Displaying a preview of the embroidery
pattern
.....................................................
22
Step6
Saving the embroidery pattern
................
23
Step7
Transferring the pattern to an original
card
.........................................................
24
Step8
Quitting Layout & Editing
......................
24
Using a Photo Stitch Function
.........................
25
Step1
Starting up Layout & Editing
.................
25
Step2
Opening an image file
.............................
26
Step3
Adjusting the size and position of the
image
......................................................
27
Step4
Automatically converting the image
to an embroidery pattern
.........................
27
Creating and Editing Embroidery
Patterns
......................................................
30
Using Design Center
.......................................
30
Step1
Starting up Design Center
.......................
30
Step2
Opening an image file
.............................
31
Step3
Continuing to stage 2 (Line Image
stage)
.......................................................
31
Step4
Editing lines
............................................
32
Step5
Continuing to stage 3 (Figure Handle
stage)
.......................................................
33
Step6
Continuing to stage 4 (Sew Setting
stage)
.......................................................
34
Step7
Specifying sewing attributes
...................
34
Step8
Previewing the image
.............................
37
Step9
Saving the file
.........................................
38
Using Layout & Editing
....................................
39
Step1
Importing embroidery patterns from
Design Center
.........................................
39
Step2
Adjusting the size and position of the
embroidery pattern
..................................
40
Step3
Adding shapes
.........................................
41
Step4
Adding text
.............................................
43
Step5
Fitting the text around the oval
...............
44
Step6
Adding a circle for the center of the
sun
...........................................................
45
Step7
Selecting a programmable fill stitch
.......
46
Step8
Adding a closed broken line for the sun’s
rays
..........................................................
48
Step9
Changing the sewing order of sun and
rays
..........................................................
49
Step10
Adjusting the rays
...................................
50
Step11
Setting hole sewing
.................................
50
Step12
Previewing the embroidery pattern
.........
51
Step13
Transferring the pattern to an original
card
.........................................................
52
Step14
Saving the file
.........................................
53
Step15
Quitting Layout & Editing
......................
53
Using Programmable Stitch Creator
...............
54
Step1
Starting up Programmable Stitch
Creator
....................................................
54
Step2
Opening a programmable stitch pattern.. 55
Step3
Drawing lines to edit the stitch pattern... 56
Step4
Applying embossing/engraving effects .. 57
Step5
Saving the edited stitch pattern
...............
58
Step6
Quitting Programmable Stitch Creator... 58
Creating Large-Size Embroidery
Patterns
......................................................
59
Designing a large-size embroidery pattern
...........
59
PeDesignV6Eng.book
Page i
Thursday, July 8, 2004
11:59 AM