Brother International PT-9600 Users Manual - English and Spanish - Page 35
For a custom installation, With a Mac OS before OS X, Select Custom from the Feature Set list
 |
UPC - 012502602774
View all Brother International PT-9600 manuals
Add to My Manuals
Save this manual to your list of manuals |
Page 35 highlights
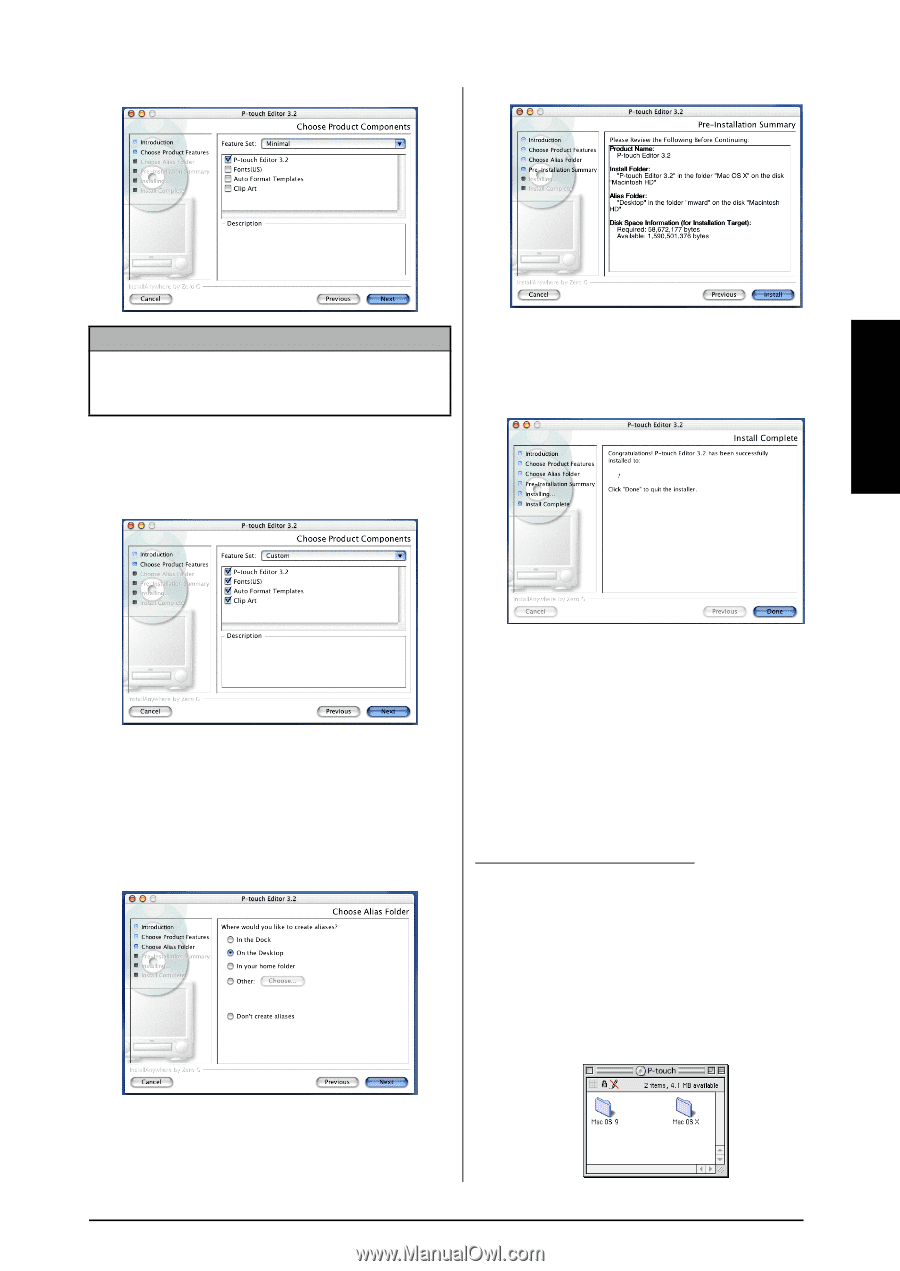
Ch. 2 Getting Started Getting Started NOTE If certain options (such as the Auto Format Templates and the Clip Art) are not installed, some P-touch Editor functions may not be available. ● For a custom installation Select "Custom" from the Feature Set list to display the list of options that can be selected for installation. 0 Check that the installation will be performed as desired, and then click the Install button. After P-touch Editor is installed, a dialog box appears, indicating that the installation is finished. A Click the Done button, and then restart the computer. Only the options with a check mark beside them are installed. Select the options that you wish to install, and then click the Next button. The Choose Alias Folder dialog box appears, allowing you to select where an alias to P-touch Editor 3.2 will be added. Installing the P-touch Quick Editor software The P-touch Quick Editor software provides quick access to the more simple label-designing features for easy text input and instant printing of labels. Install the P-touch Quick Editor software onto a Macintosh as described below. With a Mac OS before OS X: 1 With the P-touch and the Macintosh turned off, connect the P-touch to the computer using the enclosed USB interface cable as described on page 9. Be sure to leave the P-touch turned off. 2 Turn on the Macintosh. 3 Insert the enclosed CD-ROM into the com- puter's CD-ROM drive. 9 Select the desired location for the alias, and then click the Next button. A dialog box appears, allowing you to check the installation. 23
-
 1
1 -
2
-
3
-
4
-
5
-
6
-
7
-
8
-
9
-
10
-
11
-
12
-
13
-
14
-
15
-
16
-
17
-
18
-
19
-
20
-
21
-
22
-
23
-
24
-
25
-
26
-
27
-
28
-
29
-
 30
30 -
 31
31 -
 32
32 -
 33
33 -
 34
34 -
 35
35 -
 36
36 -
 37
37 -
 38
38 -
 39
39 -
 40
40 -
41
-
42
-
43
-
44
-
45
-
46
-
47
-
48
-
49
-
50
-
51
-
52
-
53
-
54
-
55
-
56
-
57
-
58
-
59
-
60
-
61
-
62
-
63
-
64
-
65
-
66
-
67
-
68
-
69
-
70
-
71
-
72
-
73
-
74
-
75
-
76
-
77
-
78
-
79
-
80
-
81
-
82
-
83
-
84
-
85
-
86
-
87
-
88
-
89
-
90
-
91
-
92
-
93
-
94
-
95
-
96
-
97
-
98
-
99
-
100
-
101
-
102
-
103
-
104
-
105
-
106
-
107
-
108
-
109
-
110
-
111
-
112
-
113
-
114
-
115
-
116
-
117
-
118
-
119
-
120
-
121
-
122
-
123
-
124
-
125
-
126
-
127
-
128
-
129
-
130
-
131
-
132
-
133
-
134
-
135
-
136
-
137
-
138
-
139
-
140
-
141
-
142
-
143
-
144
-
145
-
146
-
147
-
148
-
149
-
150
-
151
-
152
-
153
-
154
-
155
-
156
-
157
-
158
-
159
-
160
-
161
-
162
-
163
-
164
-
165
-
166
-
167
-
168
-
169
-
170
-
171
-
172
-
173
-
174
-
175
-
176
-
177
-
178
-
179
-
180
-
181
-
182
-
183
-
184
-
185
-
186
-
187
-
188
-
189
-
190
-
191
-
192
-
193
-
194
-
195
-
196
-
197
-
198
-
199
-
200
-
201
-
202
-
203
-
204
-
205
-
206
-
207
-
208
-
209
-
210
-
211
-
212
 |
 |