Brother International T-8422C Instruction Manual - English
Brother International T-8422C Manual
 |
View all Brother International T-8422C manuals
Add to My Manuals
Save this manual to your list of manuals |
Brother International T-8422C manual content summary:
- Brother International T-8422C | Instruction Manual - English - Page 1
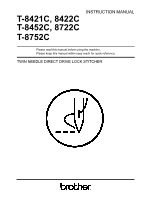
T-8421C, 8422C T-8452C, 8722C T-8752C INSTRUCTION MANUAL Please read this manual before using the machine. Please keep this manual within easy reach for quick reference. TWIN NEEDLE DIRECT DRIVE LOCK STITCHER - Brother International T-8422C | Instruction Manual - English - Page 2
very much for buying a BROTHER sewing machine. Before using your new machine, please read the safety instructions below and the explanations given in the instruction manual. With industrial sewing machines, it is normal to carry out work while positioned directly in front of moving parts such as the - Brother International T-8422C | Instruction Manual - English - Page 3
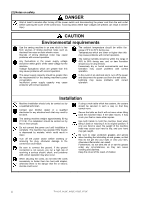
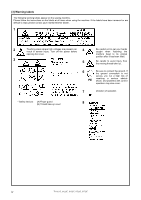
their meanings This instruction manual and the indications and symbols that are used on the machine itself are provided in order to ensure safe operation of this machine and to prevent accidents the symbol at left means "you must make the ground connection".) T-8421C, 8422C, 8452C, 8722C, 8752C i - Brother International T-8422C | Instruction Manual - English - Page 4
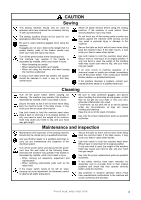
problems with correct operation. Installation Machine installation should only be carried out by a qualified technician. Contact your Brother dealer or a qualified electrician for any electrical work that may need to be done. The sewing machine of children. ii T-8421C, 8422C, 8452C, 8722C, 8752C - Brother International T-8422C | Instruction Manual - English - Page 5
of the reach of children. Use only the proper replacement parts as specified by Brother. Maintenance and inspection Maintenance and inspection of the sewing machine should only be carried out by a qualified technician. Ask your Brother dealer or a qualified electrician to carry out any maintenance - Brother International T-8422C | Instruction Manual - English - Page 6
labels The following warning labels appear on the sewing machine. Please follow the instructions on the labels at all times when using the machine. If the labels have been removed or are difficult to read, please contact your nearest Brother dealer. 1 2 Touching areas where high voltages are - Brother International T-8422C | Instruction Manual - English - Page 7
Oil pan Control box Transformer box (100V/400V system only) 2166B Oil tank 2506B T-8421C, 8422C, 8452C, 8722C, 8752C v - Brother International T-8422C | Instruction Manual - English - Page 8
CONTENTS 1. MACHINE SPECIFICATIONS 1 2. NAMES OF MAJOR PARTS 3 3. INSTALLATION 4 3-1. Table processing diagram 5 3-2. Corner sewing method (T-8452C, 8752C) ..... 26 4-9-1. To stop the needle bars (right and left 26 4-9-2. Number of stitches: quick-reference guide 8422C, 8452C, 8722C, 8752C - Brother International T-8422C | Instruction Manual - English - Page 9
69 13-8. Installing the feed dog 71 13-9. Feed dog position 72 13-10. Feed dog height 73 13-11. Feed dog angle 74 14. TROUBLESHOOTING 75 14-1. Sewing 75 14-2. Error code displays 80 15. 7-SEGMENT DISPLAY 84 T-8421C - Brother International T-8422C | Instruction Manual - English - Page 10
1. MACHINE SPECIFICATIONS 1. MACHINE SPECIFICATIONS A BC DE F 2167B A Rotary hook 4 Standard hook 7 Large hook B Stitch function 2 Fixed needle bar 5 Split needle materials 5 Heavy-weight materials 7 Heavy-weight materials (For extra thick thread) 1 T-8421C, 8422C, 8452C, 8722C, 8752C - Brother International T-8422C | Instruction Manual - English - Page 11
MACHINE SPECIFICATIONS -T3F 3,000 sti/min -T0F 4,000 sti/min -T33 3,000 sti/min -T03 4,000 sti/min 250-1,800 sti/min 1,000 sti/min 4 mm 7 mm 13 mm 1 mm #9-#14 #11-#16 AC servo motor (4-pole, 550W) Microprocessor T-8422C Max. sewing #14-#22 -403 3,000 sti/min -405, -407 250-1,800 - Brother International T-8422C | Instruction Manual - English - Page 12
2. NAMES OF MAJOR PARTS 2. NAMES OF MAJOR PARTS G50 operation panel (advanced function LCD) G10 operation panel ( cover 2168B (2) Thread wiper (T-8422C, 8452C, 8722C, 8752C) (4) Quick reverse (Actuator switch) (6) Control box (8) Power switch (10) Reverse lever (12) Machine pulley (14) Cotton stand - Brother International T-8422C | Instruction Manual - English - Page 13
installation should only be carried out by a qualified technician. Contact your Brother dealer or a qualified electrician for any electrical work that may need to be done. The sewing machine weighs approximately 50 kg (110 lb). The installation should be carried out by two or more people. Do not - Brother International T-8422C | Instruction Manual - English - Page 14
be strong enough to hold the weight and with-stand the vibration of the sewing machine. Drill holes as indicated in the illustration below. Cotton stand hole Cord hole washers [3 pcs] (5) Washers [3 pcs] 2. Connecting rod (6) Connecting rod (7) Nut 4127M 5 T-8421C, 8422C, 8452C, 8722C, 8752C - Brother International T-8422C | Instruction Manual - English - Page 15
3. INSTALLATION 3. Oil pan (1) Head cushions (left) [2 pcs] (2) Head cushions (right) [2 pcs] (3) Oil pan (4) Oiler 2874M 4. Rubber cushions (1) Rubber cushions [2 pcs] (2) Nails [4 pcs] 5. Knee lifter complying bar (3) Knee lifter complying bar 2875M T-8421C, 8422C, 8452C, 8722C, 8752C 6 - Brother International T-8422C | Instruction Manual - English - Page 16
the table hole. If the head rest (3) is not pushed in as far as it will go, the machine head will not be sufficiently stable when it is tilted back. 2171B 7. Operation panel (1) Operation panel (2) Screws so that the cotton stand (1) does not move. 2878M 7 T-8421C, 8422C, 8452C, 8722C, 8752C - Brother International T-8422C | Instruction Manual - English - Page 17
lifter plate (1) to a position where it is easy to use. 2173B 1. Turn the machine pulley so that the feed dog is below the top of the needle plate. 2. Lower the presser foot (5) , securely tighten the nut (9). Within 13 mm 2882M T-8421C, 8422C, 8452C, 8722C, 8752C 8 - Brother International T-8422C | Instruction Manual - English - Page 18
3. INSTALLATION 3-3. Lubrication CAUTION Do not connect the power cord until lubrication has been completed, otherwise the machine may operate if the treadle is depressed by mistake, which could result in injury. Be sure to wear protective goggles and gloves when handling the - Brother International T-8422C | Instruction Manual - English - Page 19
apply oil for semi dry types. 3. INSTALLATION Rotary hook race (left and right) 2200B 2174B T-8421C, 8422C, 8452C, 8722C, 8752C 2887M 10 - Brother International T-8422C | Instruction Manual - English - Page 20
result in severe injury. CAUTION Contact your Brother dealer or a qualified electrician for any problems with correct operation may also occur. 3-4-1. Opening the control box cover (1) Screw (2) Cover 3-4-2. Connecting the cords 4137M 1. Sewing machine cords 2175B 11 T-8421C, 8422C - Brother International T-8422C | Instruction Manual - English - Page 21
out from the control box should be secured to the cord holder (2) using the repeat cable tie (1), otherwise vibration from the sewing machine may cause the cords to become disconnected, which can cause problems with the operation of the control box. 4141M T-8421C, 8422C, 8452C, 8722C, 8752C 12 - Brother International T-8422C | Instruction Manual - English - Page 22
outlet. NOTE: Take care when tapping in the staples (3) to make sure that they do not pierce the cords. Do not use extension cords, otherwise machine operation problems may result. Leg Control box Green and yellow wire (ground wire) 4144M 13 T-8421C - Brother International T-8422C | Instruction Manual - English - Page 23
outlet. NOTE: Take care when tapping in the staples (5) to make sure that they do not pierce the cords. Do not use extension cords, otherwise machine operation problems may result. 2178B T-8421C, 8422C, 8452C, 8722C, 8752C 14 - Brother International T-8422C | Instruction Manual - English - Page 24
outlet. NOTE: Take care when tapping in the staples (7) to make sure that they do not pierce the cords. Do not use extension cords, otherwise machine operation problems may result. Green and yellow wire (ground wire) 2380B 15 T-8421C - Brother International T-8422C | Instruction Manual - English - Page 25
, depress the treadle (3) and check that the sewing machine does not operate. NOTE: If the sewing machine operates when the treadle (3) is depressed while the machine head is tilted back, the safety switch is probably faulty. Contact the place of purchase. T-8421C, 8422C, 8452C, 8722C, 8752C 16 - Brother International T-8422C | Instruction Manual - English - Page 26
3-6. Adjusting the treadle operation 4259M If the machine starts running at low speed when your foot is simply resting on the backward depression sensitivity will change, so readjust if necessary. 4260M 17 T-8421C, 8422C, 8452C, 8722C, 8752C - Brother International T-8422C | Instruction Manual - English - Page 27
4. PREPARATION BEFORE SEWING 4. PREPARATION BEFORE SEWING 4-1. Installing the needle CAUTION Turn off the power switch before installing the needle. The machine may operate if the treadle is depressed by mistake, which could result in injury. 1. Turn the machine pulley to - Brother International T-8422C | Instruction Manual - English - Page 28
4. PREPARATION BEFORE SEWING 4-2. Removing the bobbin CAUTION Turn off the power switch before removing the bobbin. The machine may operate if the treadle is depressed by mistake, which could result then remove the bobbin case (3). 3. Remove the bobbin. 2464B 19 T-8421C, 8422C, 8452C, 8722C, 8752C - Brother International T-8422C | Instruction Manual - English - Page 29
SEWING 4-3. Winding the lower thread CAUTION Do not touch any of the moving parts or press any objects against the machine while winding the lower thread, as this may result in personal injury or damage to the machine 80 % of the bobbin capacity. 2123M 2124M T-8421C, 8422C, 8452C, 8722C, 8752C 20 - Brother International T-8422C | Instruction Manual - English - Page 30
4. PREPARATION BEFORE SEWING 4-4. Installing the bobbin CAUTION Turn off the power switch before installing the bobbin. The machine may operate if the treadle is depressed by mistake, which could bobbins (1) made of light alloy as specified by BROTHER. 2466B 21 T-8421C, 8422C, 8452C, 8722C, 8752C - Brother International T-8422C | Instruction Manual - English - Page 31
4. PREPARATION BEFORE SEWING 2902M 1. Insert the bobbin (1) into the bobbin case (2) so that the winding direction at times such as during thread trimming. Use bobbins (1) made of light alloy as specified by BROTHER. 2468B T-8421C, 8422C, 8452C, 8722C, 8752C 22 - Brother International T-8422C | Instruction Manual - English - Page 32
could result in injury. ・ Turn the machine pulley and raise the thread take-up (1) before threading the upper thread. This will make threading easier and it will prevent the thread from coming out at the sewing start. ・ Thread the left-side thread first. 23 T-8421C, 8422C, 8452C, 8722C, 8752C - Brother International T-8422C | Instruction Manual - English - Page 33
405> Do not pass the thread through. Center Pass the thread through. (Refer to p.54) 4. PREPARATION BEFORE SEWING tab (3). Specifications indicated by the * mark include arm thread guide D (4) and felt (5). When using polyester thread, install - Brother International T-8422C | Instruction Manual - English - Page 34
4. PREPARATION BEFORE SEWING 4-6. Adjusting the stitch length Locked Unlocked 1. Unlock the stitch length dial (2) by turning the dial lock lever (1) to the right until a click is heard. 2. Turn - Brother International T-8422C | Instruction Manual - English - Page 35
machine may result. 4-9-1. To stop the needle bars (right and left) Operate the stop lever after the needle has penetrated the material and has stopped moving. Do not sew 3129M Press the push lever of sewing angle and stitch length. [Example] For a sewing angle - Brother International T-8422C | Instruction Manual - English - Page 36
) in the A, B, C and D stitch number displays is sewn continuously. After the sewing machine sews a full cycle of stitches set by A, B, C and D, the thread is trimmed E stitch number display is sewn, and then the sewing machine stops automatically. 4164M 27 T-8421C, 8422C, 8452C, 8722C, 8752C - Brother International T-8422C | Instruction Manual - English - Page 37
carried out after the set number of stitches have been sewn. 4171M (14) Half stitch key When the sewing machine is stopped, the needle bar can be moved up and down by pressing this key. 4172M (15) the indicator of the thread wiper key (18) will switch off. T-8421C, 8422C, 8452C, 8722C, 8752C 28 - Brother International T-8422C | Instruction Manual - English - Page 38
of start backtack stitches is complete, end backtacking will not be carried out. • If the indicator of the thread trimming lock key is illuminated, the sewing machine will stop in the needle up position without thread trimming being carried out. 2160M 29 T-8421C, 8422C, 8452C, 8722C, 8752C - Brother International T-8422C | Instruction Manual - English - Page 39
carried out, the sewing machine will stop at the sewing function, operation will be carried out automatically from continuous backtack sewing through to thread trimming (models with thread trimmer) just by depressing the treadle once, without needing to keep it depressed continuously. T-8421C, 8422C - Brother International T-8422C | Instruction Manual - English - Page 40
of fixed stitches 4178M Example: From 0 to 1999 stitches can be set. 2 After the set number of stitches in E (fixed stitches) have been sewn, the sewing machine stops in the needle position that has been set by the needle up/down key (refer to p. 34). After this, normal - Brother International T-8422C | Instruction Manual - English - Page 41
the number of end backtack stitches indicated in C and D, press the pleat presser sewing key to turn off the pleat presser sewing function before making the change. (The CD display will show the number of stitches and the setting can then be changed.) T-8421C, 8422C, 8452C, 8722C, 8752C 32 - Brother International T-8422C | Instruction Manual - English - Page 42
sewing machine sews sewing sewing Sewing will be possible even after the treadle is returned to the neutral position and the sewing machine stops. However, after the treadle has been depressed backward and thread trimming has been carried out (models with thread trimmer), sewing sewing - Brother International T-8422C | Instruction Manual - English - Page 43
correction sewing can be carried out. If the sewing machine is stopped, sewing will be sewing is in progress, backtack stitches will be sewn. • Correction sewing cannot be carried out while the indicator of the pleat presser sewing returned to the neutral position and sewing stops. • When the needle - Brother International T-8422C | Instruction Manual - English - Page 44
10° for the upper shaft. Becomes higher Becomes lower 2188B 2138M 2139M 4 The setting values will be memorized. 4192M 5 Normal sewing machine operation will then be possible. * For details on other adjustment items, refer to the Service Manual. 4193M 35 T-8421C, 8422C, 8452C, 8722C, 8752C - Brother International T-8422C | Instruction Manual - English - Page 45
make settings for various functions. ENTER key (4) This key is used to accept function settings. MAX key (5) This key is used to change the maximum sewing speed. * Refer to the Service Manual for details on using these keys. 4194M T-8421C, 8422C, 8452C, 8722C, 8752C 36 - Brother International T-8422C | Instruction Manual - English - Page 46
the Service Manual. Main display " init ALL " " init MEM " " init SPd " " init SEW " Initialization items Clears all settings Initializes memory switches Initializes sewing mode will be exited and normal sewing machine operation will then be possible. 4193M 37 T-8421C, 8422C, 8452C, 8722C, 8752C - Brother International T-8422C | Instruction Manual - English - Page 47
- 9) in the A, B, C and D columns of the display are sewn continuously. After the sewing machine sews a full cycle of stitches set by A, B, C and D, the thread is trimmed automatically (models indicator of the thread wiper key (6) will switch off. 4174M T-8421C, 8422C, 8452C, 8722C, 8752C 38 - Brother International T-8422C | Instruction Manual - English - Page 48
backward before sewing of the set number of start backtack stitches is complete, end backtacking will not be carried out. ・ If thread trimming lock is set, the sewing machine will stop in the needle up position without thread trimming being carried out. 2160M 39 T-8421C, 8422C, 8452C, 8722C - Brother International T-8422C | Instruction Manual - English - Page 49
neutral position.If the treadle is depressed again, operation will resume from the point where it was interrupted. ・ If thread trimming lock is set, the sewing machine will stop in the needle up position without thread trimming being carried out. 2159M T-8421C, 8422C, 8452C, 8722C, 8752C 40 - Brother International T-8422C | Instruction Manual - English - Page 50
up stop position or the needle down stop position when the treadle is returned to the neutral position and sewing stops. * This setting cannot be carried out if the lock function is on. (For details on exited and normal operation will be possible. 4206M 41 T-8421C, 8422C, 8452C, 8722C, 8752C - Brother International T-8422C | Instruction Manual - English - Page 51
slow start setting is enabled, the two stitches at the sewing start after thread trimming will be sewn at 700 sti/min. After this, the sewing speed corresponds to the treadle depression amount. * This be exited and normal operation will be possible. 4206M T-8421C, 8422C, 8452C, 8722C, 8752C 42 - Brother International T-8422C | Instruction Manual - English - Page 52
carried out at slow speed (250 sti/min) while the actuator switch is being pressed when the sewing machine is stopped. * This setting cannot be carried out if the lock function is on. (For mode will be exited and normal operation will be possible. 4206M 43 T-8421C, 8422C, 8452C, 8722C, 8752C - Brother International T-8422C | Instruction Manual - English - Page 53
will be stored and the display will return to the setting item. 4213M 5 Setting mode will be exited and normal operation will be possible. T-8421C, 8422C, 8452C, 8722C, 8752C 4206M 44 - Brother International T-8422C | Instruction Manual - English - Page 54
function off, refer to "8-7. Lock function".) 1 (Current setting value) 2 Setting the maximum sewing speed Example: 2191B The maximum sewing speed is set in columns A and B. (Setting can be carried out in units of 100 operations can then be carried out. 45 T-8421C, 8422C, 8452C, 8722C, 8752C - Brother International T-8422C | Instruction Manual - English - Page 55
2194B 2138M 2139M 4 (Setting item) The setting will be stored and the display will return to the setting item. 4220M 5 Normal sewing machine operation will then be possible. * For details on other adjustment items, refer to the Service Manual. 4206M T-8421C, 8422C, 8452C, 8722C, 8752C 46 - Brother International T-8422C | Instruction Manual - English - Page 56
then be set.) 4221M 8-8. Resetting all settings to their defaults If the sewing machine stops operating normally, the cause may be that an incorrect setting may have (1) will disappear and normal sewing machine operation will then be possible. 4206M 47 T-8421C, 8422C, 8452C, 8722C, 8752C - Brother International T-8422C | Instruction Manual - English - Page 57
replacing the bobbin and needle y When not using the machine and when leaving the machine unattended Do not touch any of the moving parts or press any objects against the machine while sewing, as this may result in personal injury or damage to the machine. Secure the table so that it will not move - Brother International T-8422C | Instruction Manual - English - Page 58
9-2. Backtacking 2916M When the actuator switch (1) or the reverse lever (2) is pressed during sewing, the feed direction will be reversed. When it is released, the feed direction will return . Select the position (A or B) that is easier to use. 2918M 49 T-8421C, 8422C, 8452C, 8722C, 8752C - Brother International T-8422C | Instruction Manual - English - Page 59
stopper (6). 1. Return the stitch length dial (4) to the stitch length for normal sewing. 2. (4). 3. Start sewing. 4. At the position where you would like to start sewing condensed stitches, press (2) is being pressed.) * To stop sewing condense stitches and return to using the backtack - Brother International T-8422C | Instruction Manual - English - Page 60
tension> CAUTION Turn off the power switch before adjusting the lower thread tension. The machine may operate if the treadle is depressed by mistake, which could result in injury. tension nut (2). Becomes weaker 51 Becomes weaker Becomes stronger 2924M T-8421C, 8422C, 8452C, 8722C, 8752C - Brother International T-8422C | Instruction Manual - English - Page 61
that the material does not slip. (Refer to "Adjusting screw height" in the table below as a guide to adjustment.) 1. Loosen the adjusting nut (1). 2. Turn the presser adjusting screw (2) to adjust the presser Approx. 34mm Approx. 34mm Approx. 29mm 2925M T-8421C, 8422C, 8452C, 8722C, 8752C 52 - Brother International T-8422C | Instruction Manual - English - Page 62
this can be useful for increasing ease of working when sewing curves. 1. Turn the sewing machine pulley by hand to move the feed dog (2) the adjustment, sew a piece of material to check the floating amount. Raise Lower < Guide to adjustment when sewing curves > When 8422C, 8452C, 8722C, 8752C - Brother International T-8422C | Instruction Manual - English - Page 63
or less ・ When sewing under any of the above three conditions and you would like to prevent skipped stitches, thread tightening problems such as looping, or thread breakages Thread take-up amount is too large 3018M Thread take-up amount is too small Start of movement < Guide to adjustment > The - Brother International T-8422C | Instruction Manual - English - Page 64
The following cleaning operations should be carried out each day in order to maintain the performance of this machine and to ensure a long service life. Furthermore, if the sewing machine has not been used for a long period of time, carry out the following cleaning procedures before using it - Brother International T-8422C | Instruction Manual - English - Page 65
oil specified by Brother. * If this type machine head. 2. Pour lubricating oil into the oil cover (1) until the oil level reaches the reference line (2). (Refer to p.9.) 3. Return the machine head to its normal position. 2358B T-8421C, 8422C - Brother International T-8422C | Instruction Manual - English - Page 66
from operating for safety reasons. If this happens, apply grease and carry out the reset procedure. * If you continue to use the sewing machine after carrying out the reset procedure but without applying grease, problems with the sewing machine may result. 57 T-8421C, 8422C, 8452C, 8722C, 8752C - Brother International T-8422C | Instruction Manual - English - Page 67
grease> Use Brother-specified "Grease unit (SA8837-001)". 1. Using the tube 11. CLEANING 2. Applying grease Follow the procedure below to apply grease to the places indicated by arrows on the next page. Grease 4087M Insert the tip of the nozzle (1) all the way into the hole in the part. Apply - Brother International T-8422C | Instruction Manual - English - Page 68
11. CLEANING 2201B Turn the machine pulley until the screw (1) can be seen. Use the tip of a screwdriver or similar to apply 5-10 mm will change to stitch number display mode and treadle operation will be possible. (This completes the reset procedure.) 59 T-8421C, 8422C, 8452C, 8722C, 8752C - Brother International T-8422C | Instruction Manual - English - Page 69
from operating for safety reasons. If this happens, apply grease and carry out the reset procedure. * If you continue to use the sewing machine after carrying out the reset procedure but without applying grease, problems with the sewing machine may result. T-8421C, 8422C, 8452C, 8722C, 8752C 60 - Brother International T-8422C | Instruction Manual - English - Page 70
Brother-specified "Grease unit (SA8837-001)". 1. Using the tube 2. Applying grease Follow the procedure below to apply grease to the places indicated by arrows on the next page. Grease 4087M Insert the tip of the nozzle (1) all the way into the hole in the part T-8421C, 8422C, 8452C, 8722C, 8752C - Brother International T-8422C | Instruction Manual - English - Page 71
11. CLEANING 2201B Turn the machine pulley until the screw (1) can be seen. Use the tip of a screwdriver or similar to apply 5-10 mm stitch number display mode and treadle operation will be possible. (This completes the reset procedure.) 2261B 2138M 2139M T-8421C, 8422C, 8452C, 8722C, 8752C 62 - Brother International T-8422C | Instruction Manual - English - Page 72
or the lubrication amount check sheet against moving parts such as the rotary hook or the or when changing the sewing speed. 2941M 1. Tilt back the machine head. 2. Turn the sewing machine has been used for approximately two hours. T-8421C, 8422C, 8452C, 8722C, - Brother International T-8422C | Instruction Manual - English - Page 73
and inspection of the sewing machine should only be carried out by a qualified technician. Ask your Brother dealer or a qualified electrician . ・ When carrying out inspection, adjustment and maintenance ・ When replacing consumable parts such as the rotary hook and knife If the power switch needs to - Brother International T-8422C | Instruction Manual - English - Page 74
Tighten the screw (7). 35mm or more Pull Trailing thread 3015M NOTE: If using a thread trimming sewing machine, the trailing length for the left upper thread may become shorter after thread trimming because of the errors for the left upper thread. 3016M 65 T-8421C, 8422C, 8452C, 8722C, 8752C - Brother International T-8422C | Instruction Manual - English - Page 75
as follows depending on sewing machine specifications. For foundation (-T[]F) For light-weight and medium-weight materials (-[][]3) For heavy-weight materials (-405,-407) 0.25N 0.34N stud (6) to adjust the tension. 3. Tighten the tension nut (5). 3017M T-8421C, 8422C, 8452C, 8722C, 8752C 66 - Brother International T-8422C | Instruction Manual - English - Page 76
thread trimming T-8422C T-8722C T-8452C T-8752C Distance (A) 0.9 - 1.2 mm 1.4 - 1.7 mm 3054M 3055M • Check clearance (A) each time parts such as the thread may be cut too short (models with thread trimmer). * These problems may occur particularly if the stitch length is large or when carrying out - Brother International T-8422C | Instruction Manual - English - Page 77
this time. 5. Tighten the screw (7). 6. Turn the presser adjusting screw (4) to adjust the presser foot pressure, and then tighten the nut (3). Approx. 7mm 3059M T-8421C, 8422C, 8452C, 8722C, 8752C 68 - Brother International T-8422C | Instruction Manual - English - Page 78
of the stitches to be sewn. Standard stitch length Specifications -T[]F -[][]3 -405, -407 Stitch length dial 2 2 3 2. Remove the rubber cap of the needle bar base (4). 7. In this condition, secure the machine pulley with tape or similar, so that the needle bar (2) will 8422C, 8452C, 8722C, 8752C - Brother International T-8422C | Instruction Manual - English - Page 79
the tape that is securing the machine pulley. Color in Mark Needle bar lowest position Mark 3042M 3043M 13. Use an this is not a problem. If using a thread such as polyester thread which does not easily form stable loops * If problems such as skipped stitches - Brother International T-8422C | Instruction Manual - English - Page 80
14. With the needle raised, turn the machine pulley forward while pushing the needle against the does not easily form stable loops * If problems such as skipped stitches or upper thread breakages with the two screws (3). 2. Tighten the feed dog support set screw (4) so that the tip of the set - Brother International T-8422C | Instruction Manual - English - Page 81
(6). If the needle plate and the feed dog are touching, loosen the screw (1) and move the feed rocker base arm (3) sideways to adjust. 3063M T-8421C, 8422C, 8452C, 8722C, 8752C 72 - Brother International T-8422C | Instruction Manual - English - Page 82
(1)protrudes 0.9-1.1 mm from the top of the needle plate (2). 3064M 3065M 1. Tilt back the machine head. 2. Loosen the screw (3) just enough so that the feed bar (4) can slide. stitch length may occur at slow and fast sewing speeds. Lower Higher 3066M 73 T-8421C, 8422C, 8452C, 8722C, 8752C - Brother International T-8422C | Instruction Manual - English - Page 83
feed bar shaft (1) is aligned with the reference line (4) on the feed rocker base arm (3). 1. Tilt back the machine head. 2. Loosen the set screw (5). 3. Insert a screwdriver into the slit (6) in the feed bar shaft (1), the height of the feed dog. 3067M T-8421C, 8422C, 8452C, 8722C, 8752C 74 - Brother International T-8422C | Instruction Manual - English - Page 84
the power cord before carrying out troubleshooting. The machine may operate if the treadle is depressed by mistake, which could result in injury. 14-1. Sewing Items with a "*" in the "Page" column should only be checked by a qualified technician. Problem 1 Upper thread is not tight. Possible - Brother International T-8422C | Instruction Manual - English - Page 85
TROUBLESHOOTING Problem Possible cause 3 Skipped stitches occur y Is the needle tip bent? Is the needle tip blunt? while sewing If the needle tip is bent or broken, replace the needle. y Is the needle properly installed? If it is incorrect, install the needle correctly. y Is the machine sewing - Brother International T-8422C | Instruction Manual - English - Page 86
TROUBLESHOOTING Problem sewing speed too fast? Use the sewing speed control keys to gradually reduce the sewing correct when the lower thread is the sewing start. being pulled? Spinning of bobbin during by Brother being used? Use only bobbins which are specified by Brother. 2951M 2124M 21 - Brother International T-8422C | Instruction Manual - English - Page 87
TROUBLESHOOTING Problem Possible cause 9 Upper and lower threads y Is the needle bent or is the needle tip broken? are breaking. Replace the needle if it is bent or broken. y Is the needle properly installed? If it is incorrect, install the needle correctly. y Is the machine during sewing? y - Brother International T-8422C | Instruction Manual - English - Page 88
TROUBLESHOOTING Problem Possible cause 13 Machine does not operate y Is the sewing speed setting or backtack speed setting incorrect? at high speed. Use the sewing speed control keys to set the high speed. 14 Machine sewing 57* the power is turned on. 79 T-8421C, 8422C, 8452C, 8722C, 8752C - Brother International T-8422C | Instruction Manual - English - Page 89
TROUBLESHOOTING The machine head was detected as being machine head was detected as being tilted back during sewing. Turn the power off and then back on again. ・ Was the power ON switch pressed while the machine -pin machine connector problem with the actuator switch. Replace the actuator switch. 4266M Page - Brother International T-8422C | Instruction Manual - English - Page 90
14. TROUBLESHOOTING Error code E090 Treadle connector is not connected. Possible cause supply voltage too low? Check the power supply voltage. E111 E130 E131 Problem with motor encoder signal. ・ The sewing machine could not stop correctly at the needle up stop position after thread trimming. - Brother International T-8422C | Instruction Manual - English - Page 91
14. TROUBLESHOOTING Error code E150 Motor is overheating. Possible cause ・ This is displayed when the motor becomes abnormally hot and the temperature protection has activated. After the temperature has dropped, press the power ON switch and operate the sewing machine as normal. E151 Problem with - Brother International T-8422C | Instruction Manual - English - Page 92
TROUBLESHOOTING sewing machine locks up and an abnormal current is flowing. Press the power OFF switch, and then turn the machine pulley by hand and check that it turns easily. ・ This is displayed if there is some problem problem, contact the place of purchase. 83 T-8421C, 8422C, 8452C, 8722C, 8752C - Brother International T-8422C | Instruction Manual - English - Page 93
15. 7-SEGMENT DISPLAY 15. 7-SEGMENT DISPLAY 4268M T-8421C, 8422C, 8452C, 8722C, 8752C 84 - Brother International T-8422C | Instruction Manual - English - Page 94
INSTRUCTION MANUAL © 2010 Brother Industries, Ltd. All Rights Reserved. This is the original instructions. T-8421C, 8422C, 8452C, 8722C, 8752C SB1410-001 E 2010.05. B (1)
-
 1
1 -
 2
2 -
 3
3 -
 4
4 -
 5
5 -
 6
6 -
 7
7 -
8
-
9
-
10
-
11
-
12
-
13
-
14
-
15
-
16
-
17
-
18
-
19
-
20
-
21
-
22
-
23
-
24
-
25
-
26
-
27
-
28
-
29
-
30
-
31
-
32
-
33
-
34
-
35
-
36
-
37
-
38
-
39
-
40
-
41
-
42
-
43
-
44
-
45
-
46
-
47
-
48
-
49
-
50
-
51
-
52
-
53
-
54
-
55
-
56
-
57
-
58
-
59
-
60
-
61
-
62
-
63
-
64
-
65
-
66
-
67
-
68
-
69
-
70
-
71
-
72
-
73
-
74
-
75
-
76
-
77
-
78
-
79
-
80
-
81
-
82
-
83
-
84
-
85
-
86
-
87
-
88
-
89
-
90
-
91
-
92
-
93
-
94
 |
 |

T-8421C, 8422C
T-8452C, 8722C
T-8752C
Please read this manual before using the machine.
Please keep this manual within easy reach for quick reference.
TWIN NEEDLE DIRECT DRIVE LOCK STITCHER
INSTRUCTION MANUAL