Brother International T-8422C Instruction Manual - English - Page 21
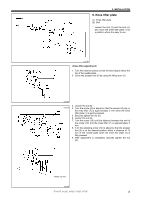
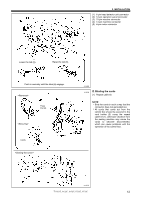
Binding the cords, Push in securely until the tabs 6 engage.
 |
View all Brother International T-8422C manuals
Add to My Manuals
Save this manual to your list of manuals |
Page 21 highlights
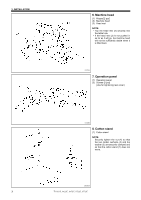
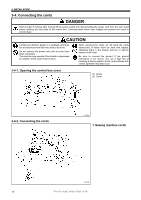
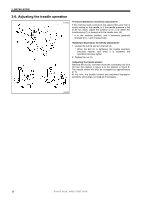
3. INSTALLATION (1) 6-pin head detector unit connector (2) 12-pin operation panel connector (3) 10-pin resolver connector (4) 14-pin machine connector (5) 4-pin motor connector Lower the tab (6). Raise the tab (6). Push in securely until the tabs (6) engage. Press the tab. Cords 4139M 4140M 2. Binding the cords (1) Repeat cable tie NOTE: Bind the cords in such a way that the connector does not get pulled out. All cords that come out from the control box should be secured to the cord holder (2) using the repeat cable tie (1), otherwise vibration from the sewing machine may cause the cords to become disconnected, which can cause problems with the operation of the control box. 4141M T-8421C, 8422C, 8452C, 8722C, 8752C 12
-
 1
1 -
2
-
3
-
4
-
5
-
6
-
7
-
8
-
9
-
10
-
11
-
12
-
13
-
14
-
15
-
 16
16 -
 17
17 -
 18
18 -
 19
19 -
 20
20 -
 21
21 -
 22
22 -
 23
23 -
 24
24 -
 25
25 -
 26
26 -
27
-
28
-
29
-
30
-
31
-
32
-
33
-
34
-
35
-
36
-
37
-
38
-
39
-
40
-
41
-
42
-
43
-
44
-
45
-
46
-
47
-
48
-
49
-
50
-
51
-
52
-
53
-
54
-
55
-
56
-
57
-
58
-
59
-
60
-
61
-
62
-
63
-
64
-
65
-
66
-
67
-
68
-
69
-
70
-
71
-
72
-
73
-
74
-
75
-
76
-
77
-
78
-
79
-
80
-
81
-
82
-
83
-
84
-
85
-
86
-
87
-
88
-
89
-
90
-
91
-
92
-
93
-
94
 |
 |

T-8421C, 8422C, 8452C, 8722C, 8752C
3. INSTALLATION
12
(1) 6-pin head detector unit connector
(2) 12-pin operation panel connector
(3) 10-pin resolver connector
(4) 14-pin machine connector
(5) 4-pin motor connector
2.
Binding the cords
(1) Repeat cable tie
NOTE:
±
Bind the cords in such a way that the
connector does not get pulled out.
±
All cords that come out from the
control box should be secured to the
cord holder (2) using the repeat
cable tie (1), otherwise vibration from
the sewing machine may cause the
cords
to
become
disconnected,
which can cause problems with the
operation of the control box.
4139M
Push in securely until the tabs (6) engage.
<Closing the cover>
4141M
<Removal>
<Securing>
Press
the tab.
Cords
4140M
Lower the tab (6).
Raise the tab (6).