Brother International T-8422C Instruction Manual - English - Page 62
Adjusting the presser foot floating amount (minute lifting amount)
 |
View all Brother International T-8422C manuals
Add to My Manuals
Save this manual to your list of manuals |
Page 62 highlights
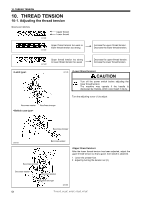
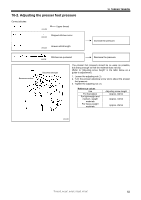
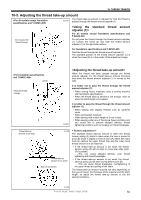
10. THREAD TENSION 10-3. Adjusting the presser foot floating amount (minute lifting amount) 3096M Floating amount • When sewing stretch materials and materials with long pile, you can make minute adjustments to the floating amount for the presser foot (1) in accordance with the material. • In addition, this can be useful for increasing ease of working when sewing curves. 1. Turn the sewing machine pulley by hand to move the feed dog (2) below the needle plate (3). 2. Use the lifting lever to lower the presser foot (1). 3. Loosen the nut (4). 4. Use a hexagon wrench to turn the adjusting screw (5) to adjust the floating amount. • To raise the presser foot (1) ... Turn the adjusting screw (5) clockwise. • To lower the presser foot (1) ... Turn the adjusting screw (5) counterclockwise. 5. Tighten the nut (4). * After making the adjustment, sew a piece of material to check the floating amount. Raise Lower < Guide to adjustment when sewing curves > When the material is placed under the presser foot (1) and the feed dog (2) is moved to its lowest position and the material is moved, there should ideally be some resistance in the material. If the floating amount is too small • Ease of working (handling) will be poorer when sewing curves. If the floating amount is too large • The stitch lengths and seam lines will be unstable. 3097M 10-4. Adjusting the trailing thread trimmer only) Longer Shorter length 35 mm or more after thread trimming (models with y At the time of thread trimming, the thread tension is loosened and tension is applied by the pretension (1) only. y The normal trailing length for the upper thread is 35 mm. y If the tension of the pretension (1) is increased, the lengths of the threads trailing from the needle tips will be reduced; if the tension is reduced, the lengths will be increased. Trailing thread Adjust by turning the pretension (1). 2926M 53 2258B T-8421C, 8422C, 8452C, 8722C, 8752C
-
 1
1 -
2
-
3
-
4
-
5
-
6
-
7
-
8
-
9
-
10
-
11
-
12
-
13
-
14
-
15
-
16
-
17
-
18
-
19
-
20
-
21
-
22
-
23
-
24
-
25
-
26
-
27
-
28
-
29
-
30
-
31
-
32
-
33
-
34
-
35
-
36
-
37
-
38
-
39
-
40
-
41
-
42
-
43
-
44
-
45
-
46
-
47
-
48
-
49
-
50
-
51
-
52
-
53
-
54
-
55
-
56
-
 57
57 -
 58
58 -
 59
59 -
 60
60 -
 61
61 -
 62
62 -
 63
63 -
 64
64 -
 65
65 -
 66
66 -
 67
67 -
68
-
69
-
70
-
71
-
72
-
73
-
74
-
75
-
76
-
77
-
78
-
79
-
80
-
81
-
82
-
83
-
84
-
85
-
86
-
87
-
88
-
89
-
90
-
91
-
92
-
93
-
94
 |
 |
