Brother International XL-2027 Users Manual - English - Page 14
Buttonhole, Button, Sewing
 |
View all Brother International XL-2027 manuals
Add to My Manuals
Save this manual to your list of manuals |
Page 14 highlights
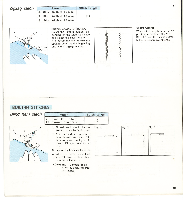
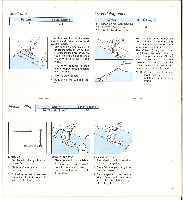
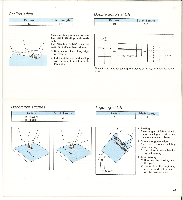
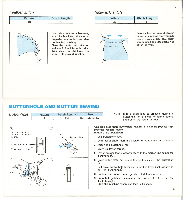
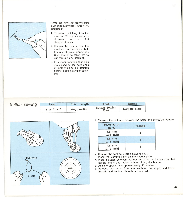
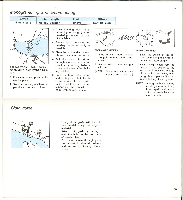
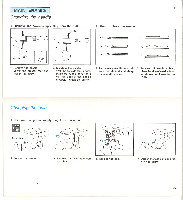
Feather stitch Pattern 18 Stitch Length 4 Rick-rack stitch Pattern 20 Use this stitch as a hemming stitch for blankets, table-cloths, draperies, embroidery and decorative top stitching. Place the fabric right side up If and sew 3/8 inch from the edge. Trim close to stitching. The stitch will prevent raveling. 23 Stitch Length 4 Sew on heavier weight stretch fabrics in any area that you may use a zigzag stitch. This stitch can be used as a decorative top stitch as well. BUTTONHOLE AND BUTTON SEWING Buttonhole Pattern 1 Stitch Length Foot F-2 Buttonhole foot NOTE: It is a good idea to practice making a buttonhole on a scrap of fabric before attempting the actual garment. ® Set the marks on the foot and fabric in line. Marks on fabric Marks on the foot CO aI() ---5- - -4$ (0) .A Button plate 0 CD, One-step automatic buttonhole making is a simple process that provides reliable results. MAKING BUTTONHOLE 1. Use buttonhole foot. 2. Using tailor chalk, mark the position of buttonhole on the fabric. 3. Attach the buttonhole foot. 4. Draw up lower thread. 5. Lower presser foot in accordance with the marked line as per the illustration 0 . 6. Draw button plate and insert the button as per the illustration 8 • 7. Pull down buttonhole lever and push this lever back slightly as per the illustration 8. Holding the upper thread gently , start the machine. 9. Buttonhole stitching is made in the orders of 1-4 as per the illustration (D Stop the machine when bar tack is finished. 24
-
 1
1 -
2
-
3
-
4
-
5
-
6
-
7
-
8
-
 9
9 -
 10
10 -
 11
11 -
 12
12 -
 13
13 -
 14
14 -
 15
15 -
 16
16 -
 17
17 -
 18
18 -
 19
19 -
20
-
21
-
22
 |
 |
