Brother International XL-2230 Users Manual - English - Page 25
Using the Needle Threader Models, equipped with a needle threader
 |
View all Brother International XL-2230 manuals
Add to My Manuals
Save this manual to your list of manuals |
Page 25 highlights
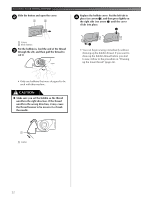
KNOWING YOUR SEWING MACHINE Put the thread behind the guide above the 6 needle. Thread the needle from front to back leaving a 7 thread tail of about 5 cm (2 inches). 1 Using the Needle Threader (Models equipped with a needle threader) Turn the power switch to 'O'. Lower the presser foot lever. 1 Turn the balance wheel toward you 2 (counterclockwise) to raise the needle holder to the highest position. 1 1 Needle holder • If your sewing machine is equipped with a needle threader, use the needle threader to thread the needle. (See page 24) 2 1 Needle holder 2 Needle threader lever 1 1 5 cm (2 inch) Note ● If the thread take-up lever is lowered, the upper thread can not be wrapped around the thread take-up lever. Make sure you raise the Presser Foot Lever and the thread take-up before you feed the upper thread. ● If you incorrectly feed the thread you may cause sewing problems. Note ● When you use the needle threader, make sure the needle holder is in the highest position, otherwise the hook may be damaged. While lowering the needle threader lever, 3 hook the thread onto the guide. 1 2 3 1 Needle holder 2 Needle threader lever 3 Guide 24
-
 1
1 -
2
-
3
-
4
-
5
-
6
-
7
-
8
-
9
-
10
-
11
-
12
-
13
-
14
-
15
-
16
-
17
-
18
-
19
-
 20
20 -
 21
21 -
 22
22 -
 23
23 -
 24
24 -
 25
25 -
 26
26 -
 27
27 -
 28
28 -
 29
29 -
 30
30 -
31
-
32
-
33
-
34
-
35
-
36
-
37
-
38
-
39
-
40
-
41
-
42
-
43
-
44
-
45
-
46
-
47
-
48
-
49
-
50
-
51
-
52
-
53
-
54
-
55
-
56
-
57
-
58
-
59
-
60
-
61
-
62
-
63
 |
 |
