Brother International XL-2600 Owner's Manual (Español) - Spanish - Page 24
Using the Needle Threader for models, equipped with a needle threader - problems
 |
View all Brother International XL-2600 manuals
Add to My Manuals
Save this manual to your list of manuals |
Page 24 highlights
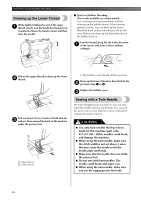
KNOWING YOUR SEWING MACHINE Put the thread behind the guide above the 6 needle. • The thread can easily be passed behind the needle bar thread guide by holding the thread in your left hand, then feeding the thread with your right hand. Using the Needle Threader (for models equipped with a needle threader) This feature is only available on certain models. Turn the power off and lower the presser foot 1 lever. Raise the needle to its highest position by 2 turning the handwheel toward you (counterclockwise) so that the mark on the handwheel points directly up. 1 Needle bar thread guide IMPORTANT: 7 Thread the needle from front to back leaving a thread tail of about 5 cm (2 inch). • If your sewing machine is equipped with a needle threader, use the needle threader to thread the needle (see next section). 1 Needle holder 2 Needle threader lever Note ● When you use the needle threader, make sure the needle holder is in the highest position, otherwise the hook may be damaged. 1 1 5 cm (2 inch) While lowering the needle threader lever, 3 hook the thread onto the guide. Note ● If the thread take-up lever is lowered, the upper thread can not be wrapped around the thread take-up lever. Make sure you raise the presser foot lever and the thread take-up lever before you feed the upper thread. ● If you incorrectly feed the thread you may cause sewing problems. 1 2 3 1 Needle holder 2 Needle threader lever 3 Guide 22
-
 1
1 -
2
-
3
-
4
-
5
-
6
-
7
-
8
-
9
-
10
-
11
-
12
-
13
-
14
-
15
-
16
-
17
-
18
-
 19
19 -
 20
20 -
 21
21 -
 22
22 -
 23
23 -
 24
24 -
 25
25 -
 26
26 -
 27
27 -
 28
28 -
 29
29 -
30
-
31
-
32
-
33
-
34
-
35
-
36
-
37
-
38
-
39
-
40
-
41
-
42
-
43
-
44
-
45
-
46
-
47
-
48
-
49
-
50
-
51
-
52
 |
 |
