Brother International XL-2600 Owner's Manual (Español) - Spanish - Page 36
Sewing Buttonholes And Buttons
 |
View all Brother International XL-2600 manuals
Add to My Manuals
Save this manual to your list of manuals |
Page 36 highlights
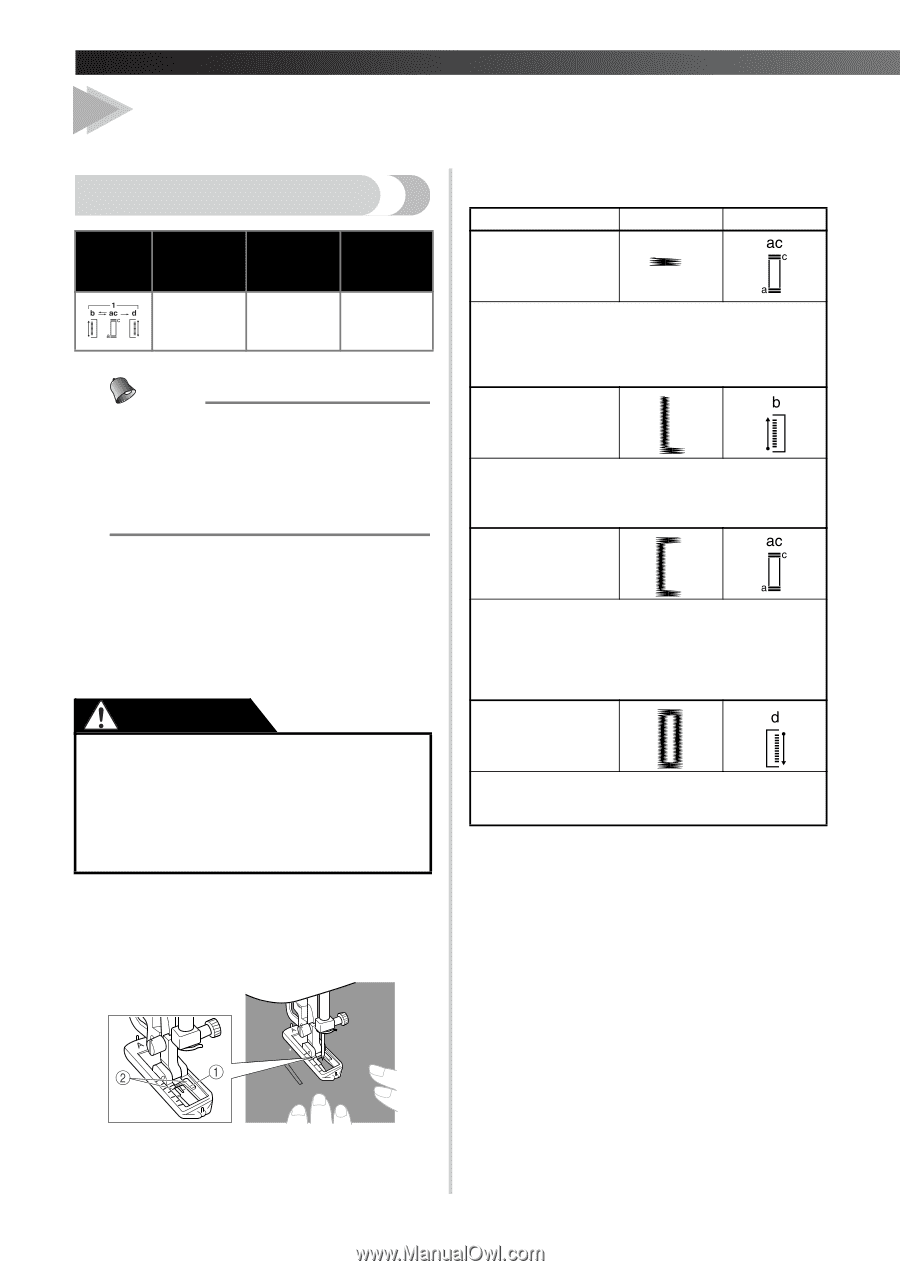
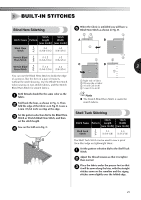
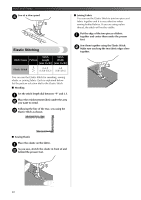
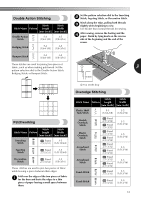
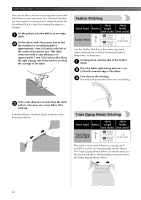
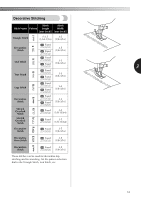
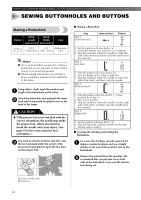
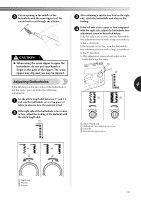
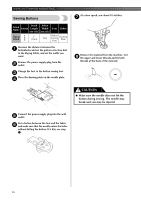
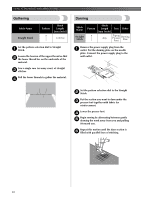
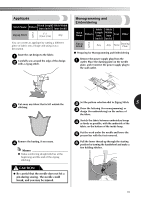
SEWING BUTTONHOLES AND BUTTONS 4 SEWING BUTTONHOLES AND BUTTONS Making a Buttonhole Stitch Stitch Pattern Length Width Foot [mm (inch)] [mm (inch)] F-1.5 3-5 Buttonhole (1/64-1/16) (1/8 - 3/16) Foot Memo ● We recommend that you practice making a buttonhole on a scrap piece of fabric before you try it on an actual garment. ● When making buttonholes on soft fabrics, place a stabilizer material on the underside of the fabric. Using tailor's chalk, mark the position and 1 length of the buttonhole on the fabric. Attach the buttonhole foot and push the frame 2 back until it stops with the plastic insert at the front of the frame. CAUTION ● If the presser foot is not installed with the correct orientation, the needle may strike the presser foot, which may bend or break the needle and cause injury. (See page 9 for the correct presser foot orientation.) You need to sew the front bar tack first. Line 3 the bar tack mark under the center of the presser foot and match it up to the two lines on the presser foot. ■ Making a Buttonhole Step Step 1 (Front bar tack) Sewn section a Pattern 1. Set the pattern selection dial to 'a'. 2. Lower the presser foot and sew 5 to 6 stitches. 3. Stop the machine when the needle is at the left side of the stitches and then raise the needle from the material. Step 2 b (Left side) 1. Turn the pattern selection dial to 'b'. 2. Sew the length of the tailor's chalk line. 3. Stop the machine when the needle is at the left side of the stitch and then raise the needle. Step 3 c (Back bar tack) 1. Turn the pattern selection dial to 'c' (same position as in step 1). 2. Sew 5 to 6 stitches. 3. Stop the machine when the needle is at the right side of the stitch and then raise the needle from the material. Step 4 (Right side) d 1. Set the pattern selection dial to 'd'. 2. Sew the right side until the needle reaches the stitches sewn in step 1. ■ Securing the Stitching and Cutting the Buttonhole To secure the stitching, turn the material 90 1 degrees counterclockwise and sew straight stitches to the end of the front bar tack of the buttonhole. Remove the material from the machine. We 2 recommend that you put pins across both ends of the buttonhole to prevent the stitches from being cut. 1 Front of chalk mark 2 Red lines 34
-
 1
1 -
2
-
3
-
4
-
5
-
6
-
7
-
8
-
9
-
10
-
11
-
12
-
13
-
14
-
15
-
16
-
17
-
18
-
19
-
20
-
21
-
22
-
23
-
24
-
25
-
26
-
27
-
28
-
29
-
30
-
 31
31 -
 32
32 -
 33
33 -
 34
34 -
 35
35 -
 36
36 -
 37
37 -
 38
38 -
 39
39 -
 40
40 -
 41
41 -
42
-
43
-
44
-
45
-
46
-
47
-
48
-
49
-
50
-
51
-
52
 |
 |