Brother International XL-3030 Users Manual - English - Page 4
Table, Contents
 |
View all Brother International XL-3030 manuals
Add to My Manuals
Save this manual to your list of manuals |
Page 4 highlights
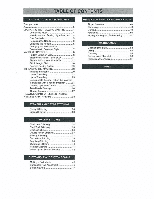
TABLE OF CONTENTS KNOWING YOUR SEWING MACHINE Principal parts 1 Accessories 3 OPERATING YOUR SEWING MACHINE 4 Connecting Plugs 4 Main Power and Sewing Light Switches ....5 Foot Controller 5 Replacing the Needle 6 Checking the Needle 6 Changing the Presser Foot 7 Converting to Free-arm Style 7 VARIOUS CONTROLS 8 Pattern Selection Dial 8 Electronic Display (1 Line LCD) 11 Electronic Display (4 Line LCD) 12 Stitch Length Dial 18 Reverse Sewing Button 19 THREADING THE MACHINE 20 Winding the bobbin 20 Lower Threading 22 Upper Threading 23 Using needle threader (when the machine is equipped with a needle threader) 24 Drawing Up Lower Thread 25 Twin Needle Sewing 26 Thread Tension 27 RELATIVE CHART OF SEWING FABRICS, NEEDLES AND "THREADS 28 USING ATTACHMENTS AND APPLICATIONS Zipper Insertion 48 Gathering 49 Darning 49 Appliques 50 Monogramming and Embroidering 51 MAINTENANCE Changing the Bulb 53 Oiling 54 Cleaning 55 Performance Checklist 56 Repacking the machine 61 INDEX STRAIGHT AND ZIGZAG STITCHING Straight Stitching 30 Zigzag Stitching 33 BUILT-IN STITCHES Blind Hem Stitching 34 Shell Tuck Stitching 35 clastic stitching 36 Double Action Stitching 37 Scallop Stitching 37 Demalive &Huhuig 38 Fagoting Stitching 39 Overedge Stitching 40 Feather Stitching 41 Triple Zigzag Stretch Stitching 42 BUTTONHOLE AND BUTTON SEWING Making a Buttonhole 43 Buttonhole Fine Adjustment 45 Button Sewing 47
-
 1
1 -
 2
2 -
 3
3 -
 4
4 -
 5
5 -
 6
6 -
 7
7 -
 8
8 -
 9
9 -
 10
10 -
11
-
12
-
13
-
14
-
15
-
16
-
17
-
18
-
19
-
20
-
21
-
22
-
23
-
24
-
25
-
26
-
27
-
28
-
29
-
30
-
31
-
32
-
33
-
34
-
35
-
36
-
37
-
38
-
39
-
40
-
41
-
42
-
43
-
44
-
45
-
46
-
47
-
48
-
49
-
50
-
51
-
52
-
53
-
54
-
55
-
56
-
57
-
58
-
59
-
60
-
61
-
62
-
63
-
64
-
65
-
66
-
67
-
68
-
69
-
70
-
71
-
72
 |
 |