Bushnell Natureview 8x40 Instruction Manual - Page 8
Installing The Batteries And Sd Card
 |
View all Bushnell Natureview 8x40 manuals
Add to My Manuals
Save this manual to your list of manuals |
Page 8 highlights
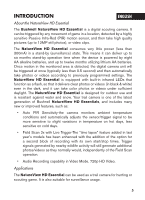
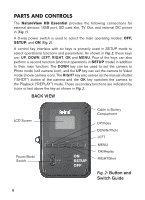
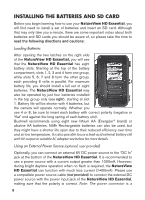
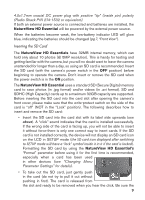
INSTALLING THE BATTERIES AND SD CARD Before you begin learning how to use your NatureView HD Essential, you will first need to install a set of batteries and insert an SD card. Although that may only take you a minute, there are some important notes about both batteries and SD cards you should be aware of, so please take the time to read the following directions and cautions: Loading Batteries After opening the two latches on the right side of the NatureView HD Essential, you will see that the NatureView HD Essential has eight battery slots. Starting at the top of the battery compartment, slots 1, 2, 3 and 4 form one group, while slots 5, 6, 7 and 8 form the other group, each providing 6 volts in parallel. For maximum battery life, you should install a full set of eight batteries. The NatureView HD Essential may also be operated by just four batteries installed in the top group only (see right), starting at slot 1. Battery life will be shorter with 4 batteries, but the camera will operate normally. Whether you use 4 or 8, be sure to insert each battery with correct polarity (negative or "flat" end against the long spring of each battery slot). Bushnell recommends using eight new lithium AA (Energizer® brand) or alkaline AA batteries. NiMh Rechargeable batteries can also be used, but they might have a shorter life span due to their reduced efficiency over time and at low temperature. It is also possible to use a lead-acid external battery cell with 6V output or suitable AC adapter-see below for more details. Using an External Power Source (optional, user provided) Optionally, you can connect an external 6V DC power source to the "DC In" jack at the bottom of the NatureView HD Essential. It is recommended to use a power source with a current output greater than 1000mA. However, during bright daytime operation when no flash is required, the NatureView HD Essential can function with much less current (>400mA). Please use a compatible power source cable (not provided) to connect the external DC power source with the power input jack of the NatureView HD Essential, making sure that the polarity is correct. Note: The power connector is a 8
-
 1
1 -
2
-
 3
3 -
 4
4 -
 5
5 -
 6
6 -
 7
7 -
 8
8 -
 9
9 -
 10
10 -
 11
11 -
 12
12 -
 13
13 -
14
-
15
-
16
-
17
-
18
-
19
-
20
-
21
-
22
-
23
-
24
-
25
-
26
-
27
-
28
-
29
-
30
-
31
-
32
-
33
-
34
-
35
-
36
-
37
-
38
-
39
-
40
-
41
-
42
-
43
-
44
-
45
-
46
-
47
-
48
-
49
-
50
-
51
-
52
-
53
-
54
-
55
-
56
-
57
-
58
-
59
-
60
-
61
-
62
-
63
-
64
-
65
-
66
-
67
-
68
-
69
-
70
-
71
-
72
-
73
-
74
-
75
-
76
-
77
-
78
-
79
-
80
-
81
-
82
-
83
-
84
-
85
-
86
-
87
-
88
-
89
-
90
-
91
-
92
-
93
-
94
-
95
-
96
-
97
-
98
-
99
-
100
-
101
-
102
-
103
-
104
-
105
-
106
-
107
-
108
-
109
-
110
-
111
-
112
-
113
-
114
-
115
-
116
-
117
-
118
-
119
-
120
-
121
-
122
-
123
-
124
-
125
-
126
-
127
-
128
-
129
-
130
-
131
-
132
-
133
-
134
-
135
-
136
-
137
-
138
-
139
-
140
-
141
-
142
-
143
-
144
-
145
-
146
-
147
-
148
-
149
-
150
-
151
-
152
-
153
-
154
-
155
-
156
-
157
-
158
-
159
-
160
-
161
-
162
-
163
-
164
-
165
-
166
-
167
-
168
-
169
-
170
-
171
-
172
-
173
-
174
-
175
-
176
-
177
-
178
-
179
-
180
-
181
-
182
-
183
-
184
-
185
-
186
-
187
-
188
-
189
-
190
-
191
-
192
-
193
-
194
-
195
-
196
 |
 |
