Canon 3000F PhotoStudio_manual.pdf - Page 69
Opening Images from an Album, Managing Images in Albums
 |
UPC - 013803028430
View all Canon 3000F manuals
Add to My Manuals
Save this manual to your list of manuals |
Page 69 highlights
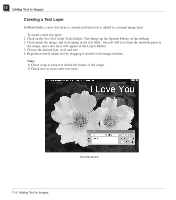
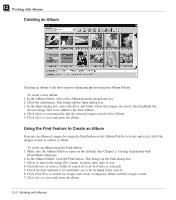
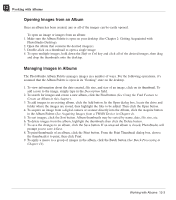
12 Working with Albums Opening Images from an Album Once an album has been created, any or all of the images can be easily opened. To open an image or images from an album: 1. Make sure the Album Palette is open on your desktop (See Chapter 2: Getting Acquainted with PhotoStudio Desktop). 2. Open the album that contains the desired image(s). 3. Double-click on a thumbnail to open a single image. 4. To open multiple images, hold down the Shift or Ctrl key and click all of the desired images, then drag and drop the thumbnails onto the desktop. Managing Images in Albums The PhotoStudio Album Palette manages images in a number of ways. For the following operations, it's assumed that the Album Palette is open in its "floating" state on the desktop. 1. To view information about the date created, file size, and size of an image, click on its thumbnail. To add a note to the image, simply type in the Description field. 2. To search for images and create a new album, click the Find button (See Using the Find Feature to Create an Album in this chapter). 3. To add images to an existing album, click the Add button. In the Open dialog box, locate the drive and folder where the images are stored, then highlight the files to be added. Then click the Open button. 4. To acquire an image from a digital camera or scanner directly into the Album, click the Acquire button in the Album Palette (See Acquiring Images from a TWAIN Device in Chapter 4). 5. To sort images, click the Sort button. Album thumbnails may be sorted by name, date, file size, etc. 6. To delete images from the album, highlight the thumbnails then click the Delete button. 7. To save the changes to an album, click the Save button. If an unsaved album is closed, PhotoStudio will prompt you to save it first. 8. To print thumbnails of an album, click the Print button. From the Print Thumbnail dialog box, choose the thumbnail(s) to print, then click Print. 9. To apply a macro to a group of images in the album, click the Batch button (See Batch Processing in Chapter 14). Working with Albums 12-3
-
 1
1 -
2
-
3
-
4
-
5
-
6
-
7
-
8
-
9
-
10
-
11
-
12
-
13
-
14
-
15
-
16
-
17
-
18
-
19
-
20
-
21
-
22
-
23
-
24
-
25
-
26
-
27
-
28
-
29
-
30
-
31
-
32
-
33
-
34
-
35
-
36
-
37
-
38
-
39
-
40
-
41
-
42
-
43
-
44
-
45
-
46
-
47
-
48
-
49
-
50
-
51
-
52
-
53
-
54
-
55
-
56
-
57
-
58
-
59
-
60
-
61
-
62
-
63
-
 64
64 -
 65
65 -
 66
66 -
 67
67 -
 68
68 -
 69
69 -
 70
70 -
 71
71 -
 72
72 -
 73
73 -
 74
74 -
75
-
76
-
77
-
78
-
79
-
80
-
81
-
82
-
83
 |
 |