Canon 4454B001 Instruction Manual - Page 12
About this Manual
 |
View all Canon 4454B001 manuals
Add to My Manuals
Save this manual to your list of manuals |
Page 12 highlights
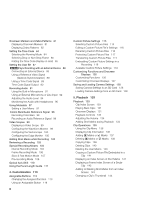
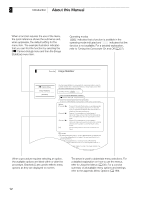
1 Introduction About this Manual When a function requires the use of the menu, the quick reference shows the submenus and, when applicable, the default setting for the menu item. The example illustration indicates that you can find the function by selecting the [l Camera Setup] menu and then the [Image Stabilizer] menu item. Operating modes indicates that a function is available in the operating mode indicated and indicates that the function is not available. For a detailed explanation, refer to Turning the Camcorder On and Off (0 27). 3 Recording Image Stabilizer Image Stabilizer [l Camera Setup] [Image Stabilizer] [Standard] Use the image stabilizer to compensate for camcorder shake in order to achieve steadier shots. There are 3 methods of image stabilization; select the method that best suits your needs. Operating modes: 1 Open the [Image Stabilizer] submenu. [l Camera Setup] [Image Stabilizer] 2 Select the desired option and then press SET. • The icon of the selected mode appears on the bottom of the screen. Options [Powered] Q: [Dynamic] P: [Standard] O: [Off]: Powered IS is most effective when you are stationary and zooming in on far subjects using high zoom ratios (the more you approach the telephoto end). This mode is not suitable for tilting and panning shots. Dynamic IS compensates for a higher degree of camcorder shake, such as when shooting while walking, and is more effective as the zoom approaches full wide angle. Standard IS compensates for a lower degree of camcorder shake, such as when shooting while remaining stationary, and is suitable for shooting natural-looking scenes. Use this setting when the camcorder is mounted on a tripod. NOTES • By default, assignable button 1 is set to [Standard] but you can also set it for another assignable button instead. You can press the button to activate standard IS. • If you set an assignable button to [Dynamic IS] or [Powered IS] (0 111), you can press the button to turn the assigned mode on or off. • If the degree of camcorder shake is too high, the image stabilizer may not be able to fully compensate. • When you are using [Dynamic] mode the edges of the picture may be When a procedure requires selecting an option, the available options are listed within or after the procedure. Brackets [ ] are used to refer to menu options as they are displayed on screen. The arrow is used to abbreviate menu selections. For a detailed explanation on how to use the menus, refer to Using the Menus (0 30). For a concise summary of all available menu options and settings, refer to the appendix Menu Options (0 169). 12
-
 1
1 -
2
-
3
-
4
-
5
-
6
-
 7
7 -
 8
8 -
 9
9 -
 10
10 -
 11
11 -
 12
12 -
 13
13 -
 14
14 -
 15
15 -
 16
16 -
 17
17 -
18
-
19
-
20
-
21
-
22
-
23
-
24
-
25
-
26
-
27
-
28
-
29
-
30
-
31
-
32
-
33
-
34
-
35
-
36
-
37
-
38
-
39
-
40
-
41
-
42
-
43
-
44
-
45
-
46
-
47
-
48
-
49
-
50
-
51
-
52
-
53
-
54
-
55
-
56
-
57
-
58
-
59
-
60
-
61
-
62
-
63
-
64
-
65
-
66
-
67
-
68
-
69
-
70
-
71
-
72
-
73
-
74
-
75
-
76
-
77
-
78
-
79
-
80
-
81
-
82
-
83
-
84
-
85
-
86
-
87
-
88
-
89
-
90
-
91
-
92
-
93
-
94
-
95
-
96
-
97
-
98
-
99
-
100
-
101
-
102
-
103
-
104
-
105
-
106
-
107
-
108
-
109
-
110
-
111
-
112
-
113
-
114
-
115
-
116
-
117
-
118
-
119
-
120
-
121
-
122
-
123
-
124
-
125
-
126
-
127
-
128
-
129
-
130
-
131
-
132
-
133
-
134
-
135
-
136
-
137
-
138
-
139
-
140
-
141
-
142
-
143
-
144
-
145
-
146
-
147
-
148
-
149
-
150
-
151
-
152
-
153
-
154
-
155
-
156
-
157
-
158
-
159
-
160
-
161
-
162
-
163
-
164
-
165
-
166
-
167
-
168
-
169
-
170
-
171
-
172
-
173
-
174
-
175
-
176
-
177
-
178
-
179
-
180
-
181
-
182
-
183
-
184
-
185
-
186
-
187
-
188
-
189
-
190
-
191
-
192
-
193
-
194
-
195
-
196
-
197
-
198
-
199
-
200
-
201
-
202
-
203
-
204
-
205
-
206
-
207
-
208
-
209
-
210
-
211
 |
 |