Canon 4454B001 Instruction Manual - Page 38
Using a Tripod
 |
View all Canon 4454B001 manuals
Add to My Manuals
Save this manual to your list of manuals |
Page 38 highlights
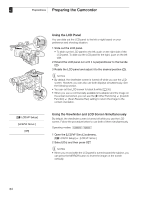
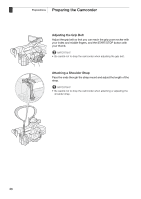
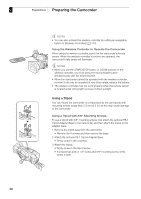
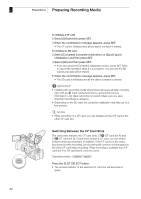
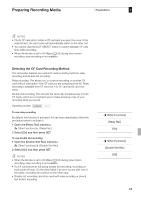
2 Preparations Preparing the Camcorder NOTES • You can also activate the wireless controller by setting an assignable button to [Wireless Controller] (0 113). Using the Wireless Controller to Operate the Camcorder When using the wireless controller, point it at the camcorder's remote sensor. When the wireless controller's buttons are operated, the camcorder's tally lamps will illuminate. NOTES • When you use the START/STOP button or ZOOM buttons on the wireless controller, you must press the record enable button simultaneously with the desired button. • When the camcorder cannot be operated with the wireless controller, or when it can only be operated at very close range, replace the battery. • The wireless controller may not work properly when the remote sensor is located under strong light sources or direct sunlight. Using a Tripod You can mount the camcorder on a tripod but do not use tripods with mounting screws longer than 5.5 mm (0.2 in.) as this may cause damage to the camcorder. Using a Tripod with 3/8" Mounting Screws To use a tripod with 3/8" mounting screws, first attach the optional TB-1 Tripod Adapter Base to the camcorder and then attach the tripod to the adapter base. 1 Remove the tripod base from the camcorder. • Remove the 4 screws and then remove the base. 2 Attach the optional TB-1 Tripod Adapter Base. • Firmly screw in the 4 screws. 3 Attach the tripod. • Firmly screw in the tripod screw. • If a tripod has both a 1/4" screw and 3/8" mounting screw, firmly screw in both. 38
-
 1
1 -
2
-
3
-
4
-
5
-
6
-
7
-
8
-
9
-
10
-
11
-
12
-
13
-
14
-
15
-
16
-
17
-
18
-
19
-
20
-
21
-
22
-
23
-
24
-
25
-
26
-
27
-
28
-
29
-
30
-
31
-
32
-
 33
33 -
 34
34 -
 35
35 -
 36
36 -
 37
37 -
 38
38 -
 39
39 -
 40
40 -
 41
41 -
 42
42 -
 43
43 -
44
-
45
-
46
-
47
-
48
-
49
-
50
-
51
-
52
-
53
-
54
-
55
-
56
-
57
-
58
-
59
-
60
-
61
-
62
-
63
-
64
-
65
-
66
-
67
-
68
-
69
-
70
-
71
-
72
-
73
-
74
-
75
-
76
-
77
-
78
-
79
-
80
-
81
-
82
-
83
-
84
-
85
-
86
-
87
-
88
-
89
-
90
-
91
-
92
-
93
-
94
-
95
-
96
-
97
-
98
-
99
-
100
-
101
-
102
-
103
-
104
-
105
-
106
-
107
-
108
-
109
-
110
-
111
-
112
-
113
-
114
-
115
-
116
-
117
-
118
-
119
-
120
-
121
-
122
-
123
-
124
-
125
-
126
-
127
-
128
-
129
-
130
-
131
-
132
-
133
-
134
-
135
-
136
-
137
-
138
-
139
-
140
-
141
-
142
-
143
-
144
-
145
-
146
-
147
-
148
-
149
-
150
-
151
-
152
-
153
-
154
-
155
-
156
-
157
-
158
-
159
-
160
-
161
-
162
-
163
-
164
-
165
-
166
-
167
-
168
-
169
-
170
-
171
-
172
-
173
-
174
-
175
-
176
-
177
-
178
-
179
-
180
-
181
-
182
-
183
-
184
-
185
-
186
-
187
-
188
-
189
-
190
-
191
-
192
-
193
-
194
-
195
-
196
-
197
-
198
-
199
-
200
-
201
-
202
-
203
-
204
-
205
-
206
-
207
-
208
-
209
-
210
-
211
 |
 |
