Canon 4454B001 Instruction Manual - Page 167
Photo Numbering
 |
View all Canon 4454B001 manuals
Add to My Manuals
Save this manual to your list of manuals |
Page 167 highlights
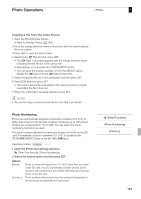
Photo Operations Photos 7 Copying a File from the Index Screen 1 Open the [Photos] Index Screen. • Refer to Viewing Photos (0 163). 2 Move the orange selection frame to the photo with the custom picture file to be copied. 3 Press SET to open the photo menu. 4 Select [Copy X File] and then press SET. • The [X Data 1/3] screen appears with the orange selection frame indicating the first file slot in the camcorder. • Alternatively, you can press the CUSTOM PICT. button. • You can push the joystick up/down or turn the SELECT dial to display the [X Data 2/3] and [X Data 3/3] screens. 5 Select the desired file slot in the camcorder and then press SET. 6 Select [OK] and then press SET. • The custom picture file embedded in the selected photo is copied, overwriting the file in that slot. 7 When the confirmation message appears, press SET. NOTES • You cannot copy a custom picture file to a slot that is protected. Photo Numbering Photos are automatically assigned consecutive numbers from 0101 to 9900, and stored on the SD card in folders containing up to 100 photos. Folders are numbered from 101 to 998. You can select the photo numbering method to be used. The photo number indicates the name and location of the file on the SD card. For example, a photo numbered 101-0107 is located in the "DCIM\101CANON" folder as the file "IMG_0107.jpg". Operating modes: 1 Open the [Photo Numbering] submenu. [J Other Functions] [Photo Numbering] 2 Select the desired option and the press SET. Options [Reset]: [Continu.]: Photo numbers will restart from 101-0101 every time you insert a new SD card. If an SD card already contains photos, photo numbers will continue from the number following that of the last photo on the SD card. Photo numbers will continue from the number following that of the last photo recorded with the camcorder. [J Other Functions] [Photo Numbering] [Continu.] 167
-
 1
1 -
2
-
3
-
4
-
5
-
6
-
7
-
8
-
9
-
10
-
11
-
12
-
13
-
14
-
15
-
16
-
17
-
18
-
19
-
20
-
21
-
22
-
23
-
24
-
25
-
26
-
27
-
28
-
29
-
30
-
31
-
32
-
33
-
34
-
35
-
36
-
37
-
38
-
39
-
40
-
41
-
42
-
43
-
44
-
45
-
46
-
47
-
48
-
49
-
50
-
51
-
52
-
53
-
54
-
55
-
56
-
57
-
58
-
59
-
60
-
61
-
62
-
63
-
64
-
65
-
66
-
67
-
68
-
69
-
70
-
71
-
72
-
73
-
74
-
75
-
76
-
77
-
78
-
79
-
80
-
81
-
82
-
83
-
84
-
85
-
86
-
87
-
88
-
89
-
90
-
91
-
92
-
93
-
94
-
95
-
96
-
97
-
98
-
99
-
100
-
101
-
102
-
103
-
104
-
105
-
106
-
107
-
108
-
109
-
110
-
111
-
112
-
113
-
114
-
115
-
116
-
117
-
118
-
119
-
120
-
121
-
122
-
123
-
124
-
125
-
126
-
127
-
128
-
129
-
130
-
131
-
132
-
133
-
134
-
135
-
136
-
137
-
138
-
139
-
140
-
141
-
142
-
143
-
144
-
145
-
146
-
147
-
148
-
149
-
150
-
151
-
152
-
153
-
154
-
155
-
156
-
157
-
158
-
159
-
160
-
161
-
 162
162 -
 163
163 -
 164
164 -
 165
165 -
 166
166 -
 167
167 -
 168
168 -
 169
169 -
 170
170 -
 171
171 -
 172
172 -
173
-
174
-
175
-
176
-
177
-
178
-
179
-
180
-
181
-
182
-
183
-
184
-
185
-
186
-
187
-
188
-
189
-
190
-
191
-
192
-
193
-
194
-
195
-
196
-
197
-
198
-
199
-
200
-
201
-
202
-
203
-
204
-
205
-
206
-
207
-
208
-
209
-
210
-
211
 |
 |
