Canon CanoScan FB 630U Macintosh User Guide
Canon CanoScan FB 630U Manual
 |
View all Canon CanoScan FB 630U manuals
Add to My Manuals
Save this manual to your list of manuals |
Canon CanoScan FB 630U manual content summary:
- Canon CanoScan FB 630U | Macintosh User Guide - Page 1
CanoScan Toolbox CS User's Guide for Macintosh - Canon CanoScan FB 630U | Macintosh User Guide - Page 2
Trademark CanoScan is a trademark of Canon, Inc. Macintosh is a registered trademark of Apple Computer, Inc. Adobe Photoshop is a registered trademark of Adobe Systems, Inc. All other names are trademarks of their respective companies. Copyright Copyright (c) Canon, Inc., 1999 This manual is - Canon CanoScan FB 630U | Macintosh User Guide - Page 3
Table of Contents 1 Introduction ...4 About the CanoScan Toolbox ...4 System Requirements...4 Canon Customer Care Center ...5 2 The CanoScan Toolbox Main Window 6 3 Using the Scanner Button 6 4 Scanning ...7 5 Saving Scanned Images 7 6 Opening Files ...8 Opening a Stored File ...8 Opening a New - Canon CanoScan FB 630U | Macintosh User Guide - Page 4
create high-quality images from your desktop. In addition to the CanoScan Toolbox application, the Canon PI CS-S plug-in application is also included on the CanoScan Software Solutions CD-ROM. It provides an interface to the scanner. The Canon PI CSS plug-in launches when you click the Scan button - Canon CanoScan FB 630U | Macintosh User Guide - Page 5
Customer Care Center Canon Computer Systems, Inc. offers a full range of technical support options* including: • 24-hour, 7-day-a-week, toll-free automated support for troubleshooting issues on most current products 1-800-423-2366) • Speak to a technician free of service charge (currently Monday - Canon CanoScan FB 630U | Macintosh User Guide - Page 6
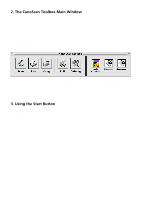
on the desktop. You can show or hide the Main window by using the CanoScan Tools command from the Window menu. The CanoScan Toolbox Main window contains buttons you use to control the CanoScan Toolbox features. Click the Scan button to launch the Canon PI CS-S plug-in Click the Copy button to scan - Canon CanoScan FB 630U | Macintosh User Guide - Page 7
the software is installed you are ready to scan. The scanning process is very simple. To scan a document: 1. Place the photo or document on the scanner as indicated in the scanner documentation. 2. Press the Start Button to launch CanoScan Toolbox CS. 3. Click on the Scan button from the Main window - Canon CanoScan FB 630U | Macintosh User Guide - Page 8
files that you have scanned as well as other image files using the CanoScan Toolbox. To open a stored file: 1. Choose the Open Image command from the File menu, or click the Edit button in the CanoScan Toolbox Main window. The Open Image dialog box appears. 2. Select the desired file and click the - Canon CanoScan FB 630U | Macintosh User Guide - Page 9
. Scanning and Faxing a Document To scan and fax a document: 1. Place the document you want to fax in the scanner. 2. Click on the Fax button from the CanoScan Toolbox Main window. 3. The document is scanned. The selected fax driver launches the fax application so you can fax the scanned document - Canon CanoScan FB 630U | Macintosh User Guide - Page 10
Photograph button to copy photos. Click OK. Copying a Document To copy documents using your scanner and printer: 1. Place the image you want to copy in the scanner. 2. Click the Copy button in the CanoScan Toolbox Main window. The Print Job dialog box opens. 3. Enter the number of copies you want to - Canon CanoScan FB 630U | Macintosh User Guide - Page 11
can also control the palette display by using the Show/Hide Tools command from the CanoScan Toolbox Main window. To use an editing tool, click on the desired tool and then move your cursor over the image window. Notice that the cursor changes shape to reflect the tool you have selected. The image - Canon CanoScan FB 630U | Macintosh User Guide - Page 12
an image: 1. Open the image you want to crop by choosing Open Image from the File menu, or click the Scan button from the CanoScan Toolbox Main window. 2. Select either the Rectangle Select tool (to select regular shapes) or the Lasso tool (to select irregu- lar shapes) from the editing toolbox and - Canon CanoScan FB 630U | Macintosh User Guide - Page 13
to adjust using the Open Image command from the File menu, or scan a new image by clicking on the Scan button from the CanoScan Toolbox Main window. 2. Choose Brightness/Contrast from the Image menu. The Brightness/Contrast dialog box displays. 3. Adjust the settings by moving the slider to the left - Canon CanoScan FB 630U | Macintosh User Guide - Page 14
you want to sharpen using the Open Image command from the File menu, or scan a new image by clicking on the Scan button from the CanoScan Toolbox Main window. 2. Click and hold the Sharpen command from the Image menu. Choose A Little from the Sharpen submenu for a slight change, or choose A Lot for - Canon CanoScan FB 630U | Macintosh User Guide - Page 15
indicates sharpening farther away. 5. Enter a number in the Threshold field to specify the level at which pixels are sharpened. 6. Click OK to sharpen the image. CanoScan Toolbox for the Macintosh, 1.0 15 - Canon CanoScan FB 630U | Macintosh User Guide - Page 16
want to resize using the Open Image command from the File menu, or scan a new image by clicking on the Scan button from the CanoScan Toolbox Main window. 2. Choose Resize from the Image menu. 3. Choose the unit type (pixels, inches or centimeters). 4. Type the desired size in the New Size section of - Canon CanoScan FB 630U | Macintosh User Guide - Page 17
want to change using the Open Image command from the File menu, or scan a new image by clicking on the Scan button from the CanoScan Toolbox Main window. 2. Choose the Image Depth command from the Image menu. Select one of the following image depth options from the Image Depth submenu: Millions of - Canon CanoScan FB 630U | Macintosh User Guide - Page 18
enhancement effects that you can use to modify images. You add effects to the CanoScan Toolbox using plug-in applications. These applications are available from a wide-range of software manufacturers. For information about installing the plug-in and using the effects with images, refer to the plug - Canon CanoScan FB 630U | Macintosh User Guide - Page 19
color pallet appears when you open an image. You can also control the palette display by using the Show/Hide Tools command from the CanoScan Toolbox Main window. The color pallet displays all the colors that are contained in the open image. To select a color from the color pallet to use with - Canon CanoScan FB 630U | Macintosh User Guide - Page 20
. Working with Catalogs Creating a Catalog CanoScan Toolbox catalogs are designed to let you Archive dialog box appears. 2. Select the desired catalog from the list box. 3. The selected catalog window opens displaying the images you have stored in the catalog in thumbnail form. 4. Choose the View By - Canon CanoScan FB 630U | Macintosh User Guide - Page 21
photographic contact sheet. To print a catalog view: 1. Open the desired catalog window. 2. Choose the Print Catalog View command from the File menu. 3. Specify open the Image window. The Editing toolbox, Brush Size pallet and Color Pallet windows open. CanoScan Toolbox for the Macintosh, 1.0 21 - Canon CanoScan FB 630U | Macintosh User Guide - Page 22
You can link frequently used applications such as Optical Character Recognition (OCR), desktop publishing, and Email applications to the CanoScan Toolbox Main window so you can access them from the CanoScan Toolbox application. To link an application: 1. Click on one of the Unassigned buttons in the
-
 1
1 -
 2
2 -
 3
3 -
 4
4 -
 5
5 -
 6
6 -
 7
7 -
8
-
9
-
10
-
11
-
12
-
13
-
14
-
15
-
16
-
17
-
18
-
19
-
20
-
21
-
22
 |
 |

User’s Guide
for Macintosh
CanoScan Toolbox CS