Canon CanoScan LiDE 600F Quick Start Guide Instructions - Page 6
Using the Scanner Buttons - software
 |
View all Canon CanoScan LiDE 600F manuals
Add to My Manuals
Save this manual to your list of manuals |
Page 6 highlights
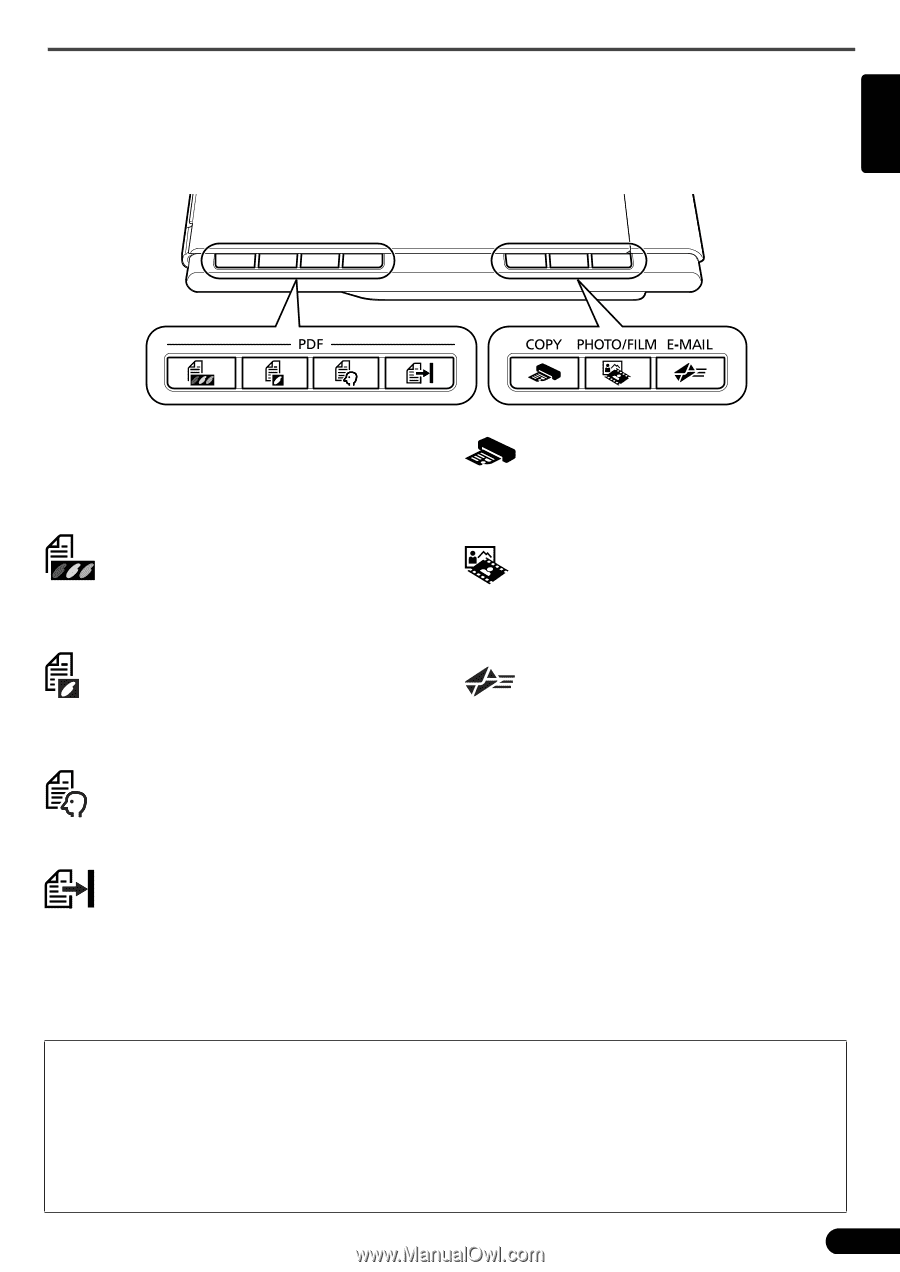
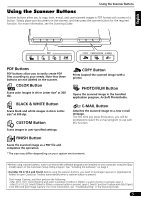
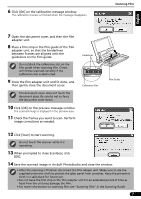
English Using the Scanner Buttons Using the Scanner Buttons Scanner buttons allow you to copy, scan, e-mail, and save scanned images in PDF format with a press of a button. Simply place your document on the scanner, and then press the scanner button for the required function. For more information, see the Scanning Guide. PDF Buttons PDF buttons allow you to easily create PDF files according to your needs. Note that these buttons are not labeled on the scanner. COLOR Button Scans color images in A4 or Letter size* at 300 dpi. BLACK & WHITE Button Scans black and white images in A4 or Letter size* at 300 dpi. CUSTOM Button Scans images in user-specified settings. COPY Button Prints (copies) the scanned image with a printer. PHOTO/FILM Button Opens the scanned image in the bundled application program, ArcSoft PhotoStudio. E-MAIL Button Attaches the scanned image to a new e-mail message. The first time you press this button, you will be prompted to select the e-mail program to use with this function. FINISH Button Saves the scanned image as a PDF file and completes the operation. *The size may differ depending on your system environment. • Before using scanner buttons, make sure that all the software programs are installed on your computer using the [Easy Install] option of the CanoScan Setup Utility program. See "Installing the Software" on page 2. • For Mac OS X 10.3 and 10.2.8: Before using the scanner buttons, you need to set Image Capture (in [Applications] folder) to open CanoScan Toolbox automatically when a scanner button is pressed. Start Image Capture, and then perform the following: - Mac OS X 10.3: Click [Options] and select CanoScan Toolbox in [When a scanner button is pressed, open:]. - Mac OS X 10.2.8: Select [Other] in [When a scanner button is pressed, open:]. Select CanoScan Toolbox and click [Open]. Click [OK] and quit Image Capture. For more information, see "Troubleshooting" in the Scanning Guide. 5
-
 1
1 -
 2
2 -
 3
3 -
 4
4 -
 5
5 -
 6
6 -
 7
7 -
 8
8 -
 9
9 -
 10
10 -
 11
11 -
 12
12 -
13
-
14
-
15
-
16
-
17
-
18
-
19
-
20
-
21
-
22
-
23
-
24
-
25
-
26
-
27
-
28
-
29
-
30
-
31
-
32
-
33
-
34
-
35
-
36
-
37
-
38
-
39
-
40
-
41
-
42
-
43
-
44
-
45
-
46
-
47
-
48
-
49
-
50
-
51
-
52
-
53
-
54
-
55
-
56
-
57
-
58
-
59
-
60
-
61
-
62
-
63
-
64
-
65
-
66
-
67
-
68
-
69
-
70
-
71
-
72
-
73
 |
 |