Canon CanoScan LiDE 600F Quick Start Guide Instructions - Page 8
English - color image scanner
 |
View all Canon CanoScan LiDE 600F manuals
Add to My Manuals
Save this manual to your list of manuals |
Page 8 highlights
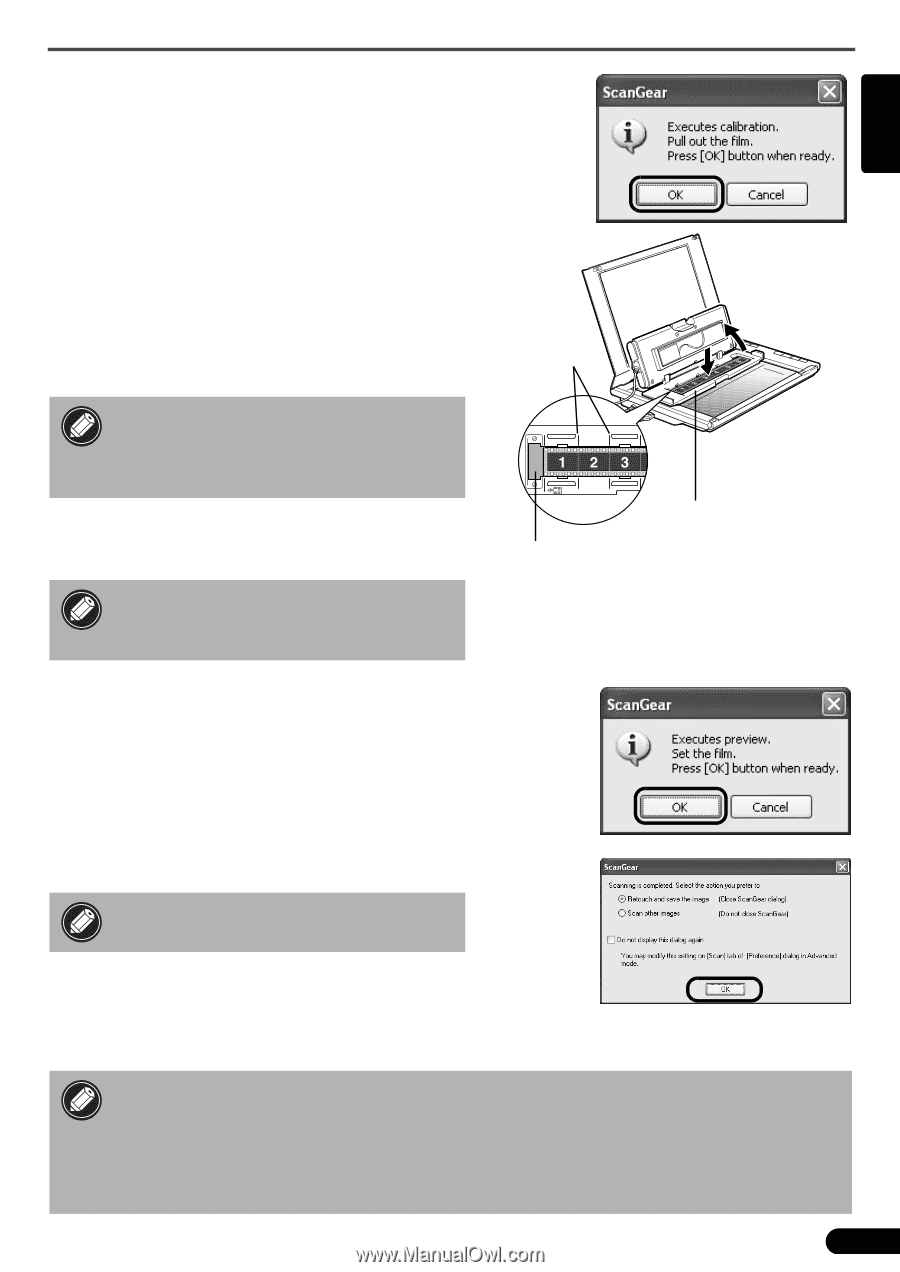
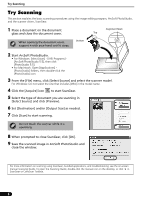
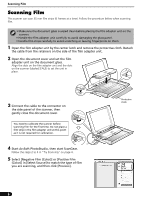
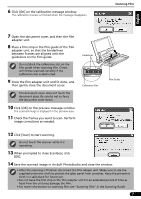
6 Click [OK] on the calibration message window. The calibration process is finished when the message disappears. Scanning Film English 7 Open the document cover, and then the film adapter unit. 8 Place a film strip in the film guide of the film adapter unit, so that the borderlines between frames are aligned with the guidelines on the film guide. Do not block the calibration slot on the film guide when scanning film. Colors will not be scanned correctly if the calibration slot is obstructed. 9 Close the film adapter unit until it clicks, and then gently close the document cover. The document cover does not touch the document glass. Be careful not to force the document cover down. 10 Click [OK] on the preview message window. The scanned image is displayed in the preview area. 11 Check the frames you want to scan. Perform image corrections as needed. Guidelines Calibration Slot Film Guide 12 Click [Scan] to start scanning. Do not touch the scanner while it is operating. 13 When prompted to close ScanGear, click [OK]. 14 Save the scanned image in ArcSoft PhotoStudio and close the window. • After the scanning is finished, disconnect the film adaper unit. Make sure to use the supplied protective cloth to protect the glass panel from scratches. Keep the protective cloth in a safe place for future use. • Do not leave the film strip in the film adapter unit for an extended period of time as heat from the unit may damage the film. • For more information on scanning film, see "Scanning Film" in the Scanning Guide. 7
-
 1
1 -
2
-
 3
3 -
 4
4 -
 5
5 -
 6
6 -
 7
7 -
 8
8 -
 9
9 -
 10
10 -
 11
11 -
 12
12 -
 13
13 -
14
-
15
-
16
-
17
-
18
-
19
-
20
-
21
-
22
-
23
-
24
-
25
-
26
-
27
-
28
-
29
-
30
-
31
-
32
-
33
-
34
-
35
-
36
-
37
-
38
-
39
-
40
-
41
-
42
-
43
-
44
-
45
-
46
-
47
-
48
-
49
-
50
-
51
-
52
-
53
-
54
-
55
-
56
-
57
-
58
-
59
-
60
-
61
-
62
-
63
-
64
-
65
-
66
-
67
-
68
-
69
-
70
-
71
-
72
-
73
 |
 |