Canon EOS 70D Basic User Manual - Page 156
Installing the Software
 |
View all Canon EOS 70D manuals
Add to My Manuals
Save this manual to your list of manuals |
Page 156 highlights
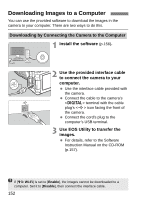
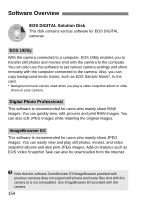
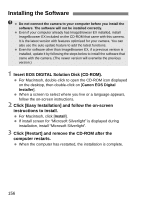
Installing the Software Do not connect the camera to your computer before you install the software. The software will not be installed correctly. Even if your computer already has ImageBrowser EX installed, install ImageBrowser EX included on the CD-ROM that came with this camera. It is the latest version with features optimized for your camera. You can also use the auto update feature to add the latest functions. Even for software other than ImageBrowser EX, if a previous version is installed, update it by following the steps below to install the software that came with the camera. (The newer version will overwrite the previous version.) 1 Insert EOS DIGITAL Solution Disk (CD-ROM). For Macintosh, double-click to open the CD-ROM icon displayed on the desktop, then double-click on [Canon EOS Digital Installer]. When a screen to select where you live or a language appears, follow the on-screen instructions. 2 Click [Easy Installation] and follow the on-screen instructions to install. For Macintosh, click [Install]. If install screen for "Microsoft Silverlight" is displayed during installation, install "Microsoft Silverlight". 3 Click [Restart] and remove the CD-ROM after the computer restarts. When the computer has restarted, the installation is complete. 156
-
 1
1 -
2
-
3
-
4
-
5
-
6
-
7
-
8
-
9
-
10
-
11
-
12
-
13
-
14
-
15
-
16
-
17
-
18
-
19
-
20
-
21
-
22
-
23
-
24
-
25
-
26
-
27
-
28
-
29
-
30
-
31
-
32
-
33
-
34
-
35
-
36
-
37
-
38
-
39
-
40
-
41
-
42
-
43
-
44
-
45
-
46
-
47
-
48
-
49
-
50
-
51
-
52
-
53
-
54
-
55
-
56
-
57
-
58
-
59
-
60
-
61
-
62
-
63
-
64
-
65
-
66
-
67
-
68
-
69
-
70
-
71
-
72
-
73
-
74
-
75
-
76
-
77
-
78
-
79
-
80
-
81
-
82
-
83
-
84
-
85
-
86
-
87
-
88
-
89
-
90
-
91
-
92
-
93
-
94
-
95
-
96
-
97
-
98
-
99
-
100
-
101
-
102
-
103
-
104
-
105
-
106
-
107
-
108
-
109
-
110
-
111
-
112
-
113
-
114
-
115
-
116
-
117
-
118
-
119
-
120
-
121
-
122
-
123
-
124
-
125
-
126
-
127
-
128
-
129
-
130
-
131
-
132
-
133
-
134
-
135
-
136
-
137
-
138
-
139
-
140
-
141
-
142
-
143
-
144
-
145
-
146
-
147
-
148
-
149
-
150
-
 151
151 -
 152
152 -
 153
153 -
 154
154 -
 155
155 -
 156
156 -
 157
157 -
 158
158 -
 159
159 -
 160
160 -
 161
161 -
162
-
163
-
164
 |
 |