Canon EOS 70D Basic User Manual - Page 49
Display the menu screen., Select a tab., Select the desired item., Select the setting., Adjust
 |
View all Canon EOS 70D manuals
Add to My Manuals
Save this manual to your list of manuals |
Page 49 highlights
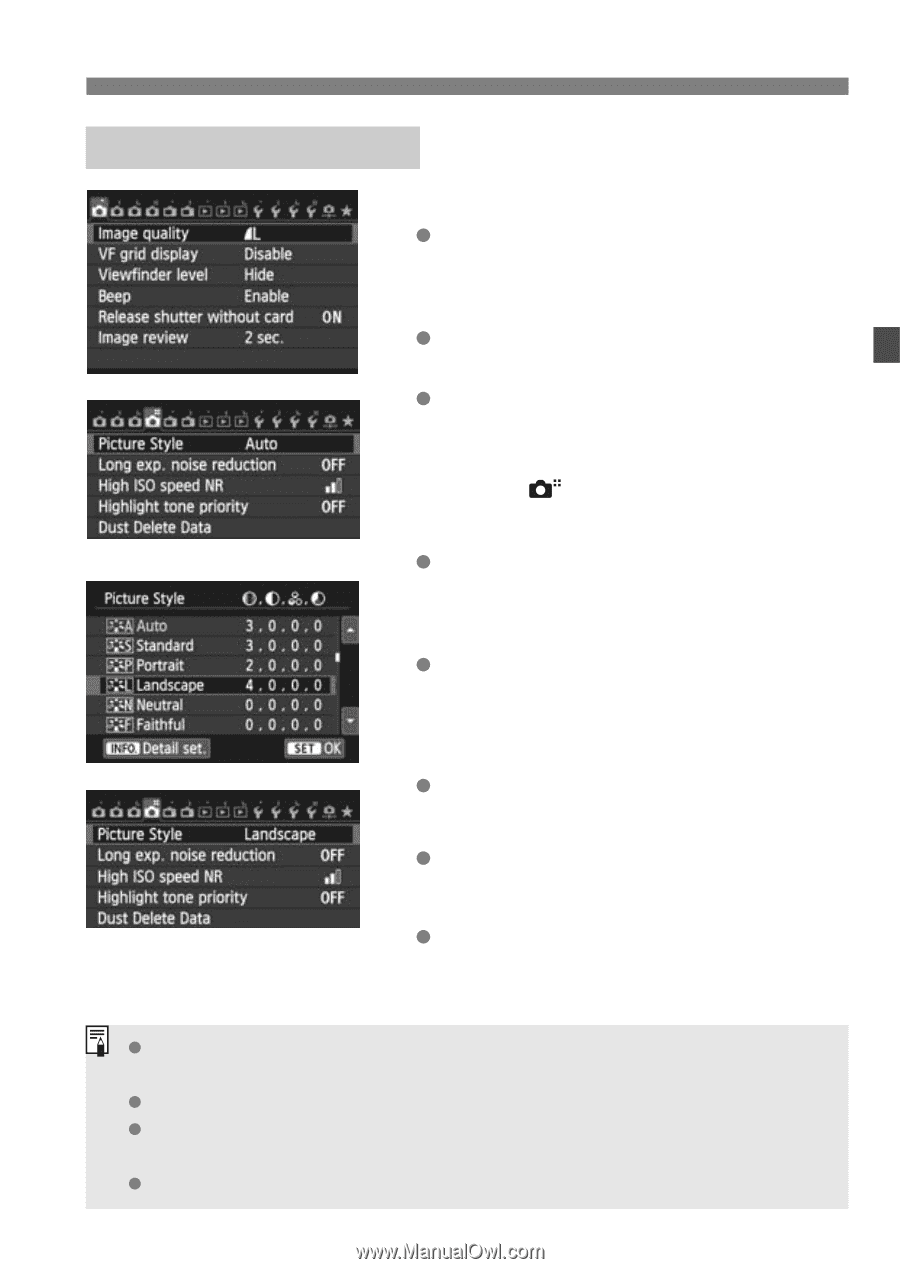
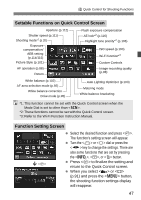
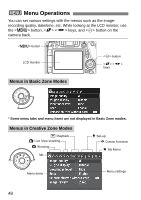
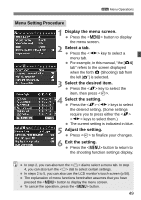
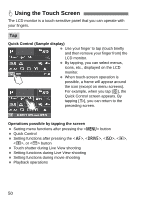
3 Menu Operations Menu Setting Procedure 1 Display the menu screen. Press the button to display the menu screen. 2 Select a tab. Press the key to select a menu tab. For example, in this manual, "the [z4] tab" refers to the screen displayed when the forth z (Shooting) tab from the left [ ] is selected. 3 Select the desired item. Press the key to select the item, then press . 4 Select the setting. Press the keys to select the desired setting. (Some settings require you to press either the keys to select them.) The current setting is indicated in blue. 5 Adjust the setting. Press to finalize your changes. 6 Exit the setting. Press the button to return to the shooting function settings display. In step 2, you can also turn the dial to select a menu tab. In step 4, you can also turn the dial to select certain settings. In steps 2 to 5, you can also use the LCD monitor's touch screen (p.50). The explanation of menu functions hereinafter assumes that you have pressed the button to display the menu screen. To cancel the operation, press the button. 49
-
 1
1 -
2
-
3
-
4
-
5
-
6
-
7
-
8
-
9
-
10
-
11
-
12
-
13
-
14
-
15
-
16
-
17
-
18
-
19
-
20
-
21
-
22
-
23
-
24
-
25
-
26
-
27
-
28
-
29
-
30
-
31
-
32
-
33
-
34
-
35
-
36
-
37
-
38
-
39
-
40
-
41
-
42
-
43
-
 44
44 -
 45
45 -
 46
46 -
 47
47 -
 48
48 -
 49
49 -
 50
50 -
 51
51 -
 52
52 -
 53
53 -
 54
54 -
55
-
56
-
57
-
58
-
59
-
60
-
61
-
62
-
63
-
64
-
65
-
66
-
67
-
68
-
69
-
70
-
71
-
72
-
73
-
74
-
75
-
76
-
77
-
78
-
79
-
80
-
81
-
82
-
83
-
84
-
85
-
86
-
87
-
88
-
89
-
90
-
91
-
92
-
93
-
94
-
95
-
96
-
97
-
98
-
99
-
100
-
101
-
102
-
103
-
104
-
105
-
106
-
107
-
108
-
109
-
110
-
111
-
112
-
113
-
114
-
115
-
116
-
117
-
118
-
119
-
120
-
121
-
122
-
123
-
124
-
125
-
126
-
127
-
128
-
129
-
130
-
131
-
132
-
133
-
134
-
135
-
136
-
137
-
138
-
139
-
140
-
141
-
142
-
143
-
144
-
145
-
146
-
147
-
148
-
149
-
150
-
151
-
152
-
153
-
154
-
155
-
156
-
157
-
158
-
159
-
160
-
161
-
162
-
163
-
164
 |
 |