Canon PIXMA MG6320 User Guide - Page 116
My Art, Use Scanned Image, Scan via ScanGear, Auto Scan
 |
View all Canon PIXMA MG6320 manuals
Add to My Manuals
Save this manual to your list of manuals |
Page 116 highlights
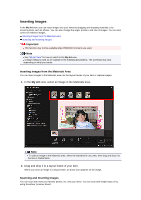
1. Place the item on the platen or ADF (Auto Document Feeder). Note See "Placing Items (When Scanning from a Computer)" for your model from Home of the Online Manual for how to place items. 2. In the Edit area of the My Art view, right-click an image, a layout frame, or the background, then select Use Scanned Image from the displayed menu. Note To insert a scanned image into the background, place a checkmark beside Photo in the Select Background dialog box. 3. From the Use Scanned Image menu, click Scan via ScanGear or Auto Scan. When Scan via ScanGear is selected The ScanGear screen appears. You can scan in the mode you want to use. Refer to "Scanning with Advanced Settings Using ScanGear (Scanner Driver)" for your model from Home of the Online Manual for details. When Auto Scan is selected Scanning starts. Items are detected automatically. Note To specify the scan/save settings, click Scan Settings... from the Use Scanned Image menu. Refer to "Settings (ScanGear) Dialog Box" or "Settings (Auto Scan) Dialog Box" for your model from Home of the Online Manual for details.
-
 1
1 -
2
-
3
-
4
-
5
-
6
-
7
-
8
-
9
-
10
-
11
-
12
-
13
-
14
-
15
-
16
-
17
-
18
-
19
-
20
-
21
-
22
-
23
-
24
-
25
-
26
-
27
-
28
-
29
-
30
-
31
-
32
-
33
-
34
-
35
-
36
-
37
-
38
-
39
-
40
-
41
-
42
-
43
-
44
-
45
-
46
-
47
-
48
-
49
-
50
-
51
-
52
-
53
-
54
-
55
-
56
-
57
-
58
-
59
-
60
-
61
-
62
-
63
-
64
-
65
-
66
-
67
-
68
-
69
-
70
-
71
-
72
-
73
-
74
-
75
-
76
-
77
-
78
-
79
-
80
-
81
-
82
-
83
-
84
-
85
-
86
-
87
-
88
-
89
-
90
-
91
-
92
-
93
-
94
-
95
-
96
-
97
-
98
-
99
-
100
-
101
-
102
-
103
-
104
-
105
-
106
-
107
-
108
-
109
-
110
-
 111
111 -
 112
112 -
 113
113 -
 114
114 -
 115
115 -
 116
116 -
 117
117 -
 118
118 -
 119
119 -
 120
120 -
 121
121 -
122
-
123
-
124
-
125
-
126
-
127
-
128
-
129
-
130
-
131
-
132
-
133
-
134
-
135
-
136
-
137
-
138
-
139
-
140
-
141
-
142
-
143
-
144
-
145
-
146
-
147
-
148
-
149
-
150
-
151
-
152
-
153
-
154
-
155
-
156
-
157
-
158
-
159
-
160
-
161
-
162
-
163
-
164
-
165
-
166
-
167
-
168
-
169
-
170
-
171
-
172
-
173
-
174
-
175
-
176
-
177
-
178
-
179
-
180
-
181
-
182
-
183
-
184
-
185
-
186
-
187
-
188
-
189
-
190
-
191
-
192
-
193
-
194
-
195
-
196
-
197
-
198
-
199
-
200
-
201
-
202
-
203
-
204
-
205
-
206
-
207
-
208
-
209
-
210
-
211
-
212
-
213
-
214
-
215
-
216
-
217
-
218
-
219
-
220
-
221
-
222
-
223
-
224
-
225
-
226
-
227
-
228
-
229
-
230
-
231
-
232
-
233
-
234
-
235
-
236
-
237
-
238
-
239
-
240
-
241
-
242
-
243
-
244
-
245
-
246
-
247
-
248
-
249
-
250
-
251
-
252
-
253
-
254
-
255
-
256
-
257
-
258
-
259
-
260
-
261
-
262
-
263
-
264
-
265
-
266
-
267
-
268
-
269
 |
 |
