Canon PIXMA MG6320 User Guide - Page 210
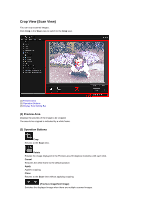
Scanned Image Thumbnails Area, Operation Buttons, Display Size Setting Bar
 |
View all Canon PIXMA MG6320 manuals
Add to My Manuals
Save this manual to your list of manuals |
Page 210 highlights
Refer to "Scanning Items Larger than the Platen (Image Stitch)" for your model from Home of the Online Manual for details. ScanGear Opens ScanGear (scanner driver) from which you can scan photos and documents with advanced settings. Click to start ScanGear. Refer to "Scanning with Advanced Settings Using ScanGear (Scanner Driver)" for your model from Home of the Online Manual for details. Settings You can make advanced scan settings. Click to start IJ Scan Utility. Refer to "Settings Dialog Box" for your model from Home of the Online Manual for details. (2) Scanned Image Thumbnails Area Displays the thumbnails and file names of the scanned images. (3) Operation Buttons Note (Previous File/Next File) appears only in the details view. Delete and Save appear only in the thumbnail view. Crop Switches to the Crop view in which you can crop scanned images. Crop View (Scan View) Rotate Rotates the scanned image 90 degrees clockwise with each click. Delete You can delete scanned images. Save Displays the Save dialog box from which you can save the scanned images. Save Dialog Box (Scan View) (Previous File/Next File) Switches the displayed image when there are multiple scanned images. (4) Display Size Setting Bar (Thumbnail View) Switches the view to the thumbnails of images. (Details View) Switches the view to preview the image. (Whole Image View) While in the details view, fits the preview to the area size. (Reduce/Enlarge)
-
 1
1 -
2
-
3
-
4
-
5
-
6
-
7
-
8
-
9
-
10
-
11
-
12
-
13
-
14
-
15
-
16
-
17
-
18
-
19
-
20
-
21
-
22
-
23
-
24
-
25
-
26
-
27
-
28
-
29
-
30
-
31
-
32
-
33
-
34
-
35
-
36
-
37
-
38
-
39
-
40
-
41
-
42
-
43
-
44
-
45
-
46
-
47
-
48
-
49
-
50
-
51
-
52
-
53
-
54
-
55
-
56
-
57
-
58
-
59
-
60
-
61
-
62
-
63
-
64
-
65
-
66
-
67
-
68
-
69
-
70
-
71
-
72
-
73
-
74
-
75
-
76
-
77
-
78
-
79
-
80
-
81
-
82
-
83
-
84
-
85
-
86
-
87
-
88
-
89
-
90
-
91
-
92
-
93
-
94
-
95
-
96
-
97
-
98
-
99
-
100
-
101
-
102
-
103
-
104
-
105
-
106
-
107
-
108
-
109
-
110
-
111
-
112
-
113
-
114
-
115
-
116
-
117
-
118
-
119
-
120
-
121
-
122
-
123
-
124
-
125
-
126
-
127
-
128
-
129
-
130
-
131
-
132
-
133
-
134
-
135
-
136
-
137
-
138
-
139
-
140
-
141
-
142
-
143
-
144
-
145
-
146
-
147
-
148
-
149
-
150
-
151
-
152
-
153
-
154
-
155
-
156
-
157
-
158
-
159
-
160
-
161
-
162
-
163
-
164
-
165
-
166
-
167
-
168
-
169
-
170
-
171
-
172
-
173
-
174
-
175
-
176
-
177
-
178
-
179
-
180
-
181
-
182
-
183
-
184
-
185
-
186
-
187
-
188
-
189
-
190
-
191
-
192
-
193
-
194
-
195
-
196
-
197
-
198
-
199
-
200
-
201
-
202
-
203
-
204
-
 205
205 -
 206
206 -
 207
207 -
 208
208 -
 209
209 -
 210
210 -
 211
211 -
 212
212 -
 213
213 -
 214
214 -
 215
215 -
216
-
217
-
218
-
219
-
220
-
221
-
222
-
223
-
224
-
225
-
226
-
227
-
228
-
229
-
230
-
231
-
232
-
233
-
234
-
235
-
236
-
237
-
238
-
239
-
240
-
241
-
242
-
243
-
244
-
245
-
246
-
247
-
248
-
249
-
250
-
251
-
252
-
253
-
254
-
255
-
256
-
257
-
258
-
259
-
260
-
261
-
262
-
263
-
264
-
265
-
266
-
267
-
268
-
269
 |
 |
