Canon PIXMA MX459 User Manual - Page 154
Changing the Settings in the Wired LAN Sheet
 |
View all Canon PIXMA MX459 manuals
Add to My Manuals
Save this manual to your list of manuals |
Page 154 highlights
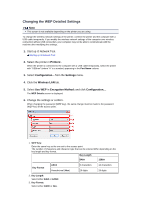
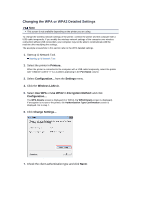
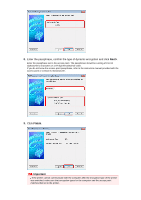
Changing the Settings in the Wired LAN Sheet Note This screen is not available depending on the printer you are using. Activate the wired LAN setting of the printer to change the settings in the Wired LAN sheet. 1. Start up IJ Network Tool. Starting up IJ Network Tool 2. Select the printer in Printers:. 3. Select Configuration... from the Settings menu. 4. Click the Wired LAN tab. The Wired LAN sheet is displayed. For details on the Wired LAN sheet, see Wired LAN Sheet. 5. Change the settings or confirm. Sets the IP address of the printer to be used over the LAN. Set a value appropriate for your network environment. 6. Click OK. After changing configuration, a screen is displayed asking you for confirmation before the settings are sent to the printer. If you click Yes, the settings are sent to the printer and the Transmitted Settings screen is displayed.
-
 1
1 -
2
-
3
-
4
-
5
-
6
-
7
-
8
-
9
-
10
-
11
-
12
-
13
-
14
-
15
-
16
-
17
-
18
-
19
-
20
-
21
-
22
-
23
-
24
-
25
-
26
-
27
-
28
-
29
-
30
-
31
-
32
-
33
-
34
-
35
-
36
-
37
-
38
-
39
-
40
-
41
-
42
-
43
-
44
-
45
-
46
-
47
-
48
-
49
-
50
-
51
-
52
-
53
-
54
-
55
-
56
-
57
-
58
-
59
-
60
-
61
-
62
-
63
-
64
-
65
-
66
-
67
-
68
-
69
-
70
-
71
-
72
-
73
-
74
-
75
-
76
-
77
-
78
-
79
-
80
-
81
-
82
-
83
-
84
-
85
-
86
-
87
-
88
-
89
-
90
-
91
-
92
-
93
-
94
-
95
-
96
-
97
-
98
-
99
-
100
-
101
-
102
-
103
-
104
-
105
-
106
-
107
-
108
-
109
-
110
-
111
-
112
-
113
-
114
-
115
-
116
-
117
-
118
-
119
-
120
-
121
-
122
-
123
-
124
-
125
-
126
-
127
-
128
-
129
-
130
-
131
-
132
-
133
-
134
-
135
-
136
-
137
-
138
-
139
-
140
-
141
-
142
-
143
-
144
-
145
-
146
-
147
-
148
-
 149
149 -
 150
150 -
 151
151 -
 152
152 -
 153
153 -
 154
154 -
 155
155 -
 156
156 -
 157
157 -
 158
158 -
 159
159 -
160
-
161
-
162
-
163
-
164
-
165
-
166
-
167
-
168
-
169
-
170
-
171
-
172
-
173
-
174
-
175
-
176
-
177
-
178
-
179
-
180
-
181
-
182
-
183
-
184
-
185
-
186
-
187
-
188
-
189
-
190
-
191
-
192
-
193
-
194
-
195
-
196
-
197
-
198
-
199
-
200
-
201
-
202
-
203
-
204
-
205
-
206
-
207
-
208
-
209
-
210
-
211
-
212
-
213
-
214
-
215
-
216
-
217
 |
 |
