Canon PIXMA iP1500 Service Manual - Page 7
Service Mode - manual
 |
View all Canon PIXMA iP1500 manuals
Add to My Manuals
Save this manual to your list of manuals |
Page 7 highlights
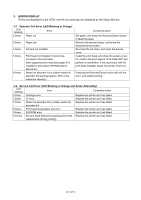
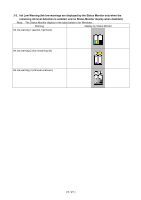
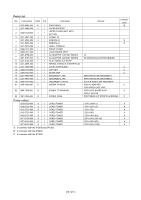
4. SERVICE MODE To conduct the following functions, a host computer (Windows 98 / ME / 2000 / XP), printer driver and service tool (QY9-0066) for the iP1500 are needed. Function Procedure Remarks Print head manual cleaning Select "Cleaning" from the printer driver's Maintenance. Cleaning time: Approx. 40 sec. Print head deep cleaning Select "Deep Cleaning" from the printer driver's Maintenance. Cleaning time: Approx. 70 sec. Paper feed roller cleaning 1. Remove the paper from the ASF. Cleaning time: Approx. 2 min. 2. Select "Roller Cleaning" from the printer driver's Maintenance. 3. Following the instruction from the Status Monitor, load 3 sheets of plain paper in the ASF, and feed them. Test printing 1) Nozzle check pattern printing Select "Nozzle Check" from the printer driver's Nozzle check pattern printing Maintenance. Print head alignment 1. Select "Print Head Alignment" from the printer driver's Significant misalignment can be Maintenance. adjusted. 2. Select the optimal value using the printed head position adjustment pattern. 2) Shipment pattern printing Refer to Shipment inspection pattern*1 below. - ROM version - Number of pages fed - Waste ink amount EEPROM reset Refer to EEPROM reset / Destination setting*3 below. (Reset of waste ink counter etc.) Destination setting Refer to EEPROM reset / Destination setting*3 below. EEPROM information check Refer to Shipment inspection pattern*1 below. Refer to Shipment inspection pattern sample*2 below. Host computer and service tool are required. Host computer and service tool are required. Host computer and service tool are required. Host computer and service tool are required. *1 Shipment inspection pattern printing a. Install the print head (QY6-0054-000), and press the Power button to turn on the printer. (The LED lights in green.) b. Load A4-sized paper. c. Connect the printer to the computer. Using the iP1500 service tool (QY9-0066), select "USB PORT." (See APPENDIX 2, ip1500 SERVICE TOOL.) d. Select "TEST PATTERN 1." The printer starts printing the shipment inspection pattern. *2 Shipment inspection pattern sample EEPROM contents can be confirmed from the shipment inspection pattern printout (top of the shipment inspection pattern). See APPENDIX 1, SHIPMENT INSPECTION PATTERN 1, for print sample. *3 EEPROM reset / Destination setting a. Install the print head (QY6-0054-000), and press the Power button to turn on the printer. (The LED lights in green.) b. Connect the printer to the computer. Using the iP1500 service tool (QY9-0066), select "USB PORT". (See APPENDIX 2, iP1500 SERVICE TOOL.) c. Destination can be set by clicking each model name in "SET DESTINATION." Confirm the model name by clicking "GET DEVICE ID" after setting change. (If incorrect, it can be changed before turning the unit OFF/ON.) When "EEPROM CLEAR" is checked, the EEPROM is reset after the shipment inspection pattern printing. ( 7 / 21 )
-
 1
1 -
 2
2 -
 3
3 -
 4
4 -
 5
5 -
 6
6 -
 7
7 -
 8
8 -
 9
9 -
 10
10 -
 11
11 -
 12
12 -
13
-
14
-
15
-
16
-
17
-
18
-
19
-
20
-
21
 |
 |