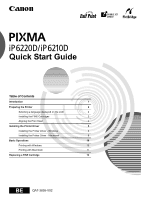
Canon PIXMA iP6220D iP6210D Quick Start Guide - Page 5
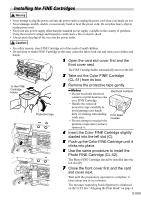
Installing the FINE Cartridges
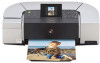 |
View all Canon PIXMA iP6220D manuals
Add to My Manuals
Save this manual to your list of manuals |
Page 5 highlights
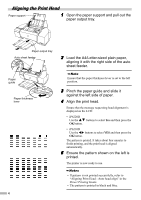
Installing the FINE Cartridges • Never attempt to plug the power cord into the power outlet or unplug the power cord when your hands are wet. • Never damage, modify, stretch, or excessively bend or twist the power cord. Do not place heavy objects on the power cord. • Never use any power supply other than the standard power supply available in the country of purchase. Using the incorrect voltage and frequency could cause a fire or electric shock. • Always push the plug all the way into the power outlet. • For safety reasons, store FINE Cartridge out of the reach of small children. • Do not drop or shake FINE Cartridge as this may cause the ink to leak out and stain your clothes and hands. 1 Open the card slot cover first and the front cover next. The FINE Cartridge holder automatically moves to the left. To the FINE Cartridge holder Protective tape 2 Take out the Color FINE Cartridge (CL-51) from its box. 3 Remove the protective tape gently. • Do not touch the electrical contacts or print head nozzles on a FINE Cartridge. • Handle the removed protective tape carefully to avoid getting your hands dirty or staining surrounding work area. • Do not attempt to reattach the protective tape once you have removed it. Electrical contacts Print head nozzles 4 Insert the Color FINE Cartridge slightly slanted into the left slot (C). 5 Push up the Color FINE Cartridge until it clicks into place. 6 Use the same procedure to install the Photo FINE Cartridge (CL-52). The Photo FINE Cartridge should be installed into the left slot (P). 7 Close the front cover first and the card slot cover next. Wait until the preparatory operation is complete; it takes about one to two minutes. The message requesting head alignment is displayed on the LCD. See "Aligning the Print Head" on page 4. 3
-
 1
1 -
 2
2 -
 3
3 -
 4
4 -
 5
5 -
 6
6 -
 7
7 -
 8
8 -
 9
9 -
 10
10 -
 11
11 -
12
-
13
-
14
-
15
-
16
 |
 |
