Canon PIXMA iP90 iP90 Quick Start Guide - Page 30
Printing Photographs Directly from a PictBridge Compliant Device - user manual
 |
View all Canon PIXMA iP90 manuals
Add to My Manuals
Save this manual to your list of manuals |
Page 30 highlights
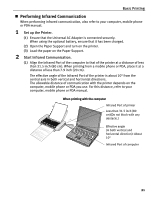
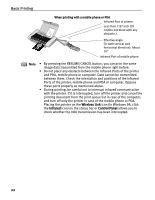
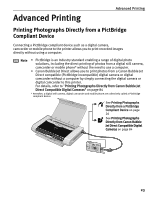
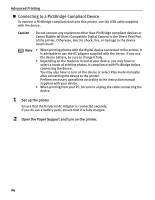
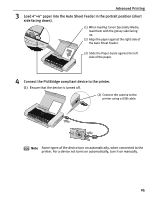
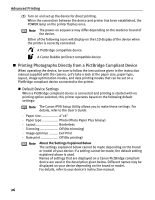
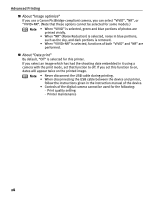
Advanced Printing (3) Turn on and set up the device for direct printing. When the connection between the device and printer has been established, the POWER lamp on the printer flashes once. Note The power-on sequence may differ depending on the model or brand of the device. Either of the following icons will display on the LCD display of the device when the printer is correctly connected. A PictBridge compatible device A Canon Bubble Jet Direct compatible device „ Printing Photographs Directly from a PictBridge Compliant Device When operating the device, be sure to follow the instructions given in the instruction manual supplied with the camera. Let's take a look at the paper size, paper type, layout, image optimization modes, and date printing modes that can be set on a PictBridge compliant device connected to the printer. „ Default Device Settings When a PictBridge compliant device is connected and printing is started with no printing option selected, this printer operates based on the following default settings: Note The Canon iP90 Setup Utility allows you to make these settings. For details, refer to the User's Guide. - Paper size 4"×6" - Paper type Photo (Photo Paper Plus Glossy) - Layout Borderless - Trimming Off (No trimming) - Image optimize .......... Exif Print - Date print Off (No printing) Note About the Settings Explained Below The settings explained below cannot be made depending on the brand or model of your device. If a setting cannot be made, the default setting explained above is used. Names of settings that are displayed on a Canon PictBridge compliant device are used in the description given below. Different names may be displayed on your device depending on the brand or model. For details, refer to your device's instruction manual. 26
-
 1
1 -
2
-
3
-
4
-
5
-
6
-
7
-
8
-
9
-
10
-
11
-
12
-
13
-
14
-
15
-
16
-
17
-
18
-
19
-
20
-
21
-
22
-
23
-
24
-
 25
25 -
 26
26 -
 27
27 -
 28
28 -
 29
29 -
 30
30 -
 31
31 -
 32
32 -
 33
33 -
 34
34 -
 35
35 -
36
-
37
-
38
-
39
-
40
-
41
-
42
-
43
-
44
-
45
-
46
-
47
-
48
-
49
-
50
-
51
-
52
-
53
-
54
-
55
-
56
-
57
-
58
-
59
-
60
-
61
-
62
-
63
-
64
-
65
-
66
-
67
-
68
-
69
-
70
-
71
-
72
-
73
-
74
-
75
-
76
-
77
-
78
-
79
-
80
-
81
-
82
-
83
-
84
-
85
-
86
-
87
-
88
-
89
-
90
-
91
-
92
-
93
-
94
-
95
-
96
-
97
-
98
-
99
-
100
-
101
-
102
-
103
-
104
-
105
-
106
-
107
-
108
 |
 |
