Canon PowerShot D20 User Guide - Page 48
Activate GPS., Shoot., Tips When, is Displayed - reviews
 |
View all Canon PowerShot D20 manuals
Add to My Manuals
Save this manual to your list of manuals |
Page 48 highlights
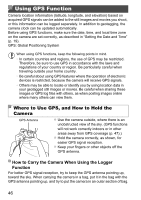
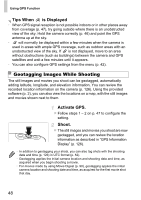
Using GPS Function Tips When is Displayed • When GPS signal reception is not possible indoors or in other places away from coverage (p. 47), try going outside where there is an unobstructed view of the sky. Hold the camera correctly (p. 46) and point the GPS antenna up at the sky. • will normally be displayed within a few minutes when the camera is used in areas with ample GPS coverage, such as outdoor areas with an unobstructed view of the sky. If is not displayed, move to an area without obstructions (such as buildings) between the camera and GPS satellites and wait a few minutes until it appears. • You can also configure GPS settings from the menu (p. 42). Geotagging Images While Shooting The still images and movies you shoot can be geotagged, automatically adding latitude, longitude, and elevation information. You can review the recorded location information on the camera (p. 126). Using the provided software (p. 2), you can also view the locations on a map, with the still images and movies shown next to them. Activate GPS. Follow steps 1 - 2 on p. 47 to configure the setting. Shoot. The still images and movies you shoot are now geotagged, and you can review the location information as described in "GPS Information Display" (p. 126). • In addition to geotagging your shots, you can also tag shots with the shooting date and time (p. 126) in UTC format (p. 52). • Geotagging applies the initial camera location and shooting date and time, as acquired when you begin shooting a movie. • For movies made by using Movie Digest (p. 90), geotagging applies the initial camera location and shooting date and time, as acquired for the first movie shot that day. 48
-
 1
1 -
2
-
3
-
4
-
5
-
6
-
7
-
8
-
9
-
10
-
11
-
12
-
13
-
14
-
15
-
16
-
17
-
18
-
19
-
20
-
21
-
22
-
23
-
24
-
25
-
26
-
27
-
28
-
29
-
30
-
31
-
32
-
33
-
34
-
35
-
36
-
37
-
38
-
39
-
40
-
41
-
42
-
 43
43 -
 44
44 -
 45
45 -
 46
46 -
 47
47 -
 48
48 -
 49
49 -
 50
50 -
 51
51 -
 52
52 -
 53
53 -
54
-
55
-
56
-
57
-
58
-
59
-
60
-
61
-
62
-
63
-
64
-
65
-
66
-
67
-
68
-
69
-
70
-
71
-
72
-
73
-
74
-
75
-
76
-
77
-
78
-
79
-
80
-
81
-
82
-
83
-
84
-
85
-
86
-
87
-
88
-
89
-
90
-
91
-
92
-
93
-
94
-
95
-
96
-
97
-
98
-
99
-
100
-
101
-
102
-
103
-
104
-
105
-
106
-
107
-
108
-
109
-
110
-
111
-
112
-
113
-
114
-
115
-
116
-
117
-
118
-
119
-
120
-
121
-
122
-
123
-
124
-
125
-
126
-
127
-
128
-
129
-
130
-
131
-
132
-
133
-
134
-
135
-
136
-
137
-
138
-
139
-
140
-
141
-
142
-
143
-
144
-
145
-
146
-
147
-
148
-
149
-
150
-
151
-
152
-
153
-
154
-
155
-
156
-
157
-
158
-
159
-
160
-
161
-
162
-
163
-
164
-
165
-
166
-
167
-
168
-
169
-
170
-
171
-
172
-
173
-
174
-
175
-
176
-
177
-
178
-
179
-
180
-
181
-
182
-
183
-
184
-
185
-
186
-
187
-
188
-
189
-
190
-
191
-
192
-
193
-
194
-
195
-
196
-
197
-
198
-
199
-
200
-
201
-
202
-
203
-
204
-
205
-
206
-
207
-
208
-
209
-
210
-
211
-
212
-
213
-
214
-
215
-
216
-
217
-
218
 |
 |