Canon PowerShot G3 X Digital Photo Professional Ver.4.2 for Macintosh Instruct - Page 44
Changing the Picture Style, Picture Style, Description
 |
View all Canon PowerShot G3 X manuals
Add to My Manuals
Save this manual to your list of manuals |
Page 44 highlights
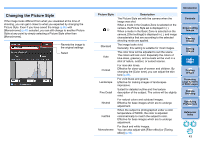
Changing the Picture Style If the image looks different from what you visualized at the time of shooting, you can get it closer to what you expected by changing the Picture Style. Even if you have saved the image (p.85) with [Monochrome] (p.49) selected, you can still change to another Picture Style at any point by simply selecting a Picture Style other than [Monochrome]. Reverts the image to the original settings Select Picture Style ( ) Standard Auto Portrait Landscape Fine Detail Neutral Faithful Monochrome Description The Picture Style set with the camera when the image was shot. When a mode in the Creative Zone is selected on the camera, the Picture Style set is displayed in ( ). When a mode in the Basic Zone is selected on the camera, [Shot settings] is displayed in ( ), and image characteristics that are according to the selected shooting mode are applied. The image looks vivid. Generally, this setting is suitable for most images. The color tone will be adjusted to suit the scene. The colors will look vivid. Especially the colors of blue skies, greenery, and sunsets will be vivid in a shot of nature, outdoor, or sunset scenes. For nice skin tones. Effective for close-ups of women and children. By changing the [Color tone], you can adjust the skin tone (p.49). For vivid blues and greens. Effective for making images of landscapes impressive. Suited for detailed outline and fine texture description of the subject. The colors will be slightly vivid. For natural colors and subdued images. Effective for base images which are to undergo adjustment. When the subject is photographed under a color temperature of 5200K, the color is adjusted colorimetrically to match the subject's color. Effective for base images which are to undergo adjustment. For black and white images. You can also adjust with [Filter effect] or [Toning effect] (p.49). Introduction Contents 1 Downloading Images 2Viewing Images 3Sorting Images 4Editing Images 5Printing Images 6 Processing Large Numbers of RAW Images 7Remote Shooting 8 Specifying Preferences Reference/ Index 43
-
 1
1 -
2
-
3
-
4
-
5
-
6
-
7
-
8
-
9
-
10
-
11
-
12
-
13
-
14
-
15
-
16
-
17
-
18
-
19
-
20
-
21
-
22
-
23
-
24
-
25
-
26
-
27
-
28
-
29
-
30
-
31
-
32
-
33
-
34
-
35
-
36
-
37
-
38
-
 39
39 -
 40
40 -
 41
41 -
 42
42 -
 43
43 -
 44
44 -
 45
45 -
 46
46 -
 47
47 -
 48
48 -
 49
49 -
50
-
51
-
52
-
53
-
54
-
55
-
56
-
57
-
58
-
59
-
60
-
61
-
62
-
63
-
64
-
65
-
66
-
67
-
68
-
69
-
70
-
71
-
72
-
73
-
74
-
75
-
76
-
77
-
78
-
79
-
80
-
81
-
82
-
83
-
84
-
85
-
86
-
87
-
88
-
89
-
90
-
91
-
92
-
93
-
94
-
95
-
96
-
97
-
98
-
99
-
100
-
101
-
102
-
103
-
104
-
105
-
106
-
107
-
108
-
109
-
110
-
111
-
112
-
113
-
114
-
115
-
116
-
117
-
118
-
119
-
120
-
121
-
122
-
123
-
124
-
125
-
126
-
127
-
128
-
129
-
130
-
131
-
132
-
133
-
134
-
135
-
136
-
137
 |
 |
