Canon VB-S805D Network Camera VB-S30D/VB-S31D/VB-S800D/VB-S805D/VB-S900F/VB-S9 - Page 168
the top cover., Turn off the camera.
 |
View all Canon VB-S805D manuals
Add to My Manuals
Save this manual to your list of manuals |
Page 168 highlights
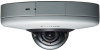
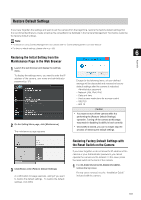
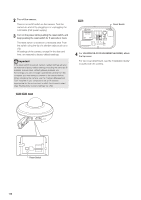
2 Turn off the camera. There is no on/off switch on the camera. Turn the camera on and off by plugging in or unplugging the LAN cable (PoE power supply). 3 Turn on the power while pushing the reset switch, and keep pushing the reset switch for 5 seconds or more. The reset switch is located in a recessed area. Push the switch using the tip of a slender object such as a clip. All settings of the camera, except for the date and time, are restored to factory default settings. Important If the reset switch is pushed, network-related settings will also be restored to factory default settings including the camera's IP address, subnet mask, default gateway address, etc. Accordingly, you can no longer operate the camera from the computer you were using to connect to the camera before. When initializing the camera, use the "Camera Management Tool" installed in your computer to set an IP address appropriate for the environment in which the camera is used (See "Making Initial Camera Settings" (p. 28)). Reset Switch 4 For VB-S30D/VB-S31D/VB-S800D/VB-S805D, attach the top cover. For top cover attachment, see the "Installation Guide" included with the camera. Reset Switch 168
-
 1
1 -
2
-
3
-
4
-
5
-
6
-
7
-
8
-
9
-
10
-
11
-
12
-
13
-
14
-
15
-
16
-
17
-
18
-
19
-
20
-
21
-
22
-
23
-
24
-
25
-
26
-
27
-
28
-
29
-
30
-
31
-
32
-
33
-
34
-
35
-
36
-
37
-
38
-
39
-
40
-
41
-
42
-
43
-
44
-
45
-
46
-
47
-
48
-
49
-
50
-
51
-
52
-
53
-
54
-
55
-
56
-
57
-
58
-
59
-
60
-
61
-
62
-
63
-
64
-
65
-
66
-
67
-
68
-
69
-
70
-
71
-
72
-
73
-
74
-
75
-
76
-
77
-
78
-
79
-
80
-
81
-
82
-
83
-
84
-
85
-
86
-
87
-
88
-
89
-
90
-
91
-
92
-
93
-
94
-
95
-
96
-
97
-
98
-
99
-
100
-
101
-
102
-
103
-
104
-
105
-
106
-
107
-
108
-
109
-
110
-
111
-
112
-
113
-
114
-
115
-
116
-
117
-
118
-
119
-
120
-
121
-
122
-
123
-
124
-
125
-
126
-
127
-
128
-
129
-
130
-
131
-
132
-
133
-
134
-
135
-
136
-
137
-
138
-
139
-
140
-
141
-
142
-
143
-
144
-
145
-
146
-
147
-
148
-
149
-
150
-
151
-
152
-
153
-
154
-
155
-
156
-
157
-
158
-
159
-
160
-
161
-
162
-
 163
163 -
 164
164 -
 165
165 -
 166
166 -
 167
167 -
 168
168 -
 169
169 -
 170
170 -
 171
171 -
 172
172 -
 173
173 -
174
-
175
-
176
-
177
-
178
-
179
-
180
-
181
-
182
-
183
-
184
-
185
 |
 |
