Canon ZR700 Digital Video Software (Windows) Ver.20 Instruction Manual - Page 22
Installing the Digital Video Software - digital camcorder
 |
UPC - 013803063691
View all Canon ZR700 manuals
Add to My Manuals
Save this manual to your list of manuals |
Page 22 highlights
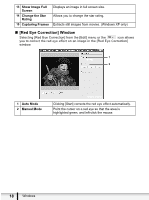
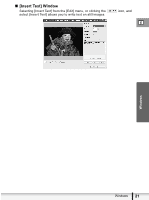
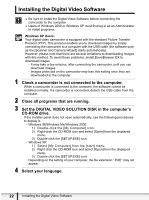
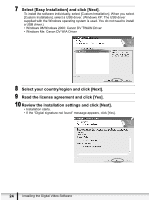
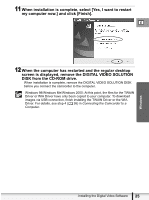
Installing the Digital Video Software Be sure to install the Digital Video Software before connecting the camcorder to the computer. Users of Windows 2000 or Windows XP must first log in as an Administrator to install programs. Windows XP Users: Your digital video camcorder is equipped with the standard Picture Transfer Protocol (PTP). This protocol enables you to download images by simply connecting the camcorder to a computer with the USB cable (the software such as the [Scanner and Camera Wizard] starts automatically). However, please note that there are several limitations to downloading images with this method. To avoid these problems, install ZoomBrowser EX to download images. - It may take a few minutes, after connecting the camcorder, until you can download images. - Images protected on the camcorder may lose this setting once they are downloaded to the computer. 1 Check a camcorder is not connected to the computer. While a camcorder is connected to the computer, the software cannot be installed normally. If a camcorder is connected, detach the USB cable from the computer. 2 Close all programs that are running. 3 Set the DIGITAL VIDEO SOLUTION DISK in the computer's CD-ROM drive. If the installer panel does not open automatically, use the following procedures to display it. - Windows 98/Windows Me/Windows 2000: 1) Double-click the [My Computer] icon. 2) Right-click the CD-ROM icon and select [Open] from the displayed menu. 3) Double-click the [SETUP.EXE] icon. - Windows XP: 1) Select [My Computer] from the [start] menu. 2) Right-click the CD-ROM icon and select [Open] from the displayed menu. 3) Double-click the [SETUP.EXE] icon. Depending on the setting of your computer, the file extension ".EXE" may not appear. 4 Select your language. 22 Installing the Digital Video Software
-
 1
1 -
2
-
3
-
4
-
5
-
6
-
7
-
8
-
9
-
10
-
11
-
12
-
13
-
14
-
15
-
16
-
 17
17 -
 18
18 -
 19
19 -
 20
20 -
 21
21 -
 22
22 -
 23
23 -
 24
24 -
 25
25 -
 26
26 -
 27
27 -
28
-
29
-
30
-
31
-
32
-
33
-
34
-
35
-
36
-
37
-
38
-
39
-
40
-
41
-
42
-
43
-
44
-
45
-
46
-
47
-
48
-
49
-
50
-
51
-
52
-
53
-
54
-
55
-
56
-
57
-
58
-
59
-
60
-
61
-
62
-
63
-
64
-
65
-
66
-
67
-
68
-
69
-
70
-
71
-
72
-
73
-
74
-
75
-
76
-
77
-
78
-
79
-
80
-
81
-
82
-
83
-
84
-
85
-
86
-
87
-
88
-
89
-
90
-
91
-
92
-
93
-
94
-
95
-
96
-
97
-
98
-
99
-
100
 |
 |