Canon imagePROGRAF W7200 Setup Guide - Page 104
Add icon Add Printer button., destination, click the name of the printer in the displayed list, then
 |
View all Canon imagePROGRAF W7200 manuals
Add to My Manuals
Save this manual to your list of manuals |
Page 104 highlights
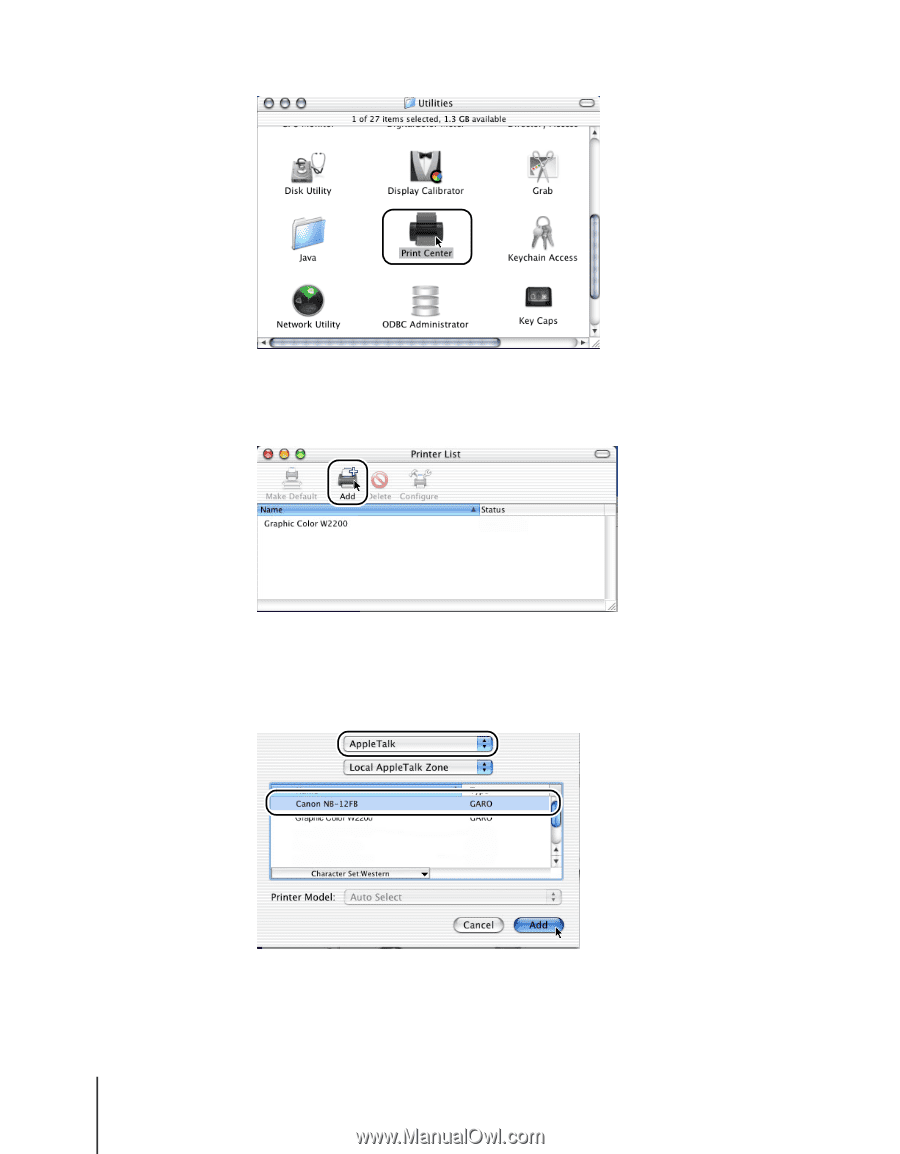
3 Open the Utilities menu folder and open the Print Center. 4 If the name of the printer is not displayed in the Printer List, click the Add icon (Add Printer button). 5 From the connection destination menu, select the printer connection destination, click the name of the printer in the displayed list, then click the Add button. If the printer is not displayed in the list, check the printer cable connection and make sure that it is secure. 3-34 Installing the Software
-
 1
1 -
2
-
3
-
4
-
5
-
6
-
7
-
8
-
9
-
10
-
11
-
12
-
13
-
14
-
15
-
16
-
17
-
18
-
19
-
20
-
21
-
22
-
23
-
24
-
25
-
26
-
27
-
28
-
29
-
30
-
31
-
32
-
33
-
34
-
35
-
36
-
37
-
38
-
39
-
40
-
41
-
42
-
43
-
44
-
45
-
46
-
47
-
48
-
49
-
50
-
51
-
52
-
53
-
54
-
55
-
56
-
57
-
58
-
59
-
60
-
61
-
62
-
63
-
64
-
65
-
66
-
67
-
68
-
69
-
70
-
71
-
72
-
73
-
74
-
75
-
76
-
77
-
78
-
79
-
80
-
81
-
82
-
83
-
84
-
85
-
86
-
87
-
88
-
89
-
90
-
91
-
92
-
93
-
94
-
95
-
96
-
97
-
98
-
 99
99 -
 100
100 -
 101
101 -
 102
102 -
 103
103 -
 104
104 -
 105
105 -
 106
106 -
 107
107 -
 108
108 -
 109
109 -
110
-
111
-
112
-
113
-
114
-
115
-
116
-
117
-
118
-
119
-
120
-
121
-
122
-
123
-
124
-
125
-
126
 |
 |
Installing the Software
3-34
3
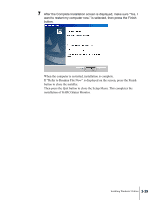
Open the Utilities menu folder and open the Print Center.
4
If the name of the printer is not displayed in the Printer List, click the
Add icon (Add Printer button).
5
From the connection destination menu, select the printer connection
destination, click the name of the printer in the displayed list, then
click the Add button.
If the printer is not displayed in the list, check the printer cable connection
and make sure that it is secure.