Canon imagePROGRAF W7200 Setup Guide - Page 27
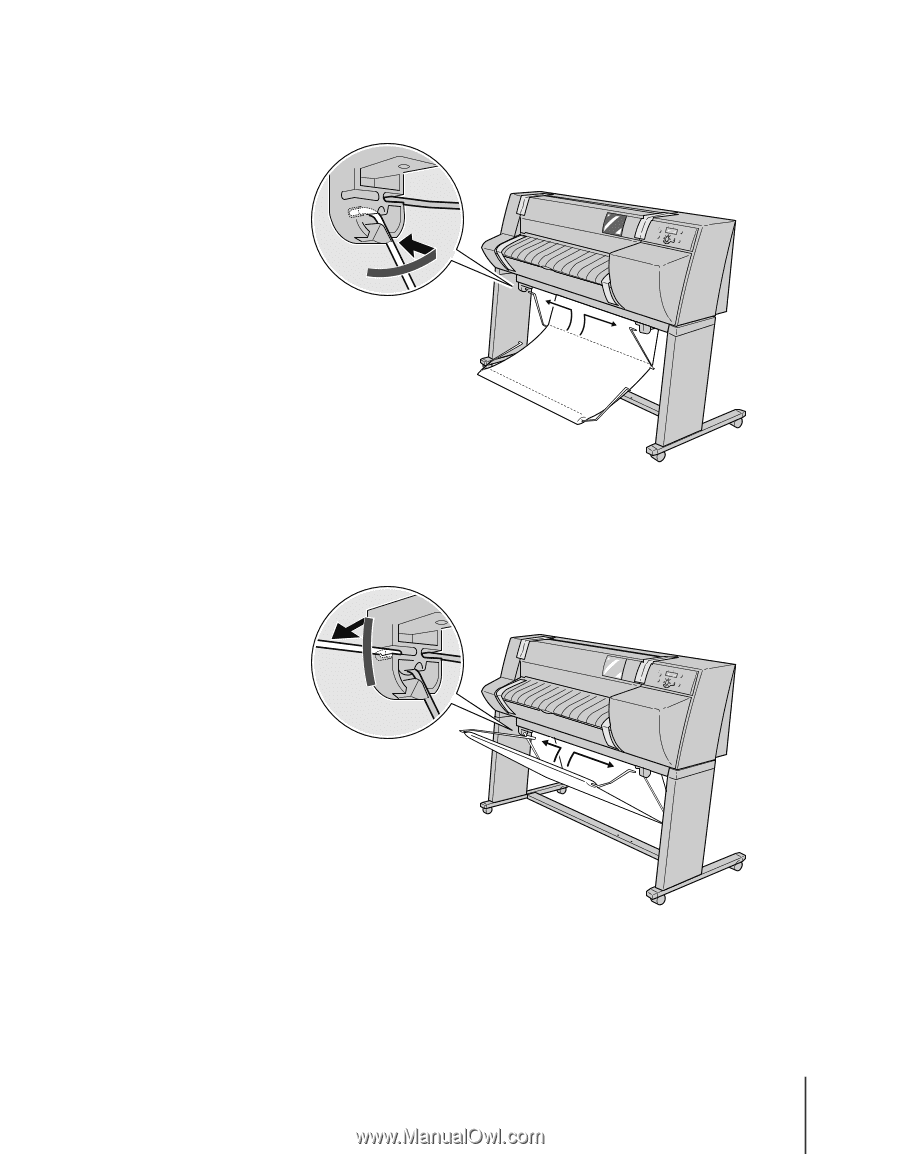
Insert the longest arms of the output stacker into the front grooves
 |
View all Canon imagePROGRAF W7200 manuals
Add to My Manuals
Save this manual to your list of manuals |
Page 27 highlights
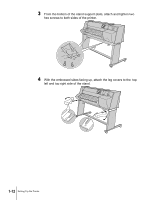
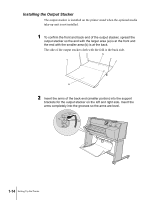
3 Insert the center arms of the output stacker into the center grooves of the support brackets on the left and right side. Insert the arms completely into the grooves so the arms are diagonal. 4 Insert the longest arms of the output stacker into the front grooves of the support brackets on the left and right side. Insert the arms completely into the grooves so the arms are level. 2 Select a Location for the Printer 1-15
-
 1
1 -
2
-
3
-
4
-
5
-
6
-
7
-
8
-
9
-
10
-
11
-
12
-
13
-
14
-
15
-
16
-
17
-
18
-
19
-
20
-
21
-
 22
22 -
 23
23 -
 24
24 -
 25
25 -
 26
26 -
 27
27 -
 28
28 -
 29
29 -
 30
30 -
 31
31 -
 32
32 -
33
-
34
-
35
-
36
-
37
-
38
-
39
-
40
-
41
-
42
-
43
-
44
-
45
-
46
-
47
-
48
-
49
-
50
-
51
-
52
-
53
-
54
-
55
-
56
-
57
-
58
-
59
-
60
-
61
-
62
-
63
-
64
-
65
-
66
-
67
-
68
-
69
-
70
-
71
-
72
-
73
-
74
-
75
-
76
-
77
-
78
-
79
-
80
-
81
-
82
-
83
-
84
-
85
-
86
-
87
-
88
-
89
-
90
-
91
-
92
-
93
-
94
-
95
-
96
-
97
-
98
-
99
-
100
-
101
-
102
-
103
-
104
-
105
-
106
-
107
-
108
-
109
-
110
-
111
-
112
-
113
-
114
-
115
-
116
-
117
-
118
-
119
-
120
-
121
-
122
-
123
-
124
-
125
-
126
 |
 |
2 Select a Location for the Printer
1-15
3
Insert the center arms of the output stacker into the center grooves of
the support brackets on the left and right side. Insert the arms
completely into the grooves so the arms are diagonal.
4
Insert the longest arms of the output stacker into the front grooves of
the support brackets on the left and right side. Insert the arms
completely into the grooves so the arms are level.