Canon imagePROGRAF iPF850 Setup Guide - Page 10
Load Paper to Adjust the Printhead
 |
View all Canon imagePROGRAF iPF850 manuals
Add to My Manuals
Save this manual to your list of manuals |
Page 10 highlights
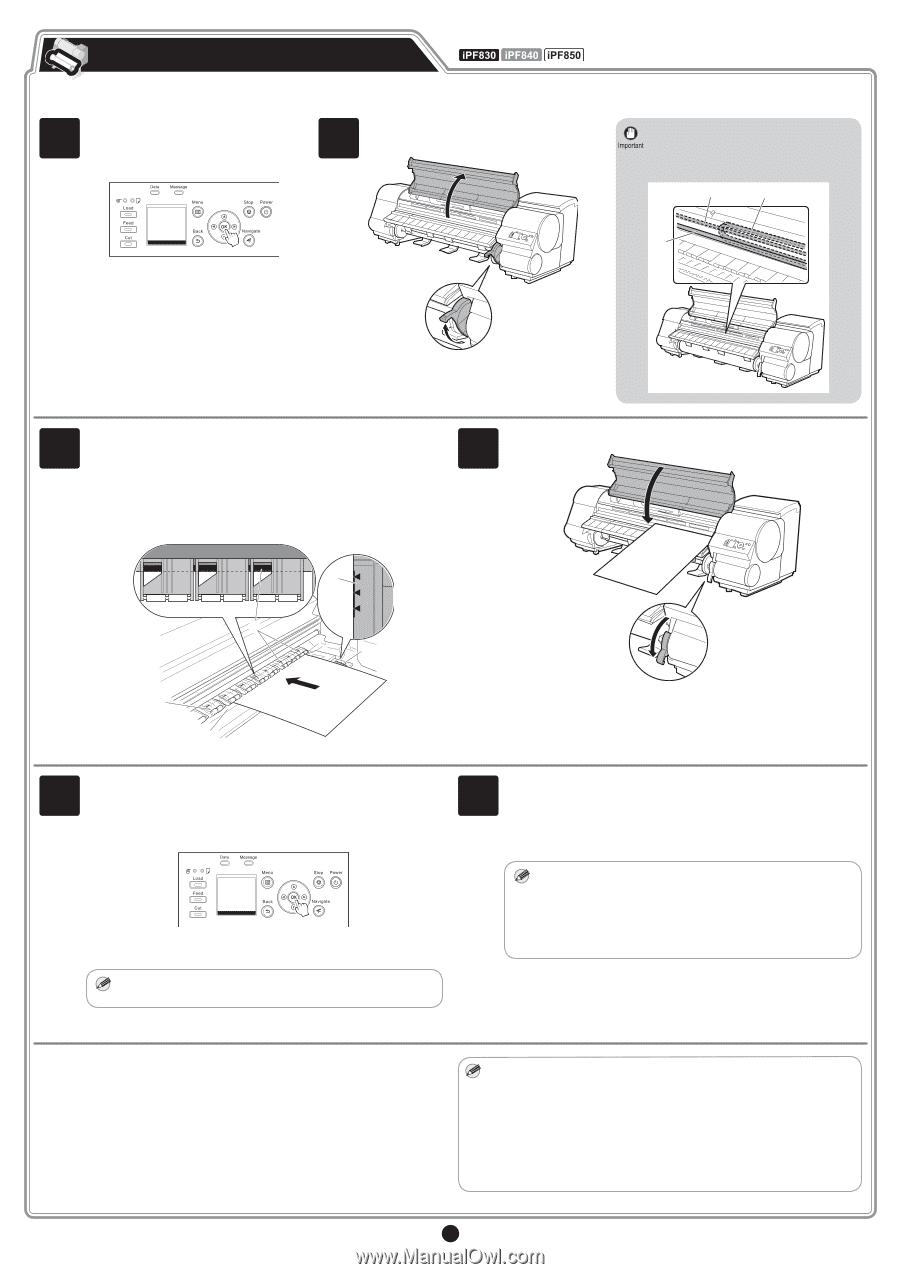
Load Paper to Adjust the Printhead Load the included paper and adjust the Printhead. 1 Select type of paper for printhead adj. is shown on the display screen. Use the ▲ and ▼ keys to select Cut Sheet and then press OK. 2 Open the top cover and lift the release lever. • Do not touch the linear scale (a), carriage shaft (b), or fixed blade (c). This may stain your hands and damage the printer. a c b 3 Insert the paper included with the printer between the platen (a) and paper retainer (b) in portrait orientation with the printed side of the paper facing up. Load the paper aligned with the paper alignment lines (c) to ensure that the paper is not crooked, and align the leading edge of the paper with the front side of the line (d). When inserted, sheets are automatically held by suction against the platen. 4 Lower the release lever and close the top cover. c d c b a 5 The screen for selecting the paper type is shown on the display screen. Press ▲ or ▼ to select the type of paper loaded in the printer. Select Coated Paper and then press OK. Then from the menu that appears, select Coated Paper and then press OK. Paper begins feeding. • If Paper loaded crooked. is displayed, reload the cut sheet by MEMO referring to step 3. 6 Once feeding the paper is finished, the printer automatically starts charging the system with ink and adjusting the printhead. Charging the system with ink and adjusting the printhead for the first time takes about 30 minutes. Install the software on your computer while the printer is working. (See "Install the Software" on page 11) • Charging the system with ink fills the system from the ink tanks MEMO to the printhead. In addition, cleaning is performed to keep the printer in optimal condition. This may cause the remaining ink indicator and maintenance cartridge capacity indicator to drop some amount. The starter ink tank is for first-time installation. It is recommended that you purchase replacement ink tanks quickly. Once the printhead adjustment has finished, the paper with the adjustment pattern printed on it is ejected. Release the release lever and remove the paper. This completes the printer setup. When you load roll paper after the setup, you need to first press the Load key and select roll paper as the paper source. For details, refer to the User's Guide and Basic Guide that can be accessed by the procedure in "How to Display the Electronic Manuals" (P. 18). • You can also see the method for loading roll paper using the control MEMO panel navigation function. You can view the navigation using the following procedure. 1.Press the Navigate key. 2.Press the ▲ and ▼ keys to select Load Roll Paper and then press the OK key. 3.Press the ▲ and ▼ keys to select View Op. Guide and then press the OK key. The navigation starts. 10
-
 1
1 -
2
-
3
-
4
-
 5
5 -
 6
6 -
 7
7 -
 8
8 -
 9
9 -
 10
10 -
 11
11 -
 12
12 -
 13
13 -
 14
14 -
 15
15 -
16
-
17
-
18
-
19
-
20
 |
 |