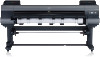
Canon imagePROGRAF iPF9400 Setup Guide - Page 4
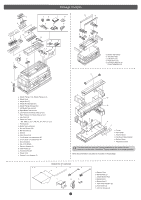
Stand, Allen Wrench, Rewind Spool
 |
View all Canon imagePROGRAF iPF9400 manuals
Add to My Manuals
Save this manual to your list of manuals |
Page 4 highlights
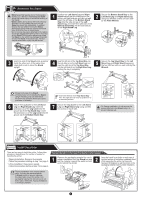
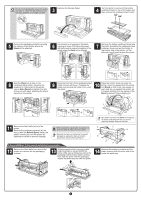
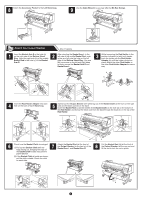
• Do not cut the black belts around the printer until step 11. When the black belts are cut, Tipping installation is no longer possible. 3 Remove the Sample Paper. 4 Turn the joints to pull out of the bottom cardboard sheet on top of the pallet, and then remove the cardboard stand holder. 5 Remove the packaging material covering the sections of the printer where the Stand will be attached. 6 Use scissors to cut openings in the plastic covering as shown. Pull the covering apart with both hands to expose the sections of the printer where the Stand will be attached. 7 Remove the bottom cardboard sheet and the pallet. Assemble the cardboard stand holder as shown and put the holder to the bottom side of the printer. Let the side with round holes (a) face the printer. a 8 Rest the Stand on its side on the cardboard stand holder. Adjusting the positions for attachment to the printer, use an Allen Wrench to tighten four M4 screws on both sides, attaching the stand securely to the printer. 9 Bend the front flap of the cardboard stand holder forward as shown. Collapse the holder and remove the holder from under 10 Place the bottom sheet (a) under the printer. Have four people hold the printer and Stand on both ends, two people on the stand. each end. As you support the printer, tip it forward, pivoting it on the pieces of the Stand to prevent it from slipping (b). a 11 Remove the black belts (a) from the printer. Remove the packaging material (b), the box (c) with the Rewind Spool inside, the plastic covering (d), and the pieces (e) attached to casters to prevent slippage. • When cutting the black belts, be careful not Caution to let the belts fly away from the printer. • Remove the tape on the pieces to prevent MEMO slippage by pulling the tape across the pieces from above when peeling off. Lifting installation: In the case of installation by six people 12 Remove the black belts from around the printer and remove the top packaging material. 13 While two people hold the carrying handles under the printer on one end and lift the printer a little, have a third person remove the packaging material and the plastic covering from under the printer. After the packaging material has been removed, lower the printer. b • Be careful to prevent the Stand from slipping. MEMO • To avoid scratching the floor, be sure to place the bottom sheet on the floor. b c b a e d e a 14 Remove the packaging material and the plastic covering from the other side of the printer the same way. 4
-
 1
1 -
 2
2 -
 3
3 -
 4
4 -
 5
5 -
 6
6 -
 7
7 -
 8
8 -
 9
9 -
 10
10 -
11
-
12
-
13
-
14
-
15
-
16
-
17
-
18
-
19
-
20
 |
 |
