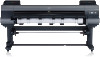
Canon imagePROGRAF iPF9400 Setup Guide - Page 5
Attach the Media Take-up Unit
 |
View all Canon imagePROGRAF iPF9400 manuals
Add to My Manuals
Save this manual to your list of manuals |
Page 5 highlights
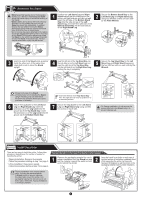
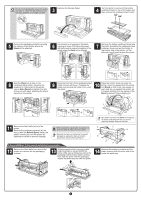
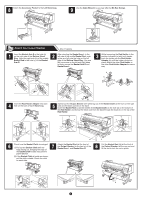
15 With three people holding the carrying handles under the printer on both ends, lift the printer. • The weight of the main unit alone is approximately Caution 164 kg (361.6 lb). Moving the printer requires at least six people, three on either side. Be careful to avoid back strain and other injuries. • When moving the printer, firmly grasp the carrying handles (a) under each side. Holding the printer at other positions is dangerous and cause injury and damage if the printer is dropped. 16 Align the triangles on the back of the printer and Stand when setting the printer on the Stand. Secure the printer and Stand firmly together using four M4 hex screws on each side by the Allen Wrench. a Attach the Media Take-up Unit 1 Firmly secure the Left Fastener for Media Take-up Unit and Right Fastener for Media Take-up Unit to the front (a) and back (b) of the Top Stand Stay using four M4 hex screws on each side by the Allen Wrench. 2 Hook up the hole (a) of the Left Media Take-up Unit with the protrusion (b) of the Left Fastener for Media Take-up Unit, and hook up the hole (c) of the Right Media Take-up Unit with the protrusion (d) of the Right Fastener for Media Take-up Unit. Secure the Media Take-up Units firmly by using three M4 hex screws (e) on each side by the Allen Wrench in the sequence shown. aa b b 3 Pull up the cord of the Media Take-up Sensor (a) through the hole (c) of the Right Stand Leg. Put the Media Take-up Sensor under the Bottom Stand Stay (b) on the right. bc b b a c d e e 4 With the Media Take-up Sensor against the underside of the Bottom Stand Stay and the Right Stand Leg, insert M4 hex screws in the three holes (a) and slide the screws out of the way toward the narrow end of the protruding holes. Insert M4 hex screws in the small holes (b) as well. Use the Allen wrench to tighten all five M4 hex screws firmly in the order shown, from (2) to (6). a a • The Media Take-up Sensor remains MEMO concealed in the Bottom Stand Stay. 5 Plug the Media Take-up Sensor cord firmly and fully into the Right Media Takeup Unit to connect it. 6 Attach the cord holders (a) to the holes of the Top Stand Stay. Bring the power cord of the Right Media Take-up Unit to the back of the printer and pass the cord through the cord holders. After passing the cord behind the holders, plug the cord into the Power Supply Connector on the back of the printer. a b b a a 7 Load the left side of the Rewind Spool on the Media Take-up Unit so that the gear (a) on the right side of the Rewind Spool meshes with the gear (b) of the Right Media Take-up Unit. a 5 OFF ON b a
-
 1
1 -
 2
2 -
 3
3 -
 4
4 -
 5
5 -
 6
6 -
 7
7 -
 8
8 -
 9
9 -
 10
10 -
 11
11 -
12
-
13
-
14
-
15
-
16
-
17
-
18
-
19
-
20
 |
 |
