Carvin FET1000 Instruction Manual - Page 37
Front, Panel, Features
 |
View all Carvin FET1000 manuals
Add to My Manuals
Save this manual to your list of manuals |
Page 37 highlights
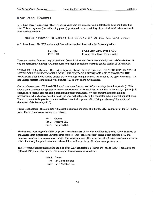
FET Series Power Amplifiers About the FET Series Amps Section 3 Front Panel Features Power Switch: Rocking the power switch "Up" will apply power to the FET amp. The red LED power "PWR" indicator light will illuminate to indicate that the amplifier is powered. The turn on "mute" circuitry will engage immediately upon applying power to your unit. This will delay the connection to the speakers by approximately three seconds. The turn on delay allows the amp and any associated gear time to stabilize before the amp is connected to the speakers. This professional feature protects the speakers from any high level transients that might appear at the amp's input due to "turn on" transients in equipment feeding the amp. CH 1 and CH 2 Input Level Controls: These precision (41 step) input level attenuators are carefully calibrated to allow the operator to adjust the sensitivity of the power amp to match the output level of nearly any mixer or pre-amp . These controls do not limit the amp's output power, and maximum output levels can be achieved at any setting above -10dB (12 O'clock). You can fmd the best gain control setting as follows: A. For normal operation set the FET amplifier level controls at -10dB (knob marker straight up). B. Adjust the mixer or pre-amp output gain controls to set the desired sound level. C. If you wish to operate the mixer/pre-amp at a higher output level, then reduce the settings of the input attenuators a few dB and check the mixer/pre-amp sound level again. D. If you wish to operate the mixer/pre-amp at a lower output level, then increase the settings of the input attenuators a few dB and check the mixer/pre-amp sound level again. Note: If distortion should occur before the red peak indicators light, then try reducing the gain of the mixer/pre-amp and increasing the input level setting of the FET amplifier to -10 dB or higher. The maximum input level on all FET models is: Balanced Unbalanced +15 dBV +15 dBV LED Status Indicators: At the left of the Input Level Attenuator for each channel are a pair of LED's that indicate the signal status of the channel. The green "Signal" LED indicates when a -30 dB signal is present at the output (post level). The red "Clip" LED indicates precisely when clipping (distortion) starts to occur. These indicators monitor the circuits of the amplifier and provide an accurate indication of signal presence and any overloading. If the red clip indicators are lighting, you should turn down either the mixer/pre-amp output level, or the input level at the amplifier until the light just stops flashing (occasional flashing is OK as low level clipping distortion is rarely audible). The clipping indicators feature a special peak hold circuit that will provide a bright indication for even momentary clipping. NOTE: Continual flashing of the red clip indicators will not damage the amp but may be harmful to the speakers because of the excess high frequency energy generated at clipping. 3-4
-
 1
1 -
2
-
3
-
4
-
5
-
6
-
7
-
8
-
9
-
10
-
11
-
12
-
13
-
14
-
15
-
16
-
17
-
18
-
19
-
20
-
21
-
22
-
23
-
24
-
25
-
26
-
27
-
28
-
29
-
30
-
31
-
 32
32 -
 33
33 -
 34
34 -
 35
35 -
 36
36 -
 37
37 -
 38
38 -
 39
39 -
 40
40 -
 41
41 -
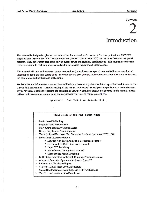 42
42 -
43
-
44
-
45
-
46
-
47
-
48
 |
 |
