Casio LK94 User Guide - Page 51
Changing the Settings, General MIDI Tone
 |
View all Casio LK94 manuals
Add to My Manuals
Save this manual to your list of manuals |
Page 51 highlights
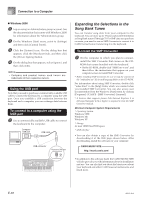
Connection to a Computer NOTE • This keyboard supports SMF 0 and 1 format data. • Voice Fingering Guide, on-screen fingering indicators, voice announcement of evaluation points, and the Practice Phrase function are not supported for SMF data you purchase or create. General MIDI Tone The General MIDI standard defines the tone numbering sequence, the drum sound numbering sequence, the number of MIDI channels that can be used, and other general factors that determine the sound source configuration. Because of this, musical data produced on a General MIDI sound source can be played back using similar tones and identical nuances as the original, even when played on another manufacturers sound source. This keyboard conforms with General MIDI standards, so it can be connected to a computer and used to play back General MIDI data that has been purchased, downloaded from the Internet, or obtained from any other source. Changing the Settings This section tells you how to make the settings required when connecting to a computer. KEYBOARD CHANNEL (Default: 1) The keyboard channel is the channel used to send messages from this keyboard to a computer. You can specify one channel from 1 to 16 as the keyboard channel. 1 Press the SETTING button until the KEYBOARD CHANNEL screen appears. Keybd Ch 2 Use the [+], [-], and the number buttons to change the channel number. Example: To specify channel 4 Keybd Ch NAVIGATE CHANNEL (Default: 4) When messages are received from a computer for play on this keyboard, the navigate channel is the channel whose note data appears on the display. You can select one channel from 01 to 16 as the navigate channel. Since this setting lets you use the data on any channel of commercially available SMF data to light on the on-screen keyboard guide, you can analyze how different parts of an arrangement are played. 1 Press the SETTING button until the NAVIGATE CHANNEL screen appears. Nav i . Ch 2 Use the [+], [-], and the number buttons [0] through [9] to change the channel number. Example: To specify channel 2 Nav i . Ch To turn off specific sounds before playing back tune data that is being received 1 While playing tune data, press the RIGHT/TRACK 2 button. • This cuts the sound of the navigate channel, but on- screen keyboard guide keys continue to light in accordance with the channel's data as it is received. Press RIGHT/TRACK 2 button again to turn the channel back on. 1 While playing tune data, press the LEFT/TRACK 1 button. • This cuts the sound of the channel whose number is one less than the navigate channel, but on-screen keyboard guide keys continue to light in accordance with the channel's data as it is received. Press LEFT/ TRACK 1 button again to turn the channel back on. Example: If the navigate channel is channel 4, the above operation turns off channel 3. 655A-E-051A E-49
-
 1
1 -
2
-
3
-
4
-
5
-
6
-
7
-
8
-
9
-
10
-
11
-
12
-
13
-
14
-
15
-
16
-
17
-
18
-
19
-
20
-
21
-
22
-
23
-
24
-
25
-
26
-
27
-
28
-
29
-
30
-
31
-
32
-
33
-
34
-
35
-
36
-
37
-
38
-
39
-
40
-
41
-
42
-
43
-
44
-
45
-
 46
46 -
 47
47 -
 48
48 -
 49
49 -
 50
50 -
 51
51 -
 52
52 -
 53
53 -
 54
54 -
 55
55 -
 56
56 -
57
-
58
-
59
-
60
-
61
-
62
-
63
-
64
-
65
-
66
-
67
-
68
-
69
 |
 |
