Casio SA400 User Guide - Page 23
Displays
 |
UPC - 052452704005
View all Casio SA400 manuals
Add to My Manuals
Save this manual to your list of manuals |
Page 23 highlights
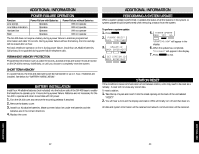
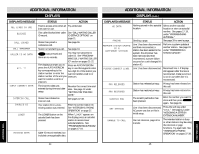
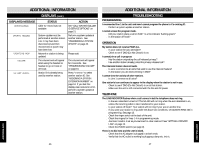
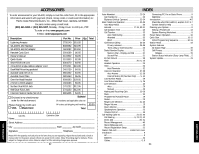
ADDITIONAL INFORMATION DISPLAYS DISPLAYED MESSAGE ALL LINES IN USE BLOCKED CALL JOINED CALL TRANSFER CALLER ID NO DATA EXT. ?? INPUT CORRECT DATA INTERCOM CALL INVALID ID LOWER MISSING DATA STATUS ACTION Tried to access a line when all Try a little later. lines were in use. This caller blocked their caller See "CALL WAITING CALLER ID record. ID SERVICE OPTIONS" on page 21. Station has joined a conference call. See page 36. Station is transferring a call. See page 34. CALLER ID was pressed and there are no records. You may not subscribe to caller ID. See "PROGRAMMING CALL WAITING CALLER ID" section on pages 21-22. The displays prompts you to Press an AUTO INTERCOM press the AUTO INTERCOM key or use the keypad to enter key corresponding to the two-digit ID of the station you station number or enter the want to transfer a call to or station number of the unit you intercom. want to transfer a call to or intercom. The incorrect data was entered during time and date setup. Station has initiated an intercom call. Re-enter the correct time and date. See page 12 under "SETTING THE TIME AND DATE." See pages 37-38. Your station ID or a non- Enter the correct station ID. existing station was entered. See "INTERCOM & PAGING OPERATION" on page 37. The LOWER button on the autodial bank has been pressed. When "LOWER" appears on the display press an autodial station to access lower autodial stations. See "PROGRAMMING AUTODIAL" on pages 17-19. Caller ID record received, but included unrecognizable data. ADDITIONAL INFORMATION DISPLAYS (cont.) DISPLAYED MESSAGE STATUS ACTION NO DATA PAGING Nothing stored in this autodial Select another autodial location. location or store an autodial number. See pages 17-19, under "PROGRAMMING AUTODIAL." Sending a page. See page 39 to send a page. PERFORM SYSTEM UPDATE AT A DIFFERENT STATION Line 1 has been disconnected Perform a system update at and then reconnected, a another station. See page 43 station has been added to the under "PERFORMING A system, the AC power has SYSTEM UPDATE." been removed and then reconnected, a power failure occurred or a unit changed it's station ID. PLEASE CONNECT LINE1 Line 1 has been disconnected. Reconnect line 1. If display still appears after the line is reconnected, make sure line 1 is not in use when line 1 is reconnected. PRV RELEASED Station has released privacy. Privacy has been released on this call. PRV RESTORED Station has restored privacy. Privacy has been restored on this call. SCRATCH PAD The scratch pad button has been pressed. Enter the number you want to store and then press SCRATCH PAD again. See page 31. SET STATION Line 1 has been disconnected, Press the soft key under AC power was lost or this is "SAVE." See page 12 under initial setup. "ASSIGNING A STATION EXTENSION NUMBER." UNABLE TO CALL Can not intercom, page all or transfer. The intended station is busy or other stations may be using the intercom or page functions. Try again later. See "INTERCOM & PAGING OPERATION" on pages 37-39. ADDITIONAL INFO ADDITIONAL INFO 44 45
-
 1
1 -
2
-
3
-
4
-
5
-
6
-
7
-
8
-
9
-
10
-
11
-
12
-
13
-
14
-
15
-
16
-
17
-
 18
18 -
 19
19 -
 20
20 -
 21
21 -
 22
22 -
 23
23 -
 24
24 -
 25
25 -
 26
26 -
 27
27 -
 28
28 -
29
 |
 |
